Difference between revisions of "Audio Message from Standalone IP Speaker"
From Zenitel Wiki
(→Configuration steps) |
|||
| Line 19: | Line 19: | ||
==Configuration steps== | ==Configuration steps== | ||
| − | # | + | # Set the IP Speaker as an [[Edge Controller]] |
# Upload and configure the Audio Message | # Upload and configure the Audio Message | ||
# Configure the inputs | # Configure the inputs | ||
Revision as of 11:46, 25 March 2022
This article describes how a Zenitel IP Speaker can be used to play a prerecorded message, triggered by a push button. The message can play once and then stop, or the message can play in loop and a second button can be used to stop the message.
Contents
Hardware wiring
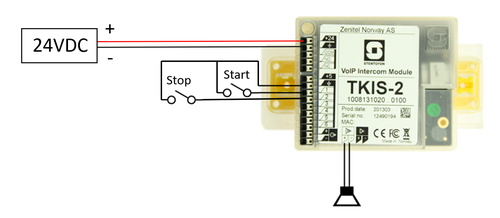
For the man overboard we will have two buttons:
- One to start playing the message
- One to stop playing the message
Since it is a standalone speaker there is no network, except when configuring. Inside the speaker there is a TKIS-2 kit. This is displayed in the picture below.
 |
| Wiring the TKIS-2 inside the speaker |
Configuration steps
- Set the IP Speaker as an Edge Controller
- Upload and configure the Audio Message
- Configure the inputs
Setting up as Edge controller
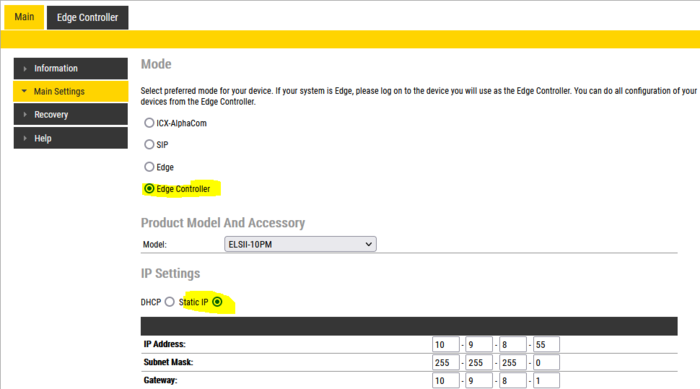
Log in to the IP Speaker, and go to Main Settings. Enable “Edge Controller”, and set a Static IP address:
 |
| Setting as the Edge Controller |
Next is to give the IP Speaker a number in the Directory so it registers to itself. Go to Edge controller, System configuration, Directory:
 |
| Assigning the directory number |
The inputs
The inputs 1 and 2 are used to start and stop the message. This is done by calling nonexistent numbers and the stop message function.
 |
| Configuring the inputs |
The call of course will fail but still generate an “call ended” event. That we will utilize for the audio messages.
Upload audio message
Log in to the Edge Controller, and go to System Configuration > Special Settings. Under Audio Messages, select "Show Settings".
Browse to the wav file, and Upload the file.
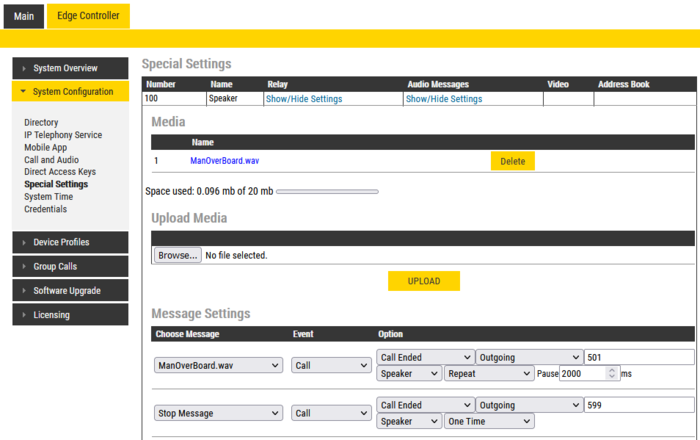
Next step is to link the audio message to a (non-existing) call number. When a call is initiated to this number, and the call fails, the linked message will be played. Good practice is to use number 501 = Message 1 (and 502 = Message 2 etc. if more messages).
In the screenshot below the message will play in loop when a call is made to numbers 501. The message is stopped by making a call to number 599:
 |
| Message linked to call number 501. Message will play in loop. Stop the message by calling 599. |
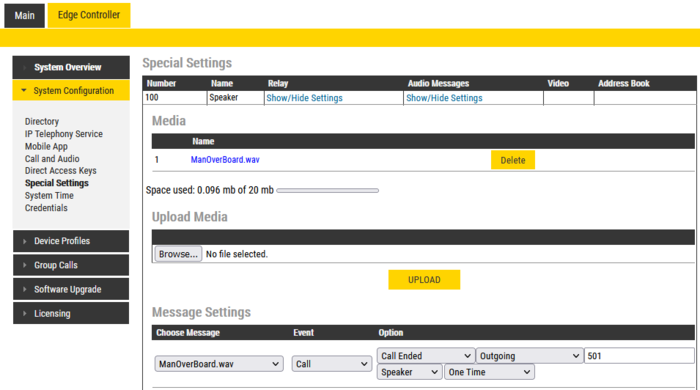
In the screenshot below the message will play once, then stop, when a call is made to numbers 501:
 |
| Message linked to call number 501. Message will play once. |
Multiple messages
If multiple messages are wanted, one can assign more inputs to fake numbers (e.g. 501, 502, 503 etc.) and use the same method “call ended” event to start the messages. You still need only one stop message.


