Difference between revisions of "Logging into an Zenitel IP Device"
From Zenitel Wiki
| (32 intermediate revisions by the same user not shown) | |||
| Line 1: | Line 1: | ||
| − | {{ | + | {{AEIPS}} |
| − | [[ | + | Access the web interface of a Zenitel IP device with a standard web browser: |
| − | + | <table style="max-width:80%; border-style: double; border-color: #c7c7c7;"> | |
| − | # | + | <tr style="rowspan:2;"> |
| − | # In the browser’s address bar, type the | + | <td style="display: block; vertical-align: bottom;">[[Image:StartUp Z-device.PNG|350px]]</td> |
| − | ::- The | + | </tr> |
| − | [[ | + | <tr> |
| − | < | + | <td style='background-color:#efefef;'>Connect the laptop and the IP device to a network switch, and open a web browser</td> |
| − | To log into the | + | </tr> |
| + | </table> | ||
| + | |||
| + | # Open a web browser | ||
| + | # In the browser’s address bar, type the IP address of the device | ||
| + | ::- The login page will be displayed. | ||
| + | |||
| + | |||
| + | <table style="max-width:80%; border-style: double; border-color: #c7c7c7;"> | ||
| + | <tr style="rowspan:2;"> | ||
| + | <td style="display: block; vertical-align: bottom;">[[Image:LoginToStation.PNG|500px]]</td> | ||
| + | </tr> | ||
| + | <tr> | ||
| + | <td style='background-color:#efefef;'>The login page</td> | ||
| + | </tr> | ||
| + | </table> | ||
| + | |||
| + | To log into the device: | ||
# Click on one of the login options | # Click on one of the login options | ||
| − | # Enter the | + | # Enter the User Name. Default is '''admin''' |
| − | # Enter the | + | # Enter the Password. Default is '''alphaadmin''' |
| − | The '''Station Information''' page will now be displayed, showing the IP | + | The '''Station Information''' page will now be displayed, showing the IP configuration and status. |
<br> | <br> | ||
== Default IP addresses == | == Default IP addresses == | ||
| − | + | * The [[:Category:Stations#Turbine_stations|Zenitel stations and devices]] are set to obtain IP address automatically from the network (DHCP). If no DHCP server present, it will get a random '''169.254.x.x''' address The station will speak its own IP address when pressing the '''Call button''', a '''Digit key''' a '''DAK key''' or activate an '''Input''' of the station. | |
| − | * The [[:Category:Stations#Turbine_stations| | + | * The [[:Category:Stations#INCA_stations|previous generation of Zenitel IP stations (known as INCA)]] has default IP address '''169.254.1.100'''. |
<br> | <br> | ||
== How to set a static IP Address on your Windows 10 computer == | == How to set a static IP Address on your Windows 10 computer == | ||
| − | In order to access the web interface of the station, your computer must be in the same subnet range | + | In order to access the web interface of the station, your computer must be in the same subnet range as the device. |
| − | # | + | # Click '''Start''', and type '''Control''' in the search field, then select '''Control Panel'''. |
#Click on '''Network and Internet'''. | #Click on '''Network and Internet'''. | ||
#Click on '''Network and Sharing Center'''. | #Click on '''Network and Sharing Center'''. | ||
| Line 32: | Line 49: | ||
#Select the '''Use the following IP address''' option. | #Select the '''Use the following IP address''' option. | ||
#Set the '''IP address''' (e.g., '''169.254.1.90'''). | #Set the '''IP address''' (e.g., '''169.254.1.90'''). | ||
| − | #Set the '''Subnet mask'''. | + | #Set the '''Subnet mask'''. (e.g., '''255.255.0.0'''). |
#Set the '''Default gateway'''. This address is typically your router’s IP address (e.g., '''169.254.1.1'''). | #Set the '''Default gateway'''. This address is typically your router’s IP address (e.g., '''169.254.1.1'''). | ||
#Click '''OK'''. | #Click '''OK'''. | ||
#Click '''Close''' again to close the network adapter properties. | #Click '''Close''' again to close the network adapter properties. | ||
| − | Once you’ve completed the steps, you can open your web browser and try | + | <table style="max-width:80%; border-style: double; border-color: #c7c7c7;"> |
| + | <tr style="rowspan:2;"> | ||
| + | <td style="display: block; vertical-align: bottom;">[[Image:PC StaticIP.PNG|400px]]</td> | ||
| + | </tr> | ||
| + | <tr> | ||
| + | <td style='background-color:#efefef;'>Setting a Static IP Address on the laptop</td> | ||
| + | </tr> | ||
| + | </table> | ||
| + | |||
| + | Once you’ve completed the steps, you can open your web browser and try logging into the device. | ||
| + | |||
| + | ---- | ||
| + | {{Doc|This article is linked to from the document A100K11920}} | ||
[[Category: IC-EDGE Configuration]] | [[Category: IC-EDGE Configuration]] | ||
[[Category: Pulse - Configuration]] | [[Category: Pulse - Configuration]] | ||
[[Category: SIP intercom - Configuration]] | [[Category: SIP intercom - Configuration]] | ||
Latest revision as of 15:39, 4 September 2024
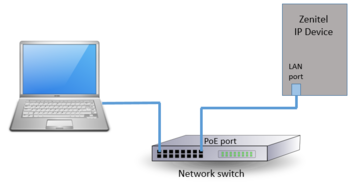
Access the web interface of a Zenitel IP device with a standard web browser:
 |
| Connect the laptop and the IP device to a network switch, and open a web browser |
- Open a web browser
- In the browser’s address bar, type the IP address of the device
- - The login page will be displayed.
 |
| The login page |
To log into the device:
- Click on one of the login options
- Enter the User Name. Default is admin
- Enter the Password. Default is alphaadmin
The Station Information page will now be displayed, showing the IP configuration and status.
Default IP addresses
- The Zenitel stations and devices are set to obtain IP address automatically from the network (DHCP). If no DHCP server present, it will get a random 169.254.x.x address The station will speak its own IP address when pressing the Call button, a Digit key a DAK key or activate an Input of the station.
- The previous generation of Zenitel IP stations (known as INCA) has default IP address 169.254.1.100.
How to set a static IP Address on your Windows 10 computer
In order to access the web interface of the station, your computer must be in the same subnet range as the device.
- Click Start, and type Control in the search field, then select Control Panel.
- Click on Network and Internet.
- Click on Network and Sharing Center.
- On the left pane, click the Change adapter settings link.
- Right-click the network adapter and select Properties.
- Select the Internet Protocol Version 4 (TCP/IPv4) option.
- Click the Properties button.
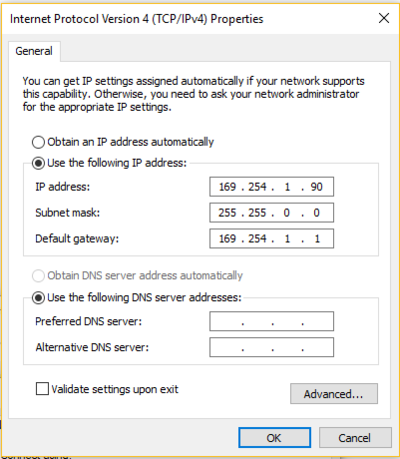
- Select the Use the following IP address option.
- Set the IP address (e.g., 169.254.1.90).
- Set the Subnet mask. (e.g., 255.255.0.0).
- Set the Default gateway. This address is typically your router’s IP address (e.g., 169.254.1.1).
- Click OK.
- Click Close again to close the network adapter properties.
 |
| Setting a Static IP Address on the laptop |
Once you’ve completed the steps, you can open your web browser and try logging into the device.

