AMAG Symmetry - IC-EDGE Integration
From Zenitel Wiki
Contents
Introduction
The interface between IC-EDGE and AMAG Symmetry is through an integration module which is available on the download page of Zenitel Wiki. This article assumes that
- the reader is familiar with the Zenitel IC-Edge System
- the reader is familiar with setup and operation of the AMAG Symmetry
- the AMAG Symmetry is operational
Only points which are specific to this integration and to its connected intercom stations are described. Installation of the IC-Ecge System is described in the Quick Guide.
Compatibility
- Symmetry: 9.3.25 or later
- IC-EDGE: 5.1.3.0 and higher
Licensing
IC-Edge
The integration is not licensed in IC-Edge.
Symmetry:
- INTERCOM-KIT-V9 – Intercom license for Symmetry SMS v9. Only one per Symmetry SMS System required.
- VID-CAM-001-V9– Video Integration Licenses. One needed for each Camera. The Intercom Integration for IC-EDGE supports the automatic call up of up to four cameras per Substation. In order to associate a camera, the camera must be defined in Symmetry.

|
VID-CAM-001-V9 assumes a single camera, but there are larger camera bundles as well (such as VID-CAM-016-V9 for a block of 16 cameras) |
Integrated Capabilities
The Symmetry Intercom Management software provides an easy-to-use graphical interface for managing, answering and responding to calls from intercoms connected to the IC-EDGE intercom system. The intercoms are normally sited outside the building, such as at doors, parking barriers and other entrances. Typically, the intercoms are used by visitors or other personnel to request entry.
The software is a fully-integrated component of Symmetry. It enables operators to respond to calls using the same user interface used to manage other forms of security, such as access control, intrusion and video monitoring. This enhances operator efficiency by avoiding the need to learn and operate different systems. The integration to IC-EDGE offers several features to multiple areas of the Symmetry SMS System. The Intercom License provides an Intercom screen that allows for operators to initiate and answer calls from/to the master station located next to the Symmetry Workstation. Additionally, several other Symmetry SMS features are enhanced by integrating to the IC-EDGE system.
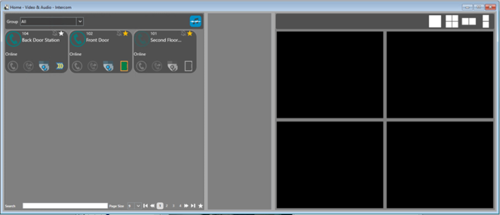
Home/Video & Audio/Intercom Screen
An incoming call is indicated by the appropriate intercom button, and by a sound, which can be different for each intercom. Clicking the intercom button opens an audio link between the operator's IC-EDGE Master Station and the person making the call.
The integrated features of the software enable the operator to control other security devices while responding to a call. For example, when answering a call, the operator is able to unlock a door or barrier, or operate an auxiliary output device.
The screen lists all outstanding call requests, which allows the system to be used in busy environments where many incoming call requests may be made at the same time.
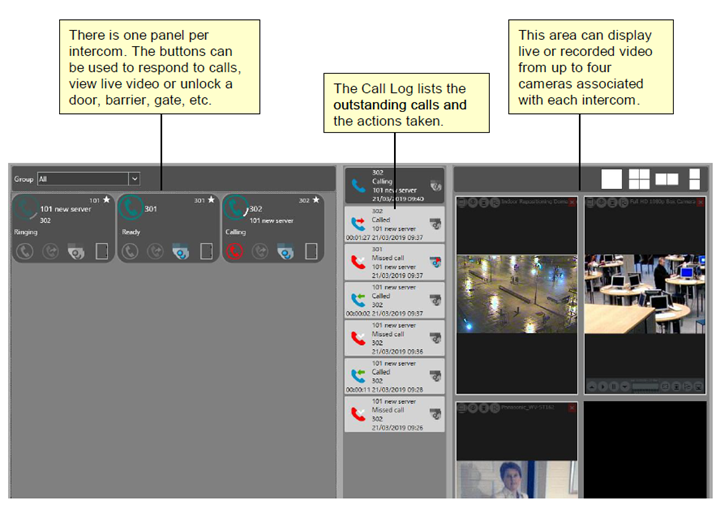
Stations are displayed in the left most panel. If a station is linked with a Symmetry SMS Workstation, it will be displayed in this screen if “Show as a Call Station” is selected when configuring, allowing for Operators to initiate calls between Symmetry SMS Workstations as well as to Substations. For the purposes of this document, we will define a “Call Station” as any Substation or Master Station defined within Symmetry SMS as a “Intercom/Station” and any station (usually Master Station) seated next to a Symmetry SMS Client that has been marked to Show as a Call Station.
Features provided in the Left Panel are as follows:
- View all defined Call Stations:
- Filter View Call Stations by:
- Group Multicast – Select button
 to Play a Recorded Voice Message for all intercoms in the selected Intercom Group:
The Center pane lists a Call Log. You can right click and select “Callback” on a previous call.
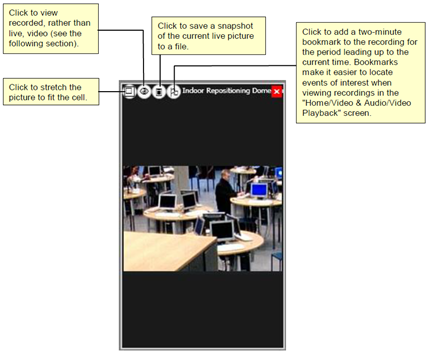
The Right Pane displays Cameras that were Associated in the Install/Intercom/Stations screen. This is not to be confused with the Install/Video&Audio/Camera Associations screen which does not link cameras within the Intercom Management. If video is recorded then playback/bookmark options are available.
Graphics Screen
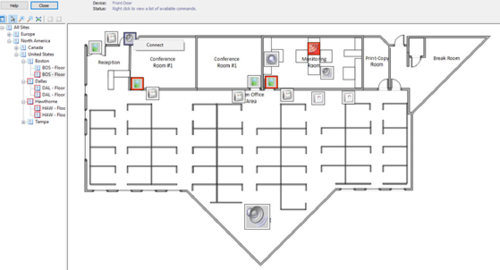
Like other devices, intercom Call Stations and Intercom Clients can be placed on a Graphical Map. Operators may right-click and select “Connect” to initiate a call from the Station associated with their Symmetry SMS Workstation out to the Call Station selected.
Alarm Management Screen
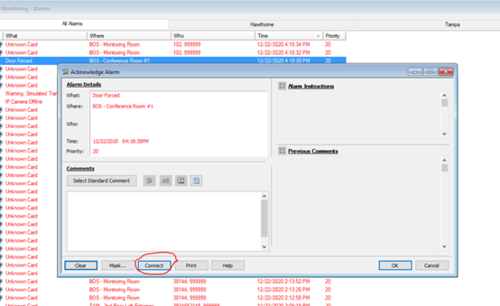
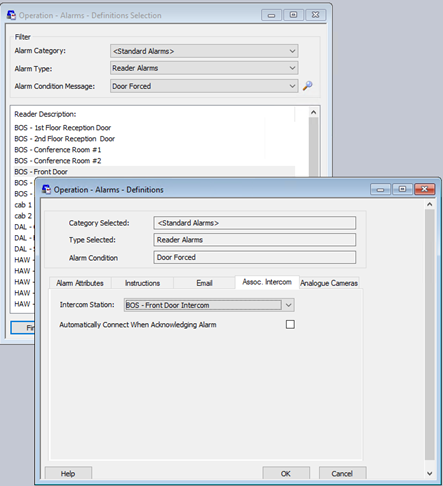
If Alarm Definitions set Associated Intercoms to a Call Station, then a call can be made to the intercom when Acknowledging alarms. Either the operator can select “Connect” to manually initiate a call or, if configured, an automatic call can be made to the Call Station as soon as the Alarm Acknowledgment screen is open.
Verification Screen
The Verification Screen provides a “Call Button” ![]() allowing Operators to initiate a call to a Call Station associated with the Entry Point. The Screen will outline in Red when ringing to the Call Station, and the Call button changes to a “Hang Up” button when the connection is made:
allowing Operators to initiate a call to a Call Station associated with the Entry Point. The Screen will outline in Red when ringing to the Call Station, and the Call button changes to a “Hang Up” button when the connection is made:![]()
Trigger Commands
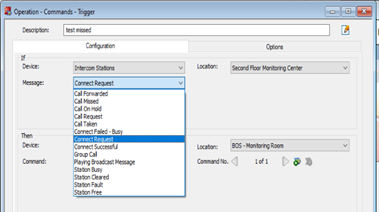
Intercoms may be used in the “If” section of Trigger Commands. Although other selection options are available, the only confirmed Messages for IC-EDGE are Call Taken, Connection Request, and Station Free.
Reporting
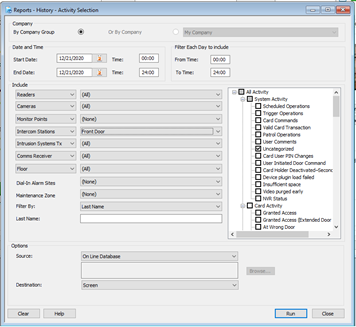
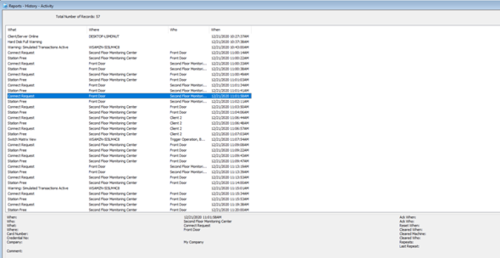
Connection Requests, Station Free, and Call Taken events are reportable in the Symmetry Reports/History/Activity Screen. The events are listed as System Activity as “Uncategorized” but filters for Intercom Stations or Intercom Groups may be used as filters.
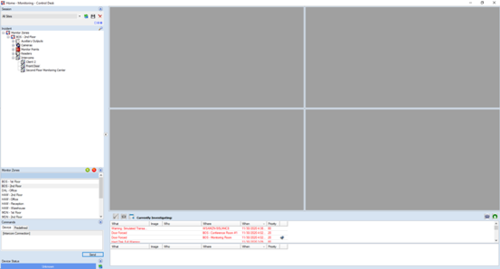
Control Desk Control Desk is an add on Alarm Monitoring client that allows for grouping of devices based on proximity to create “Monitor Zones”. When an alarm from a device within the Monitor Zone comes in, selection of the alarm opens up status and control of devices within that Zone. This allows, for example, access to Cameras, Readers, and other devices in the Lobby to be made available when an alarm happens in the Lobby. Intercom Device types can be added to Monitor Zones allowing for the ability to initiate an Intercom Connection to the Call Station(s) in the Monitor Zone.
Configuration Example
The below configuration assumes a working IC-Edge system with an ITSV-3 and a TCIV-3+.
The TCIV-3+ is the Edge Controller; it will operate a Controller and a Substation simultaneously. The final configuration would vary depending on the end user needs, but for this exercise will be performing the configuration below with the Substation calling into the ITSV-3 Master Station on button press:
| Device | Mode | Role | IP Address | Station Number |
|---|---|---|---|---|
| TCIV-3+ | Edge Controller | Substation | 192.168.1.222 | 102 |
| ITSV-3 | SIP Device | Master Station | 192.168.1.221 | 101 |
The above settings and below configuration are not the only possible configuration, but rather the details that are used for this example.
IC-EDGE Additional Configuration
ITSV-3
The ITSV-3 must be configured to accept command:
- Log in into the ITSV-3 web page
- Navigate to Account/Account 1/Advanced Settings and make the following settings:
- Allow Unsolicited REFER: Enabled
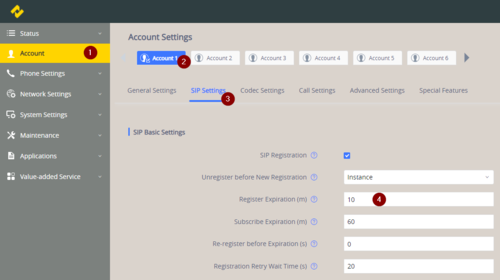
To reduce the time that it will take to detect and display a connection error it is necessary to reduce the registration time-out:
- Navigate to Account/Account 1/SIP Settings and make the following settings:
- Register Expiration (m): 1
- Click Save
- At the top of the page, click ‘Apply’
Symmetry Configuration
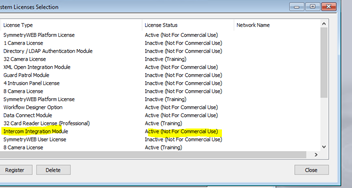
Intercom Integration License is loaded into Symmetry from the Maintenance/Licensing/System Licenses:
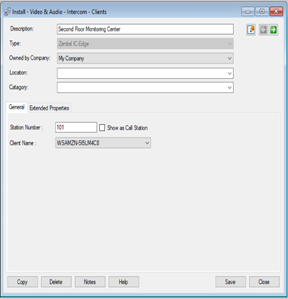
Any Station located next to a Symmetry SMS Workstation is configured in the Install/Video & Audio/Intercom/Clients screen. Usually this would be a Master Station. In this case, the ITSV-3 is located next to the Symmetry Client.
We enter the Description, Station Number/ID (101 in this case) and the Symmetry SMS client (workstation) name. The “Type” is set to “Zenitel IC-Edge”. If we had multiple Symmetry Workstations with a Master Station in proximity, then we could select “Show as a Call Station” to allow Operators in other locations to call us; but in this example there is only one Symmetry client and only one master station, so it is left unchecked.
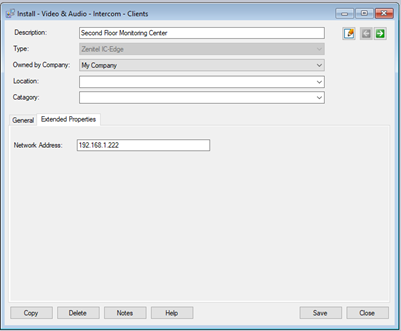
In the “Extended Properties” tab, we enter the IP Address of the IC-EDGE controller, not the IP address of the ITSV-3. In this case, the Edge Controller is the TCIV-3+ station, 192.168.1.222.
For Video Substations, we can optionally add the Video stream as a Camera within Symmetry (instructions for adding the camera to an NVR such as Symmetry CompleteView are out of the scope of this document; this is for Live Video purposes only).
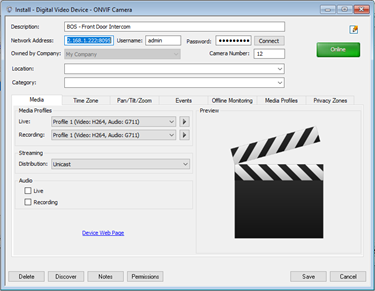
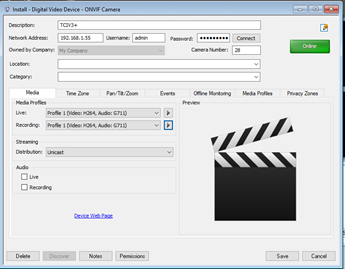
Under Install/Video & Audio/Digital Video, we can add the cameras as ONVIF cameras. Select “ONVIF Camera” and click the “New” button.
In the case of the obsolete TCIV station, we add the camera by entering the IP Address, followed by “:8095” (192.168.1.222:8095 in this exercise). The default admin/alphaadmin is password is used. We can click “Connect” to verify that the information is correct.
Click Save when done.
In the case of the TCIV+ station, we add the camera by entering the IP Address, no additional port necessary. The default admin/alphaadmin is password is used. We can click “Connect” to verify that the information is correct.
Click Save when done.
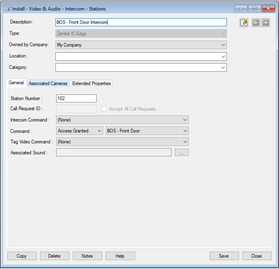
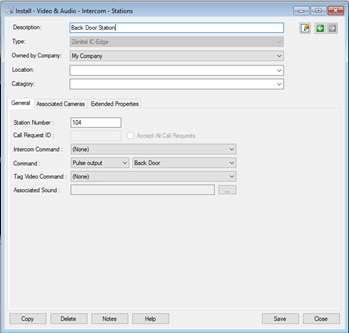
Next, we define the Substations in Symmetry. This is done in the Install/Video & Audio/Intercom/Stations screen. We must set the Type setting to “Zenitel IC-Edge”. For the TCIV-3+ station, we have a Station ID of 102. The Intercom Command option is out of scope for this exercise, but allows the Command settings to be issued from the Master Station keys. The Command “Access Granted” is set and the Reader that the Intercom is for is selected form the Drop-Down box.
Tag Video Command would allow video to be tagged based on a DAK key pressed, but is out of scope of this exercise. Associated Sound allows for customized sound on call request, but is outside of the scope of this exercise. Only .wav files supported.
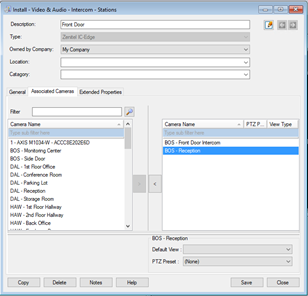
Selecting the Associated Cameras tab allows us to specify which cameras are displayed during a call. In this example, we select the TCIV+ camera that is built into the substation as well as a second camera from an integrated NVR.
The TCIV-3+ Station is configured in a similar manner, except in this case we assume that the station is next to a reader-less door controlled by an auxiliary output. So instead of an “Access Granted” command, we “Pulse output” and select the auxiliary output. We associate the camera from the TCIV-3+ Station:
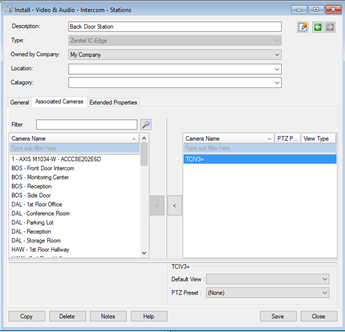
This completes the configuration necessary for the Home/Video & Audio/Intercom screen.
Set up of Graphics is straightforward; in the Setup/Graphics/Setup screen, Intercoms are listed in the “Device” drop down and added just like other devices such as readers.
We can link an alarm to an intercom using the Operation/Alarms/Definition screen. When selecting the alarm, under the “Assoc. Intercom” tab we can select the Intercom as needed. Note that the stations linked with a Symmetry Client are only available if the “Show as Call Station” option was selected when we define the station in the Installation/Intercom/Client screen. If we select “Automatically Connect When Acknowledging Alarm”, then opening up an alarm from the Alarm Screen will auto call the station (even if the alarm had previously been acknowledged). With or without this setting, Operators can manually Connect/Disconnect using the Connect button from the Acknowledgment screen. Closing the Acknowledgment screen will auto disconnect regardless of this setting. If the “Show Combined Alarm/Acknowledgment Screen” Client Preferences option is used, then Operators must manually disconnect.
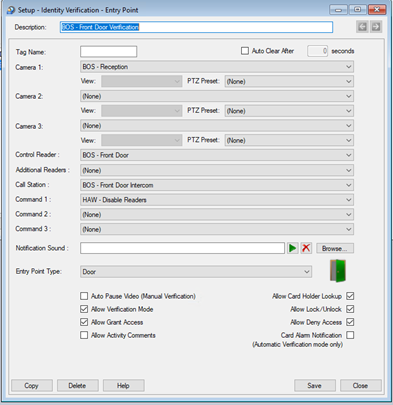
If using the Intercom integration in the Home/Identity/Verification screen, we must simply select the Call Station when setting up the Entry Point. Note that even though Cameras were linked with the Intercom, that does not transfer to the Entry Point, as the Entry Point itself must be set up with its own linked cameras.
Intercom Call Stations can also be grouped in the Setup/Device Groups/Intercoms screen, just like Reader Groups and other device groups.
No special configuration is required for Control Desk; the Intercom devices are added to Monitor Zones in the same manner as Readers and Cameras. Please consult Control Desk documentation for setup.
Appendix – Broadcast Message Configuration
When the IC-EDGE integration as introduced, it also added the ability to associate an audio message that can be broadcasted to a selected Intercom Device Group as configured in Setup/Device Groups/Intercoms.
Intercom Station Audio Message Configuration.
- Access the web interface of an IC-Edge station with a standard web browser.
- Select Edge Configuration > Audio Messages.
- Under Upload Media > Choose File and then Upload. See audio message file preconditions below.
- Under Message Settings select the following:
- Choose Message: Select the audio message required
- Event: Call
- Option: Call Ended - Outgoing - Speaker - One Time - Enter audio message activation number configured in the
- IC_EdgeCallGroupMapping.xml file.
Then Save
Zenitel Audio Message File Preconditions
Audio file for upload needs to be WAV file format, PCM 16 bit, 16 kHz and single channel (Mono) Total messages file size 20 MB A filename can have max 50 characters Any number of audio files can be uploaded, as long as the total file size is below 20 MB Up to 15 different events can be defined to trigger audio messages
Symmetry Audio Message Mappings File (IC_EdgeCallGroupMapping.xml)
This file can be found in the C:\ProgramData\Security Management System\Intercom\ folder and contains the necessary information to be able to broadcast an audio message to a specific intercom group. In the 'Broadcasts' section' specify the following attributes:
- Index - A zero based index of the intercom groups configured in Symmetry and displayed in the 'Group' selection drop down list on the main Intercom screen. The default 'All' Group is index zero, there after it is in order 1 to n.
- Number - Audio message activation number to be used to broadcast the recorded audio message. This number is user defined but must not be a configured Intercom number. Suggested a range of numbers should be reserved for this purpose, for example from 94 onwards.
Example:
<Broadcasts>
<Broadcast Index="0" Number="94" />
<Broadcast Index="2" Number="96" />
<Broadcast Index="3" Number="97" />
</Broadcasts>
Notes:
An Intercom can exist in multiple groups therefore it is possible for each Intercom to play a different audio message depending on configuration and the intercom group selected at the point the broadcast is initiated.
Add further Broadcast Indexes as needed, the next in sequence would be "<Broadcast Index="4" Number="98" />"
Use case:
Upload audio message "SecurityAlertCloseAllGates.wav" to all Intercoms at the entrance gates setting the audio message activation number to 98.
In Symmetry configure an Intercom Group called 'Perimeter Gates' containing the Intercoms at all the entrance gates (index 4).
Add <Broadcast Index="4" Number="98" /> to xml Broadcast element in the IC_EdgeCallGroupMapping.xml file.
Select Intercom Group 'Perimeter Gates'
Select Play Recorded Voice Message button. This will broadcast the recorded audio message "Security alert close all gates" to the Intercoms at all the entrance gates.
Notes:
Repeat the configuration for each IC-Edge device (WAV file/s) and Symmetry Client (xml file)
The Play Recorded Voice Message button will be displayed on a Symmetry Client Intercom screen if an IC-Edge Intercom Client is associated to it. The button will always be enabled, whether the above configuration has
been performed, or not.


