Difference between revisions of "AlphaCom XE demo suitcase - User Guide"
From Zenitel Wiki
(→Mobile Radio integration) |
(→Mobile Radio integration) |
||
| Line 164: | Line 164: | ||
*Dial 8200 to exit the radio conference | *Dial 8200 to exit the radio conference | ||
| − | '''Private call:''' | + | '''Private call: (Mototrbo radio only)''' |
| − | ''Private call'' means point to point call between intercom and radio handset | + | ''Private call'' means point to point call between intercom and radio handset. |
Call from an intercom station to Radio handset: | Call from an intercom station to Radio handset: | ||
Revision as of 16:23, 23 September 2013
This article describes how to set up and use the AlphaCom XE demo suitcase, item 100 9607 600.

Contents
- 1 Demo Suitcase Content
- 2 IP Addresses and Directory Numbers
- 3 Connection Diagram
- 4 How to use the demo suitcase
- 4.1 Sound quality
- 4.2 Call Request
- 4.3 Door Opening
- 4.4 Anti-nuisance
- 4.5 Group call and All Call
- 4.6 Recall
- 4.7 Auto-attendant
- 4.8 Emergency group call with Acknowledgement
- 4.9 Voice alarm distribution
- 4.10 Integration with CCTV
- 4.11 Voice Activity Detection (VAD)
- 4.12 Monitoring
- 4.13 Scanning
- 4.14 Silent Alarm
- 4.15 Noise Cancelling
- 4.16 STENTOFON Recorder
- 4.17 Mobile Radio integration
- 4.18 Softclient
- 4.19 SIP Station (X-Lite)
- 4.20 Analytics
- 5 Restore the demo configuration
- 6 AlphaPro database versions
- 7 Related articles
Demo Suitcase Content

The AlphaCom XE demo suitcase contains the following parts:
- 1 x AlphaCom XE1 incl. power adapter, preconfigured
- 1 x station stand, consisting of one CRM V station, two IP substations and a signaling unit
- 1 x IP Desktop station
- 1 x PoE switch, incl. power adaptor
- 1 x Axis M1011 IP camera, incl. power adapter
- 7 x Ethernet cables
- 1 x Memory stick including SoftClient, AlphaPro database, CCTV software and documentation
The AlphaPro database can also be downloaded from the download page.
IP Addresses and Directory Numbers
The system is preconfigured with the following static IP addresses and directory numbers:
| Device | IP address | Dirno | Name |
|---|---|---|---|
| AlphaCom XE1, Ethernet port 1 | 192.168.1.1 | ||
| AlphaCom XE1, Ethernet port 0 | 169.254.1.5 | ||
| CRM V | 192.168.1.10 | 101 | Control Room |
| IP Desktop | 192.168.1.11 | 102 | Office |
| IP Substation | 192.168.1.12 | 103 | Elevator |
| IP Substation 3G | 192.168.1.13 | 104 | Entrance |
| Softclient (PC) | 192.168.1.2 | 105 | Softclient |
| SIP Station (e.g. X-Lite on PC) | 192.168.1.2 | 106 | SIP Station |
| Recorder PC | 192.168.1.2 | ||
| PC | 192.168.1.2 | ||
| IP Camera | 192.168.1.20 |
Subnet mask is 255.255.255.0.
The IP stations are set to register by directory number (not by MAC address).
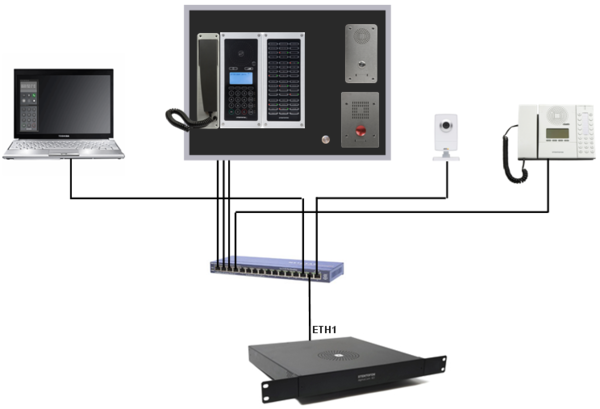
Connection Diagram
- Connect the IP stations to the PoE ports of the network switch (the 8 leftmost ports).
- Connect the AlphaCom XE1, the IP camera and the PC to the non-PoE ports (the 8 rightmost ports).

How to use the demo suitcase

Sound quality
The stations in the stand are located very close to each other, and it is hard to give a good demo of the AlphaCom XE sound quality. If you going to demo the sound quality it is better to place the IP Desktop station on a remote location, and make calls to or from the IP Desktop.
Call Request
- Call buttons on the substations make Call Request to the CRM V. Indication on the LED's on the DAK panel.
- Call Request Forwarding to station 102 is activated by pressing the Transfer button on the DAK panel. The transfer status is shown in the LCD display. Transfer Off cancels the forwarding.
Door Opening
- Door open: Press digit 6 on the CRM V while in communication with IP substation 104 to operate the LED in the signaling unit.
- Door open/closed status: The switch on the signaling unit is connected to an input of the IP substation. The input can be used to indicate door open or closed status on the DAK panel. Door open is indicated by flashing red LED in the DAK panel.
Anti-nuisance
- On the DAK panel press the Antinuisance button + station button (e.g. Elevator or Entrance) to disable calls from that station for 9 seconds. Red LED indicates disabled state. (In real life the station will be disabled for maybe 15 minutes).
Group call and All Call
- Press All Call to make a regular broadcast to all stations. If you demonstrate voice paging (i.e. you are searching for someone), you can answer the paging by pressing 99 on a station (e.g. on the IP desktop).
- Press All Call (4gong) to make an All Call with customized “dingdong” signal. The standard ding-dong is substituted by a wav file playing a gong sequence. This is to demo that the standard dingdong signal can be substituted by any signal.
- Press All Call (coco) to make an All Call with customized pre-warning signal. The standard ding-dong is substituted by a wav file playing a coco sound.
- Press Dynamic Grp to make a dynamic group call. Select members on the DAK panel. Members can be selected and deselected (toggle function). Press Dynamic Grp again to dispatch the group call.
Recall
- Press Recall (M), then press and hold M-key while recording. Release M to listen. Press M to do a new recording, or press 8 to dispatch the message as an All Call.
- Press Recall. Start talking (no M-key) and press C when finished to dispatch the message. Alternative: Lift the handset, press Recall, talk and hang up.
Auto-attendant
Preparations:
- An Auto-attendant message has to be recorded in advance, or as a part of the demo: Lift the handset of the IP desktop station and dial 8180 + 9550. (If there is an existing message, it will be played, and you can press "0" to delete it, or C if you choose to keep it). Press M to start recording. Press 8 to save.
To demonstrate the auto-attendant:
- Dial 9550 on a station. The auto-attendant message will be played. Now you can:
- Press 1 to get connected to the CRMV (101)
- Press 2 to get connected to the Softclient (105)
- Or wait for 10 seconds and get connected to the CRMV.
Emergency group call with Acknowledgement
This is a group call were all recipients have to verify that they have received the group call message by dialing an acknowledgement code.
- Press Emerg.Grp. A group call is activated, and the red LED’s of the recipients will be lit in the DAK panel. The receiving stations must dial 9590 to acknowledge. LED status will change to green. Press Clear to reset all LED’s in the DAK panel.
Additional note: Four stations are receiving the group call: IP desktop, Softclient and the two IP substations. The IP substations are included for the demo-effect on the DAK panel, but can of course not dial the acknowledge code.
Voice alarm distribution
- Press Fire, Evacuate or Baggage to distribute prerecorded voice message to all stations at full volume. Press Message Off to stop the message.
Integration with CCTV
- The IP camera is associated with station 104. When station 104 makes a call the picture will automatically appear in the Milestone Smart Client. Installation and set up of the Milestone software is described in a separate article.
Voice Activity Detection (VAD)
- When the VAD function is enabled, voice activity detected by the microphone of the station 104 (the IP Substation with red button) will be indicated as Call Request with low priority on the DAK Panel of the Control Room Station. The camera will automatically appear on the Milestone PC.
Note: As from Demo Suitcase version 1.6 the VAD function can be enabled/disabled by pressing a button on the DAK panel.
- In earlier versions, the VAD function had to be enabled in the IP substation 104 (192.169.1.13). Log on to the station webserver using Internet Explorer, select Advanced > VAD, and set VAD Status to Enabled. Adjust the sensitivity by changing Minimum Amplitude.
Monitoring
- To silently monitor a station, press the Monitoring button + station button (e.g. Elevator or Entrance). The green LED in the DAK panel shows which station is currently monitoring.
- To stop the monitoring, press the Monitoring button twice.
Additional info: During monitoring the microphone LED of the monitored station will be lit. It is possible to disable the LED if required.
Scanning
- To silently monitor multiple stations, press the Scanning button. The system will start to monitor in rotating order the IP Desktop -> Elevator -> Entrance -> IP Desktop ->... The green LED in the DAK panel shows you which station is currently monitored.
- To stop the scanning, press the Scanning button again.
- If you want to stop the scanning and listen to a particular station, press the Monitoring button + station button (e.g. Elevator or Entrance).
Silent Alarm
The Silent Alarm is demonstrated by pressing the '*' button (DAK 1) on the IP Desktop station. Without any audible signal in the alarm station, a special alert (gong) signal will be heard in the CRM V station, followed by the audio signal from the alarm station. In real life the alarm button will be a hidden button or a foot switch.
Procedure:
- Push the '*' button on the IP Desktop station to trigger the alarm
- An alert signal (here: gong sequence) and display information will appear in the destination stations (Here: in the CRM V)
- An audio connection is silently established from the alarm station to the destination station(s)
- The destination station(s) can press M-key and talk back, if desired
- The alarm is cancelled by pressing DAK 2 (#) on the alarm station
Background info: Silent Alarm is intended for e.g. public offices which handle clients that can become threatening. As client handling is confidential, each employee sits alone in his/her office, and a possible attack will not be noticed by co-workers. Each office is equipped with an intercom station, plus a hidden alarm button. When the alarm button is pressed, a special group call with a characteristic ding-dong sequence or a prerecorded spoken message is broadcast to neighboring offices, and all station displays show the location of the alarm station, e.g. "Alarm: Office 3". The neighboring offices will automatically listen in to the alarm room. It is possible to simulate an innocent conversation by pressing the M-key and talk back to the alarm station, and thus make the threatening client understand that he is not alone. When the situation is under control, the alarm is cleared by pressing a DAK-key on the alarm station.
Noise Cancelling
- Use an ethernet extension cable (not provided with the demoset) and place the IP desktop station in a different room. Press the button Noise on the DAK panel to generate prerecorded traffic noise in the speaker of the CRMV. The "Noise" button will also preset the volume on the CRMV and on the IP substation 104 to a suitable level for this demo.
- Make a call from the IP desktop to station 104. You will now hear the noise.
- Log on to the webserver of station 104 (192.168.1.13) using Internet Explorer, select Advanced > Audio Settings, and set Noise Reduction Level = 3 (or 4). You should now hear that the noise almost disappear in the IP desktop station. Note that sometimes the change doesn't take effect immediately, you might have to cancel the call and establish a new call.
- Press Message Off to stop the message, and reset the volume levels on CRMV and IP substation 104.
STENTOFON Recorder
As from Demo Suitcase version 1.4 the demo suitcase is prepared for voice recording. Before doing any demo, the STENTOFON Recorder Software must be installed on the PC according to the STENTOFON Recorder manual A100K11036.
During installation you have to enter a username and the IP address of the AlphaCom.
- Username = recorder (small letters)
- Address = 192.168.1.1

It is recommended to install and get familiar with the STENTOFON Recorder Software and the Playback Client before doing demos for customers.
Note that the recording features requires a license. License for recording was included in the demo suitcase as from October 2011. Demo suitcases produced before this date does not include recording license. The demo suitcase license can be updated by contacting alphasupport@zenitel.com.
Mobile Radio integration
Operation

Listen to radio traffic (Talk Group):
- On the CRMV press the DAK button labeled «Radio», or dial 8204
- On master station 102, dial the radio channel number 8204
- Talk back to the radios by pressing the M-key
- Dial 8200 to exit the radio conference
Private call: (Mototrbo radio only)
Private call means point to point call between intercom and radio handset.
Call from an intercom station to Radio handset:
- Dial 5 + Handset ID. E.g.: 5 + 1004
- Press PTT on handset to answer
- Press M-key on intercom to talk
- The call cancels after 5 seconds of inactivity
Call from radio handset to intercom station 102:
- Press «Menu» + «OK»
- Scroll to «Manual dial», then «OK»
- Enter 1003 (gateway ID)
- Press PTT button briefly to establish call to 102
- Press PTT again to talk
- Press M-key on station 102 to talk back
- The call cancels after 5 seconds of inactivity
- Selective dialing is not possible
Installation and configuration
As from Demo Suitcase version 1.6 the demo suitcase is prepared for Mobile Radio integration using an IPARIO unit, and a license for IPARIO is included. When upgrading older versions of the demo suitcase to v. 1.6, please contact alphasupport@zenitel.com for a license upgrade. The IPARIO unit and the mobile radio system are not included with the demo suitcase. To be able to show the integration, one must have the following equipment in addition to the demo suitcase:
- IPARIO unit (100 8095 100)
- Mobile Radio gateway, e.g Motorola GM340 (analog) or Motorola DM3400/3600 (digital).
- One or more radio handsets
The IPARIO must be configured with the following parameters:
- AlphaCom IP address: 192.168.1.1
- Directory number: 5
- IP Address: 192.168.1.15 (suggestion)
- Subnet mask: 255.255.255.0
- Gateway: 192.168.1.1
Softclient
- The demo suitcase is prepared for STENTOFON Softclient on directory number 105. The PC should be assigned IP address 192.168.1.2. Download and install the Softclient on your PC. In File > Preferences set AlphaCom IP address = 192.168.1.1 and AlphaCom ID (MAC or Dirno) = 105.
SIP Station (X-Lite)
- The demo suitcase is prepared for SIP Station on directory number 106. The PC should be assigned IP address 192.168.1.2. [Download] and install the X-Lite software on your PC. Create a SIP account with the following settings: Display Name = Any text. User name = 106. Domain = 192.168.1.1.
Analytics
As from Demo Suitcase version 1.5 the demo suitcase is prepared for analytics. Before doing any demo, the STENTOFON Analytics software must be installed on the PC according to the article AlphaCom XE demo suitcase - Analytics upgrade. It is also advisable to purchase the in that article described glass break simulator.
Enabling the demo
To enable the analytics demonstration, press the last button on the IP-DAK48 panel, labelled 'Analytics'. The red led will start flashing to indicate that the demo is active. Press the same button again to deactivate the demonstration.
The following analytics are enabled by default:
- On station 102: Car alarms
- On station 103: Glass break simulator
- On station 136: Glass break, car alarms, gunshots, aggression
Demo with audio files or glassbreak simulator
Use of the glassbreak simulator is recommended. When the simulator is operated, station 103 will detect the sound. This audio will be analysed by the analytics server and a command will be sent to the AlphaCom. As a result an audio file will be played on station 103, warning off a possible intruder.
It is also possible to playback the provided audio files through high quality speakers directly from the PC. The analytics server is programmed to analyse audio from station 102 for car alarms. When detected a warning message will be played on station 102.
The warnings will only be played when the analytics demo is enabled. Note that the stations will always stream audio to the analytics server software.
Analytics demo software
When installing the STENTOFON Analytics Software with the demo option enabled, a small additional link will be placed on your PC desktop called 'Analytics Demo'. When this link is clicked a small program is started which can be used to send audio streams into the analytics software. The format of this stream is in the same format as produced in the IP stations and the STENTOFON Analytics Software will analyse these audio streams in exactly the same manner.
The main reason is that due to obvious reasons there is no other way in which a gunshot detection can be demonstrated. In addition it is possible to also demonstrate aggression, breaking glass and car alarms, but it is highly recommended to use the methods as described in the paragraph 'Demo with audio files or glassbreak simulator' as in that case the audio is picked up by physical IP-stations as would happen in reality as well.
The AlphaCom supports so-called IP-dummy stations. These are IP audio only stations to which it is possible to connect an external RTP-stream and which are able to send an RTP-stream to a specific address. In the demo database 4 such IP-dummy stations are defined: 133, 134, 135, 136.
The Analytics Demo application has been setup to stream audio to IP-dummy stations 134 and 135. When the last button on the IP-DAK48 panel is pressed, several things happen:
- The red led starts flashing, showing that the analytics demo is activated
- A connection is setup between 134 and 136; It is the IP-dummy with dir nr 136 which is used as source, meaning that the stream is sent from a 'real', albeit not physical, intercom station
- A connection is setup between 135 and 101; The sole purpose of this connection is to make the audio from the Analytics Demo audible through the loudspeaker of the CRMV.
Restore the demo configuration
If the configuration for some reason has been changed, you can easily restore the standard demo configuration by dialing the code 7819 + M on the CRMV or the IP desktop station.
AlphaPro database versions
- DemoCaseXE.zip: First database for the demo suitcase
- DemoCaseXE_v1.1.zip: Added the Noise Cancelling feature
- DemoCaseXE_v1.2.zip: Milestone CCTV fix: Serial Port settings for EDO1: Enabled disconnect/connect on each write
- DemoCaseXE_v1.3.zip: Added Monitoring, Scanning and Silent Alarm features. Improved Anti-nuisance user interface.
- DemoCaseXE_v1.4.zip: Added support for recorder. Note that recorder license is required (Recorder license is included in demo suitcases as from October 2011).
- DemoCaseXE_v1.5.zip: Added support for analytics, also see the article AlphaCom XE demo suitcase - Analytics upgrade.
- DemoCaseXE_v1.6.zip: Added support for Mobile Radio Integration via IPARIO, and for integration of PA system via IPARIO. It is now possible to enable/disable the VAD function from the DAK panel.
Related articles
AlphaCom XE demo suitcase - Milestone setup
AlphaCom XE demo suitcase - Analytics upgrade