Difference between revisions of "AlphaVision - How to get started"
From Zenitel Wiki
(→Map and Icons) |
|||
| (22 intermediate revisions by 4 users not shown) | |||
| Line 1: | Line 1: | ||
| + | {{A}} | ||
| + | {{obsolete}} | ||
__NOTOC__ | __NOTOC__ | ||
| − | |||
This article gives step-by-step instructions how to get started with [[AlphaVision]]. | This article gives step-by-step instructions how to get started with [[AlphaVision]]. | ||
Main configuration steps are: | Main configuration steps are: | ||
| Line 6: | Line 7: | ||
* '''AlphaPro''': Activate ACDP link and Device 64 | * '''AlphaPro''': Activate ACDP link and Device 64 | ||
* '''AlphaVision''': Configure communication parameters (AVCMSetup) and select 'Operator station' | * '''AlphaVision''': Configure communication parameters (AVCMSetup) and select 'Operator station' | ||
| + | [[Image:AlphaVision - example.png|thumb|500px|left|AlphaVision - Example configuration]] | ||
<br style="clear:both;" /> | <br style="clear:both;" /> | ||
=== AlphaWeb === | === AlphaWeb === | ||
| Line 16: | Line 18: | ||
** Link Type: Stentofon MultiDrop Master - Reserved | ** Link Type: Stentofon MultiDrop Master - Reserved | ||
** Broadcast: Enabled | ** Broadcast: Enabled | ||
| − | ** Destination: AlphaVision ( | + | ** Destination: AlphaVision (any text) |
** Port: 55010 | ** Port: 55010 | ||
** Keep Alive: Enabled | ** Keep Alive: Enabled | ||
| Line 30: | Line 32: | ||
=== AlphaVision === | === AlphaVision === | ||
==== Setup==== | ==== Setup==== | ||
| − | * Download and install AlphaVision on a PC. Latest software version is available on | + | * Download and install AlphaVision on a PC. Latest software version is available on request. |
* Start the 'AVCMSetup' program (Windows XP: Start-> All Programs -> AlphaVision: AVCMSetup). Set: | * Start the 'AVCMSetup' program (Windows XP: Start-> All Programs -> AlphaVision: AVCMSetup). Set: | ||
| − | |||
** Communiation Type: IP | ** Communiation Type: IP | ||
** AC E IP address: The IP address of the AlphaCom | ** AC E IP address: The IP address of the AlphaCom | ||
** Normally one can leave the other parameters as is. Press OK to close the window. | ** Normally one can leave the other parameters as is. Press OK to close the window. | ||
| + | [[Image:AlphaVision - AVCMSetup.png|thumb|left|500px|AlphaVision: AVCMSetup]] | ||
<br style="clear:both;" /> | <br style="clear:both;" /> | ||
| − | + | ||
* Start the AlphaVision program. Username = '''service''', password = '''service''' (Supervisor login). The 'Message Window' at the bottom of the screen should show "Run Mode", and a green "eye" should appear at the bottom right corner of the PC, indicating the the communication between AlphaVision and AlphaCom is OK. | * Start the AlphaVision program. Username = '''service''', password = '''service''' (Supervisor login). The 'Message Window' at the bottom of the screen should show "Run Mode", and a green "eye" should appear at the bottom right corner of the PC, indicating the the communication between AlphaVision and AlphaCom is OK. | ||
* Select the 'System Tree' tab. AlphaVision will automatically detect stations as they are being used, and they will show up in the System Tree. An easy way to automatically detect all stations is to dial the code [[Start Tone Test (Line Monitoring) feature|7885 (Tone Test)]] from a [[SuperUser]]. Now all stations will detected one by one. (Initially only Station 102 will appear in the System Tree, as this is the default operator station. Double click on station 102 to open the tree to see all stations). | * Select the 'System Tree' tab. AlphaVision will automatically detect stations as they are being used, and they will show up in the System Tree. An easy way to automatically detect all stations is to dial the code [[Start Tone Test (Line Monitoring) feature|7885 (Tone Test)]] from a [[SuperUser]]. Now all stations will detected one by one. (Initially only Station 102 will appear in the System Tree, as this is the default operator station. Double click on station 102 to open the tree to see all stations). | ||
* Assign an 'Operator station' to AlphaVision by selecting Configuration -> Options -> Systems tab. By default station 102 in node 1 is set as operator station if found, and no other station is defined. | * Assign an 'Operator station' to AlphaVision by selecting Configuration -> Options -> Systems tab. By default station 102 in node 1 is set as operator station if found, and no other station is defined. | ||
| + | [[Image:AlphaVision - Running.png|thumb|left|500px|AlphaVision screenshot - Communication OK and stations are detected and shown in the System Tree]] | ||
<br style="clear:both;" /> | <br style="clear:both;" /> | ||
==== Operation ==== | ==== Operation ==== | ||
| − | When a [[Call Request]] is | + | When a [[Call Request]] is sent to the 'Operator Station' (e.g. a station dials 623 + 102), the call will appear in the Call Request list, and an "Accept" button will appear. The call is answered by clicking the "Accept" button, or by double clicking the station in the call request list. During conversation, a "Cancel" button will appear to terminate the conversation. |
| − | In 'Configuration -> Maps' you can create or import a map. From the 'System Tree' you can drag stations and drop them on the map, and they will appear as icons on the map. | + | ==== Map and Icons ==== |
| + | In 'Configuration -> Maps' you can create or import a map. From the 'System Tree' you can drag stations and drop them on to the map, and they will appear as icons on the map. | ||
| + | |||
| + | When the icons are placed on the map, they will automatically show the status of the station, based on data received from the AlphaCom: | ||
| + | |||
| + | * Idle | ||
| + | * Connected | ||
| + | * Call Request (low priority) | ||
| + | * Call Request (high priority) | ||
| + | * Station Error | ||
| + | |||
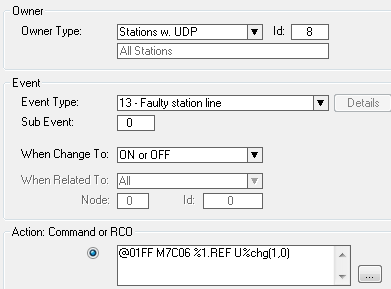
| + | The first four statuses are reported automatically by the AlphaCom, but to show Station Errors one have to add one event in AlphaPro: | ||
| + | |||
| + | In '''Exchange & System''' > '''Events''', '''Insert''' an event with the following properties: | ||
| + | |||
| + | [[File:AlphaVision - ErrorReport.PNG|thumb|left|500px|Create this event to show "Station Down" on the icon]] | ||
| + | <br style="clear:both;" /> | ||
| + | {{Code2| | ||
| + | @01FF M7C06 %1.REF U%chg(1,0) | ||
| + | }} | ||
| + | |||
| + | Where 01 is the node number of the AlphaCom. | ||
=== Related articles === | === Related articles === | ||
*[[AlphaVision]] (Main article) | *[[AlphaVision]] (Main article) | ||
*[[AlphaVision_-_single_click_to_call|AlphaVision - Single Click to Call]] | *[[AlphaVision_-_single_click_to_call|AlphaVision - Single Click to Call]] | ||
| − | [[Category: | + | |
| + | [[Category:Discontinued Products]] | ||
Latest revision as of 10:13, 7 June 2022
This article gives step-by-step instructions how to get started with AlphaVision. Main configuration steps are:
- AlphaWeb: Enable TCP port 55010
- AlphaPro: Activate ACDP link and Device 64
- AlphaVision: Configure communication parameters (AVCMSetup) and select 'Operator station'
AlphaWeb
- In System Configuration -> Filters, enable TCP port 55010 on the ethernet port used for AlphaVision.
AlphaPro
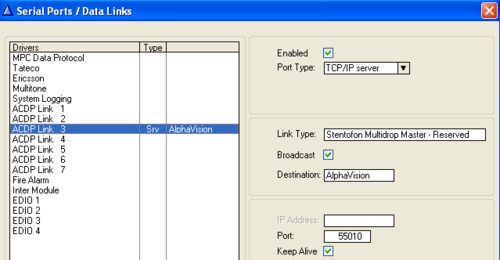
- In Exchange & System -> Serial ports, activate a communication port to be used for AlphaVision. Select one of the seven ACDP Links, and set the following parameters:
- Port Type: TCP/IP Server
- Link Type: Stentofon MultiDrop Master - Reserved
- Broadcast: Enabled
- Destination: AlphaVision (any text)
- Port: 55010
- Keep Alive: Enabled
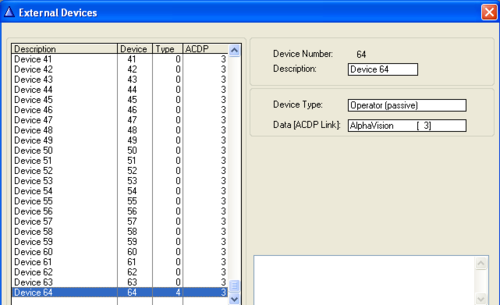
- In Exchange & System -> Devices, scroll down to device 64 and set:
- Device type: Operator (passive)
- Data (ACDP link): select the link which was configured in the Serial Ports window
AlphaVision
Setup
- Download and install AlphaVision on a PC. Latest software version is available on request.
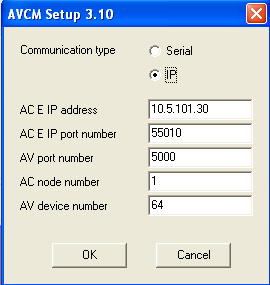
- Start the 'AVCMSetup' program (Windows XP: Start-> All Programs -> AlphaVision: AVCMSetup). Set:
- Communiation Type: IP
- AC E IP address: The IP address of the AlphaCom
- Normally one can leave the other parameters as is. Press OK to close the window.
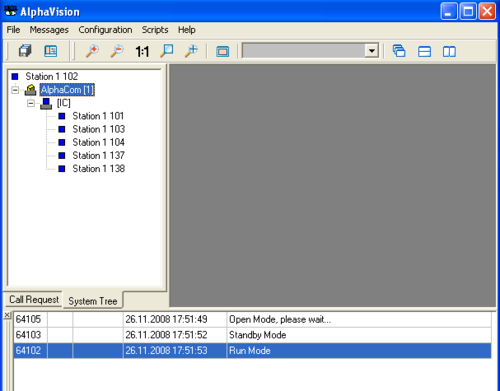
- Start the AlphaVision program. Username = service, password = service (Supervisor login). The 'Message Window' at the bottom of the screen should show "Run Mode", and a green "eye" should appear at the bottom right corner of the PC, indicating the the communication between AlphaVision and AlphaCom is OK.
- Select the 'System Tree' tab. AlphaVision will automatically detect stations as they are being used, and they will show up in the System Tree. An easy way to automatically detect all stations is to dial the code 7885 (Tone Test) from a SuperUser. Now all stations will detected one by one. (Initially only Station 102 will appear in the System Tree, as this is the default operator station. Double click on station 102 to open the tree to see all stations).
- Assign an 'Operator station' to AlphaVision by selecting Configuration -> Options -> Systems tab. By default station 102 in node 1 is set as operator station if found, and no other station is defined.
Operation
When a Call Request is sent to the 'Operator Station' (e.g. a station dials 623 + 102), the call will appear in the Call Request list, and an "Accept" button will appear. The call is answered by clicking the "Accept" button, or by double clicking the station in the call request list. During conversation, a "Cancel" button will appear to terminate the conversation.
Map and Icons
In 'Configuration -> Maps' you can create or import a map. From the 'System Tree' you can drag stations and drop them on to the map, and they will appear as icons on the map.
When the icons are placed on the map, they will automatically show the status of the station, based on data received from the AlphaCom:
- Idle
- Connected
- Call Request (low priority)
- Call Request (high priority)
- Station Error
The first four statuses are reported automatically by the AlphaCom, but to show Station Errors one have to add one event in AlphaPro:
In Exchange & System > Events, Insert an event with the following properties:
Action commands:
@01FF M7C06 %1.REF U%chg(1,0)
Where 01 is the node number of the AlphaCom.
Related articles
- AlphaVision (Main article)
- AlphaVision - Single Click to Call


