Difference between revisions of "IP DECT server 2500"
From Zenitel Wiki
(→Base Station Configuration) |
|||
| (44 intermediate revisions by 2 users not shown) | |||
| Line 1: | Line 1: | ||
| − | This article describes how to setup the STENTOFON [[DECT Server 2500]] to work with the AlphaCom XE using the SIP protocol. The STENTOFON DECT Server 2500 (or the bigger module; 8000) is a DECT system that connects to the AlphaCom XE Audio Server through the SIP protocol. The DECT Server uses digital base stations. Main advantage is that the system is not reliant on synchronization like the STENTOFON | + | {{A}} |
| + | |||
| + | {{obsolete}} | ||
| + | |||
| + | {{Note| Zenitel (Stentofon) does not provide any DECT product anymore. The information in this article may be outdated!}} | ||
| + | |||
| + | This article describes how to setup the STENTOFON [[DECT Server 2500]] to work with the AlphaCom XE using the SIP protocol. The STENTOFON DECT Server 2500 (or the bigger module; 8000) is a DECT system that connects to the AlphaCom XE Audio Server through the SIP protocol. The DECT Server uses digital base stations. Main advantage is that the system is not reliant on synchronization like the STENTOFON IP DECT Server 6000 between bases. | ||
The STENTOFON DECT Server 2500 has four card slots. In the 1st slot from the left the '''CPU''' card is installed, the 2nd slot holds the '''Media Resource''' card, slots 3 and 4 are used for other interface cards such as the digital base stations. Both the '''CPU''' card and the '''Media Resource''' card needs an ethernet connection, and its own IP address in the system. | The STENTOFON DECT Server 2500 has four card slots. In the 1st slot from the left the '''CPU''' card is installed, the 2nd slot holds the '''Media Resource''' card, slots 3 and 4 are used for other interface cards such as the digital base stations. Both the '''CPU''' card and the '''Media Resource''' card needs an ethernet connection, and its own IP address in the system. | ||
| − | [[Image: | + | [[Image:DECT-2500.png|thumb|410px|Configuration example]] |
==Configuration of AlphaCom XE== | ==Configuration of AlphaCom XE== | ||
| − | Configuration of the AlphaCom XE depends on the software version in the AMC-IP board. | + | Configuration of the AlphaCom XE depends on the software version in the AMC-IP board. You can find the latest versions on our [[downloads]] page. |
| + | |||
| + | Also see: [[SIP_phone_as_station|SIP phone as station]] | ||
| + | |||
=== AMC 10.56 and newer === | === AMC 10.56 and newer === | ||
| − | |||
* AlphaPro software 10.56. or newer is required for the configuration | * AlphaPro software 10.56. or newer is required for the configuration | ||
* From the '''Users & Stations''' window in AlphaPro, select a user and enable the 'SIP station' flag | * From the '''Users & Stations''' window in AlphaPro, select a user and enable the 'SIP station' flag | ||
* Configure Directory number and Display text | * Configure Directory number and Display text | ||
* Select a supported codec for the SIP station to use | * Select a supported codec for the SIP station to use | ||
| + | [[Image:SIP phone as station.png|left|thumb|500px|SIP phones are configured in the Users & Stations window]] | ||
| + | <br style="clear:both;" /> | ||
=== AMC 10.55 and earlier === | === AMC 10.55 and earlier === | ||
| Line 18: | Line 28: | ||
==Configuration of STENTOFON DECT Server 2500== | ==Configuration of STENTOFON DECT Server 2500== | ||
| − | |||
=== Getting access to the embedded web server=== | === Getting access to the embedded web server=== | ||
| − | + | Before the PC can access the IP Dect Server, the IP address of the PC must be changed to match the same subnet (for example 192.168.0.2). | |
| + | To access the embedded web server of the IP-Dect Server, start your internet browser (e.g. Internet Explorer) and in the address field enter '''192.168.0.1'''. You will be prompted for a username and password. | ||
| − | |||
| − | |||
Default: | Default: | ||
| − | :Username: admin | + | :Username: '''admin''' |
| − | :Password: kws8000 | + | :Password: '''kws8000''' |
The '''Service Report''' page should now be displayed. | The '''Service Report''' page should now be displayed. | ||
| − | + | [[Image:DECT - 2500 - Service Report.PNG|thumb|left|700px|Service Report page - Logged on to IP address 192.168.0.1]] | |
| − | <br | + | <br style="clear:both;" /> |
===CPU Network Configuration=== | ===CPU Network Configuration=== | ||
| − | |||
''All changes to fields marked with two stars need a reboot to take effect''<br/> | ''All changes to fields marked with two stars need a reboot to take effect''<br/> | ||
Under the '''System''' tab go the '''Network''' page where you define IP and NTP settings for the CPU card in the STENTOFON DECT Server 2500. | Under the '''System''' tab go the '''Network''' page where you define IP and NTP settings for the CPU card in the STENTOFON DECT Server 2500. | ||
| − | + | *Under '''Date and Time''', select '''Network (NTP)''' (optional) | |
| − | + | **Type in the IP address of the NTP server from which the system will obtain the current time in the '''NTP Server''' field (optional) | |
| − | + | **From the Time Zone list, select the wanted time zone (optional) | |
| − | + | [[File:DECT - 2500 - NTP.PNG|thumb|700px|left|Network Time Protocol settings]] | |
| − | [[File:DECT - 2500 - NTP.PNG]] | + | <br style="clear:both;" /> |
| − | + | *Under '''IP Settings & Status''' select '''Shelf No.''' = '''Primary''' and '''Card No.''' = '''CPU''' | |
| − | + | **In the '''IP Address''' field, type in the IP address of the IP-DECT Server | |
| − | + | **In the '''Subnet Mask''' field, type in the network mask | |
| − | + | **In the '''Gateway''' field, type in the IP address of the gateway. | |
| − | [[Image:DECT - 2500 - CPU Network.PNG]] | + | [[Image:DECT - 2500 - CPU Network.PNG|thumb|700px|left|CPU Network settings]] |
| − | + | <br style="clear:both;" /> | |
| − | + | *Click '''Save''' | |
| − | + | *Click '''Restart''' in the top menu | |
| + | **You need to change your computers IP address to match your new address in the server in order to enter the configuration again | ||
Leave the rest to default settings. <br/> | Leave the rest to default settings. <br/> | ||
===Media Resource Network Configuration=== | ===Media Resource Network Configuration=== | ||
| − | |||
''All changes to fields marked with two stars need a reboot to take effect''<br/> | ''All changes to fields marked with two stars need a reboot to take effect''<br/> | ||
Under the '''System''' tab go the '''Network''' page where you define IP settings for the Media Resource card in the STENTOFON DECT Server 2500. | Under the '''System''' tab go the '''Network''' page where you define IP settings for the Media Resource card in the STENTOFON DECT Server 2500. | ||
| − | + | *Under '''IP Settings & Status''' select '''Shelf No.''' = '''Primary''' and '''Card No.''' = '''MR card 1''' | |
| − | + | **Click '''Refresh''' | |
| − | + | **In the '''IP Address''' field, type in the IP address of the '''Media Resource'''' card | |
| − | + | **In the '''Subnet Mask''' field, type in the network mask | |
| − | + | **In the '''Gateway''' field, type in the IP address of the gateway. | |
| − | [[Image:DECT - 2500 - MR Network.PNG]] | + | [[Image:DECT - 2500 - MR Network.PNG|thumb|700px|left|Media Resource card Network settings]] |
| − | + | <br style="clear:both;" /> | |
| − | + | *Click '''Save''' | |
| + | *Click '''Restart''' in the top menu. | ||
Leave the rest to default settings. <br/> | Leave the rest to default settings. <br/> | ||
| Line 71: | Line 79: | ||
media. | media. | ||
| − | + | *Under '''General''' | |
| − | + | **In the '''Local Port''' field, type the local port number. The default local port number is 5060 | |
| − | + | **In the '''Default Domain''' field, type in the IP address of your AlphaCom | |
| − | + | *Under '''Proxies''' | |
| − | + | **In the '''URI''' field for '''Proxy 1''', type in the IP address of your AlphaCom | |
| − | [[File:DECT - 2500 - SIP Config 1.PNG]] | + | [[File:DECT - 2500 - SIP Config 1.PNG|thumb|700px|left|General and Proxy settings]] |
| − | + | <br style="clear:both;" /> | |
| − | + | *Under '''DTMF signalling''' | |
| − | [[File:DECT - 2500 - SIP Config 2.PNG]] | + | **Select the '''Send as RTP (RFC2833)''' check box |
| − | + | [[File:DECT - 2500 - SIP Config 2.PNG|thumb|700px|left|DTMF settings]] | |
| − | + | <br style="clear:both;" /> | |
| − | + | *Under '''Media''' | |
| − | + | **From the '''Packet Duration(msec)''' list, select 20 | |
| − | [[File:DECT - 2500 - SIP Config 3.PNG]] | + | **In the '''Codec Priority''' fields, select PCMU/8000 as choice number 1 |
| − | + | **Set the rest to "None" | |
| − | + | [[File:DECT - 2500 - SIP Config 3.PNG|thumb|700px|left|Media Codec settings]] | |
| − | + | <br style="clear:both;" /> | |
| − | + | *Click '''Save''' to save your '''SIP Cconfiguration''' data | |
| + | *Go to the '''System''' page and click '''Restart''' to make all the changes take effect | ||
| + | Leave the rest to default settings | ||
<br style="clear:both;" /> | <br style="clear:both;" /> | ||
==Base Station Configuration== | ==Base Station Configuration== | ||
| − | |||
===Connecting the Base Stations=== | ===Connecting the Base Stations=== | ||
Connect all base stations to the '''Base Station Interface''' | Connect all base stations to the '''Base Station Interface''' | ||
| − | + | *In the STENTOFON DECT Server 2500 webserver navigate to '''Digital Base Stations''' to ensure that the base stations are online | |
| − | + | **It takes approximately 20 seconds before the base stations are online after the are connected | |
| − | [[File:DECT - 2500 - Digital Basestations.PNG]] | + | [[File:DECT - 2500 - Digital Basestations.PNG|thumb|700px|left|Digital Base stations - List Page]] |
| − | + | <br style="clear:both;" /> | |
| − | + | *Click the green V to apply settings to each base station | |
| + | *Click '''Reboot all digital base stations''' | ||
==Handset Registration and Subscription== | ==Handset Registration and Subscription== | ||
| Line 107: | Line 117: | ||
===Registering IP-DECT Handsets=== | ===Registering IP-DECT Handsets=== | ||
| − | |||
| − | |||
To register handsets you use the web based Administration Page of the STENTOFON DECT Server 2500. | To register handsets you use the web based Administration Page of the STENTOFON DECT Server 2500. | ||
Each handset in the wireless solution must be programmed with the serial number (IPEI) before it can operate. This serial number must be registered in the web based Administration Page of the DECT Server. Serial numbers are a unique fingerprint of each handset. The serial number is programmed into the handset during the manufacturing process and cannot be changed by field personnel. The serial number can be found on a label beneath the battery or it can be viewed in the handsets display. <br/> | Each handset in the wireless solution must be programmed with the serial number (IPEI) before it can operate. This serial number must be registered in the web based Administration Page of the DECT Server. Serial numbers are a unique fingerprint of each handset. The serial number is programmed into the handset during the manufacturing process and cannot be changed by field personnel. The serial number can be found on a label beneath the battery or it can be viewed in the handsets display. <br/> | ||
| − | * For Rough and EX handsets: press '''*99984*V''' | + | *For Rough and EX handsets: press '''*99984*V''' |
| − | * For Office handsets: press '''Menu''', '''Status''', '''Firmware version''' | + | *For Office handsets: press '''Menu''', '''Status''', '''Firmware version''' |
''The Serial number consists of 12 digits''. | ''The Serial number consists of 12 digits''. | ||
| − | |||
Log in to the DECT Server 2500 and go to the Users page. | Log in to the DECT Server 2500 and go to the Users page. | ||
| − | + | [[Image:DECT - 2500 - Handset Reg 1.PNG|thumb|700px|left|DECT Handsets - List Page]] | |
| − | + | <br style="clear:both;" /> | |
| − | + | *Click '''Create New Registration''' | |
| − | + | **'''IPEI''': the '''IPEI number''' (serial number) of the handset | |
| − | + | **'''Local Number (DN)''': the subscriber number the DECT should have in the AlphaCom | |
| − | + | **'''Name''': the name of the handset as it appears in the database | |
| − | + | **'''Standby Text''': the text that is displayed when the handset is on hook | |
| − | + | **'''Presentation Text''': optional text that is sendt to caller | |
| − | + | **'''SIP Username''': the subscriber number the DECT should have in the AlphaCom (field available after '''Line Type''' is selected) | |
| − | [[File:DECT - 2500 - Handset Reg 2.PNG]] | + | **'''Domain''': the AlphaCom IP address |
| − | + | **'''Line Type''': set to SIP (makes it possible to type in the '''SIP Username''') | |
| − | + | [[File:DECT - 2500 - Handset Reg 2.PNG|thumb|700px|left|Create New Handset page]] | |
| + | <br style="clear:both;" /> | ||
| + | *Click Save to save the registration | ||
| + | *Repeat for all handsets | ||
| − | Leave the rest to default settings. | + | Leave the rest to default settings. |
====Subscribing Rough and EX Handsets==== | ====Subscribing Rough and EX Handsets==== | ||
| − | + | *Press '''MENU''' - go to '''MENU LOGIN'''. | |
| − | + | *Press '''V''' - go to '''SUBSCRIPTION CREATE''' to subscribe to a system. | |
| − | + | *Press '''V'''. The handset searches for the serial number of the system. | |
| − | + | *When the serial number of the system appears in the display, press '''V'''. | |
| − | An antenna symbol appears on the display to indicate a successful subscription. If not, the subscription has failed and the procedure must be | + | An antenna symbol appears on the display to indicate a successful subscription. If not, the subscription has failed and the procedure must be retried. |
| − | retried. | ||
====Subscribing Office Handsets==== | ====Subscribing Office Handsets==== | ||
| − | + | *Press '''Menu''' to enter main menu. | |
| − | + | *Scroll to '''Settings''' and press '''Select'''. | |
| − | + | *Scroll to '''Advanced''' and press '''Select'''. | |
| − | + | *Scroll to '''Login''' and press '''Select'''. | |
| − | + | *Scroll to '''Create login''' and press '''Select'''. The handset will start searching for a system (*). | |
| − | + | *Scroll to the found system and press '''Select'''. | |
| − | + | *Press '''Ok'''. | |
* | * | ||
''The search for a system should result in a 11 digit number, the ARI.'' | ''The search for a system should result in a 11 digit number, the ARI.'' | ||
''The ARI number to the system you are configuring should match the ARI number in th '''Users''' page in the STENTOFON DECT Server 2500 webserver.'' | ''The ARI number to the system you are configuring should match the ARI number in th '''Users''' page in the STENTOFON DECT Server 2500 webserver.'' | ||
| − | + | [[Category:Discontinued Accessories]] | |
| − | |||
| − | |||
| − | |||
| − | |||
| − | [[Category: | ||
Latest revision as of 16:02, 8 November 2021

|
Zenitel (Stentofon) does not provide any DECT product anymore. The information in this article may be outdated! |
This article describes how to setup the STENTOFON DECT Server 2500 to work with the AlphaCom XE using the SIP protocol. The STENTOFON DECT Server 2500 (or the bigger module; 8000) is a DECT system that connects to the AlphaCom XE Audio Server through the SIP protocol. The DECT Server uses digital base stations. Main advantage is that the system is not reliant on synchronization like the STENTOFON IP DECT Server 6000 between bases.
The STENTOFON DECT Server 2500 has four card slots. In the 1st slot from the left the CPU card is installed, the 2nd slot holds the Media Resource card, slots 3 and 4 are used for other interface cards such as the digital base stations. Both the CPU card and the Media Resource card needs an ethernet connection, and its own IP address in the system.
Contents
Configuration of AlphaCom XE
Configuration of the AlphaCom XE depends on the software version in the AMC-IP board. You can find the latest versions on our downloads page.
Also see: SIP phone as station
AMC 10.56 and newer
- AlphaPro software 10.56. or newer is required for the configuration
- From the Users & Stations window in AlphaPro, select a user and enable the 'SIP station' flag
- Configure Directory number and Display text
- Select a supported codec for the SIP station to use
AMC 10.55 and earlier
The AlphaCom E needs to be configured with a SIP registrar node, and must be equipped with license for SIP stations.
Configuration of STENTOFON DECT Server 2500
Getting access to the embedded web server
Before the PC can access the IP Dect Server, the IP address of the PC must be changed to match the same subnet (for example 192.168.0.2). To access the embedded web server of the IP-Dect Server, start your internet browser (e.g. Internet Explorer) and in the address field enter 192.168.0.1. You will be prompted for a username and password.
Default:
- Username: admin
- Password: kws8000
The Service Report page should now be displayed.
CPU Network Configuration
All changes to fields marked with two stars need a reboot to take effect
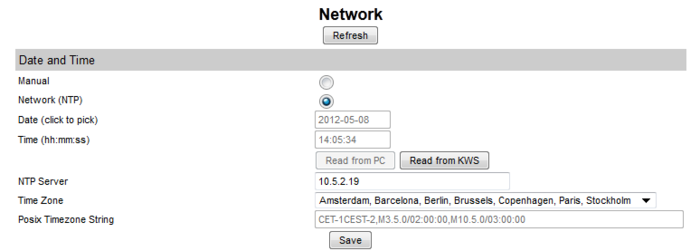
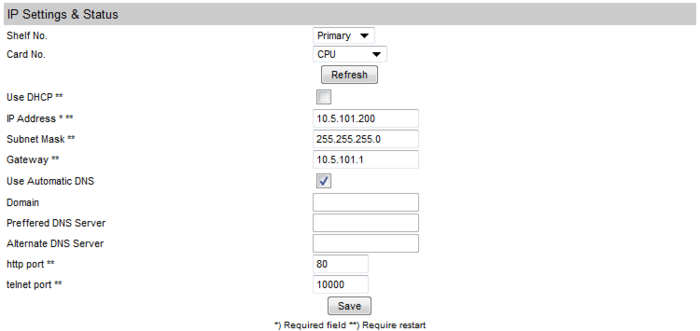
Under the System tab go the Network page where you define IP and NTP settings for the CPU card in the STENTOFON DECT Server 2500.
- Under Date and Time, select Network (NTP) (optional)
- Type in the IP address of the NTP server from which the system will obtain the current time in the NTP Server field (optional)
- From the Time Zone list, select the wanted time zone (optional)
- Under IP Settings & Status select Shelf No. = Primary and Card No. = CPU
- In the IP Address field, type in the IP address of the IP-DECT Server
- In the Subnet Mask field, type in the network mask
- In the Gateway field, type in the IP address of the gateway.
- Click Save
- Click Restart in the top menu
- You need to change your computers IP address to match your new address in the server in order to enter the configuration again
Leave the rest to default settings.
Media Resource Network Configuration
All changes to fields marked with two stars need a reboot to take effect
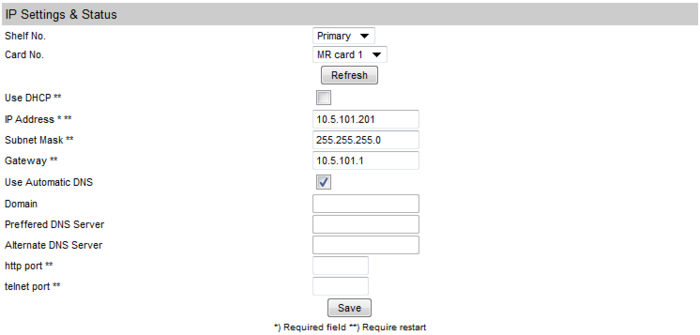
Under the System tab go the Network page where you define IP settings for the Media Resource card in the STENTOFON DECT Server 2500.
- Under IP Settings & Status select Shelf No. = Primary and Card No. = MR card 1
- Click Refresh
- In the IP Address field, type in the IP address of the Media Resource' card
- In the Subnet Mask field, type in the network mask
- In the Gateway field, type in the IP address of the gateway.
- Click Save
- Click Restart in the top menu.
Leave the rest to default settings.
DECT Server 2500 SIP Configuration
All changes to fields marked with two stars need a reboot to take effect
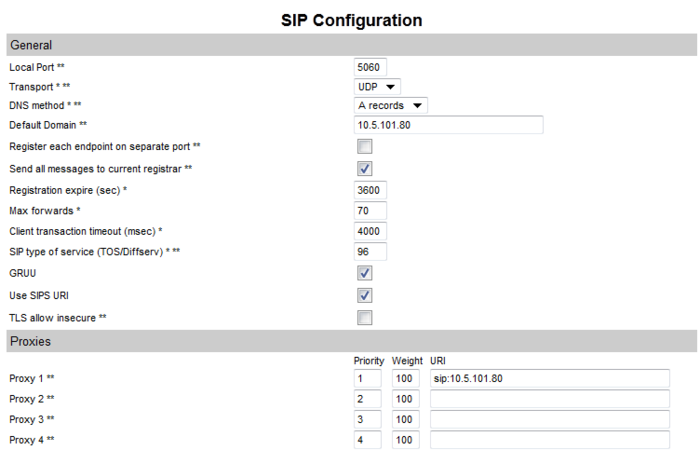
On the SIP Configuration page you define general SIP settings, DTMF signalling, message waiting indication and
media.
- Under General
- In the Local Port field, type the local port number. The default local port number is 5060
- In the Default Domain field, type in the IP address of your AlphaCom
- Under Proxies
- In the URI field for Proxy 1, type in the IP address of your AlphaCom
- Under DTMF signalling
- Select the Send as RTP (RFC2833) check box
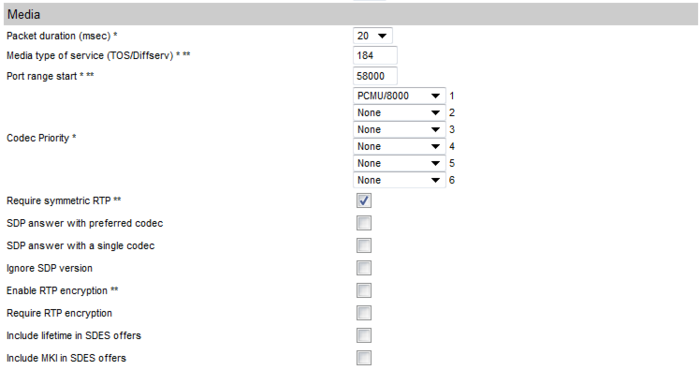
- Under Media
- From the Packet Duration(msec) list, select 20
- In the Codec Priority fields, select PCMU/8000 as choice number 1
- Set the rest to "None"
- Click Save to save your SIP Cconfiguration data
- Go to the System page and click Restart to make all the changes take effect
Leave the rest to default settings
Base Station Configuration
Connecting the Base Stations
Connect all base stations to the Base Station Interface
- In the STENTOFON DECT Server 2500 webserver navigate to Digital Base Stations to ensure that the base stations are online
- It takes approximately 20 seconds before the base stations are online after the are connected
- Click the green V to apply settings to each base station
- Click Reboot all digital base stations
Handset Registration and Subscription
This section provides information about handset registration and subscription. You must register and subscribe a handset before you can use it. When registering handsets you enter information about the handset settings (such as; the handset serial number (IPEI), name etc.) in the system database. When subscribing handsets you subscribe a registered handset to the system for usage. If the handset is not registered in the system database, subscription of the handset is not possible.
Registering IP-DECT Handsets
To register handsets you use the web based Administration Page of the STENTOFON DECT Server 2500.
Each handset in the wireless solution must be programmed with the serial number (IPEI) before it can operate. This serial number must be registered in the web based Administration Page of the DECT Server. Serial numbers are a unique fingerprint of each handset. The serial number is programmed into the handset during the manufacturing process and cannot be changed by field personnel. The serial number can be found on a label beneath the battery or it can be viewed in the handsets display.
- For Rough and EX handsets: press *99984*V
- For Office handsets: press Menu, Status, Firmware version
The Serial number consists of 12 digits.
Log in to the DECT Server 2500 and go to the Users page.
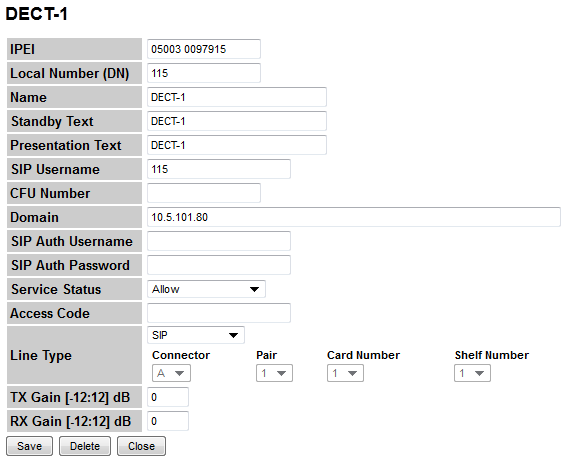
- Click Create New Registration
- IPEI: the IPEI number (serial number) of the handset
- Local Number (DN): the subscriber number the DECT should have in the AlphaCom
- Name: the name of the handset as it appears in the database
- Standby Text: the text that is displayed when the handset is on hook
- Presentation Text: optional text that is sendt to caller
- SIP Username: the subscriber number the DECT should have in the AlphaCom (field available after Line Type is selected)
- Domain: the AlphaCom IP address
- Line Type: set to SIP (makes it possible to type in the SIP Username)
- Click Save to save the registration
- Repeat for all handsets
Leave the rest to default settings.
Subscribing Rough and EX Handsets
- Press MENU - go to MENU LOGIN.
- Press V - go to SUBSCRIPTION CREATE to subscribe to a system.
- Press V. The handset searches for the serial number of the system.
- When the serial number of the system appears in the display, press V.
An antenna symbol appears on the display to indicate a successful subscription. If not, the subscription has failed and the procedure must be retried.
Subscribing Office Handsets
- Press Menu to enter main menu.
- Scroll to Settings and press Select.
- Scroll to Advanced and press Select.
- Scroll to Login and press Select.
- Scroll to Create login and press Select. The handset will start searching for a system (*).
- Scroll to the found system and press Select.
- Press Ok.
*
The search for a system should result in a 11 digit number, the ARI.
The ARI number to the system you are configuring should match the ARI number in th Users page in the STENTOFON DECT Server 2500 webserver.


