MP114/118: Add new tones to the CPT file
From Zenitel Wiki
How to terminate a call on AudioCodes MP114/118 FXO gateways
The PBX doesn't disconnect the call, but instead signals to the gateway that the call is disconnected using one of the following methods:
- Detection of polarity reversal / current disconnect
- This is the recommended method. The call is immediately disconnected after polarity reversal or current disconnect is detected on the Tel side (assuming the PBX / CO produces this signal).
- Relevant parameters: EnableReversalPolarity, EnableCurrentDisconnect, CurrentDisconnectDuration, CurrentDisconnectDefaultThreshold, and TimeToSampleAnalogLineVoltage.
- Detection of Reorder / Busy / Dial tones
- The call is immediately disconnected after Reorder / Busy / Dial tone is detected on the Tel side (assuming the PBX / CO generates this tone). This method requires the correct tone frequencies and cadence to be defined in the Call Progress Tones file. If these frequencies are unknown, define them in the CPT file (the tone produced by the PBX / CO must be recorded and its frequencies analyzed). This method is slightly less reliable than the previous one. The procedure how to #Add a tone to the Call Progress Tone file is described below.
- Relevant parameters: DisconnectOnBusyTone and DisconnectOnDialTone.
- A special DTMF code
- A digit pattern that when received from the Tel side, indicates to the gateway to disconnect the call.
- Relevant ini file parameter: TelDisconnectCode.
- Detection of silence
- The call is disconnected after silence is detected on both call directions for a specific (configurable) amount of time. The call isn’t disconnected immediately; therefore, this method should only be used as a backup mode.
- Relevant parameters: EnableSilenceDisconnect and FarEndDisconnectSilencePeriod.
Add a tone to the Call Progress Tone file
To add a tone to the CPT file, take these steps:
- Make an external call (using G.711) from an AlphaCom station to an external telephone via the MP114/118 gateway.
- Capture the call using Wireshark.
- Disconnect the call from the PBX side by hanging up the phone, and then wait approximately 30 seconds before stopping the Wireshark recording.
- In the network trace, locate the UDP stream sent from the MP114/118, and force its decoding as RTP. Analyze menu >> Decode As... >> In the Transport tab, select RTP.
- In the network trace, locate the RTP stream sent from the MP114/118.
- Save the RTP payload on your PC as a *.pcm file. Telephony menu > RTP > Stream Analysis... > Save Payload. Select:
- Channels = ‘forward’ option (gives you the audio from the gateway)
- Format = .au
- The file name must be stored with the extension *.pcm
- Open the *.pcm file in a voice recording utility such as Audacity or CoolEdit.
- Locate the tone that the PBX played to indicate the disconnected call (if such a tone exists).
- Locate the attributes of the tone -- its frequency and interval (on / off time).
- Open the Call Progress Tones ini file in a text editor (e.g. Notepad), and add the new tone at the end of the file with the attributes you found in the previous step. Ensure that you update the numbers of the successive tones and the total number of tones in the beginning of the file.
- Create a Call Progress Tones.dat file using the DConvert Utility, see procedure below.
- Load the new file to the gateway, and then reset the gateway.
Converting a CPT ini File to a Binary dat File
The procedure below describes how to convert a Call Progress Tones (CPT) ini file to a binary *.dat file, using the TrunkPack Downloadable Conversion Utility(DConvert). The DConvert software is coming with the MP114/118, or it can be downloaded from the download site. For detailed information on creating a CPT ini file, refer to Configuring the Call Progress Tones and Distinctive Ringing File in the device's User's Manual.
To convert a CPT ini file to a binary dat file, take these 10 steps:
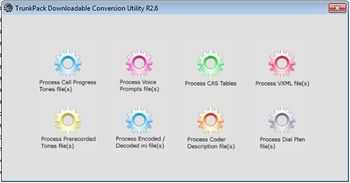
- Start the TrunkPack Downloadable Conversion Utility (DConvert.exe); the main window opens
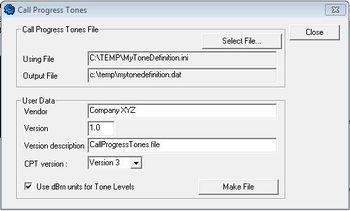
- Click the Process Call Progress Tones File(s) button; the 'Call Progress Tones' dialog box opens
- Under the 'Call Progress Tones File' group, click the Select File button.
- Navigate to the folder that contains the CPT ini file that you want to convert.
- Select the ini file, and then click the Open button; the name and path of both the ini file and the (output) dat file appears in the fields below the Select File button.
- Under the 'User Data' group, enter and perform the following:
- In the 'Vendor' field, enter the vendor's name (maximum length is 256 characters).
- In the 'Version' field, enter the version number. The format is composed of two integers separated by a period '.' (e.g., 1.2, 23.4, 5.22)/
- In the 'Version Description' field, enter a brief description of this file. The maximum length is 256 characters.
- The default value of the 'CPT Version' drop-down list is Version 3. Perform one of the following:
- If the software version you are using is prior to version 4.4, select Version 1 (to maintain backward compatibility).
- If the software version you are using is 4.4, select Version 2.
- Otherwise, leave the value at its default.
- Select the 'Use dBm units for Tone Levels' check box. Note that the levels of the call progress tones (in the CPT file) must be in -dBm units.
- Click the Make File button; the file is created and a message box is displayed when successfully complete.
- Close the application.


