Difference between revisions of "SNOM IP Phone"
From Zenitel Wiki
(→SNOM IP Phones) |
|||
| Line 1: | Line 1: | ||
| − | |||
The video image of the IP Video Door Station can be displayed on a Snom IP phone display. Following possibilities can be realized: | The video image of the IP Video Door Station can be displayed on a Snom IP phone display. Following possibilities can be realized: | ||
* '''Pop up video image'''. The video image of IP Video Door Station is shown automatically on an incoming call and end automatically when the communication is finished. | * '''Pop up video image'''. The video image of IP Video Door Station is shown automatically on an incoming call and end automatically when the communication is finished. | ||
| Line 11: | Line 10: | ||
'''Note:''' We do not recommend using newer beta versions like 8.7.5.10, 8.7.5.12 or 8.7.5.13 as they have known issues with the video handling. | '''Note:''' We do not recommend using newer beta versions like 8.7.5.10, 8.7.5.12 or 8.7.5.13 as they have known issues with the video handling. | ||
| − | + | == AlphaCom configuration == | |
The Snom phone must be configured as a SIP User in AlphaPro, '''Users & Stations'''. See article [[SIP phone as station]] for details. | The Snom phone must be configured as a SIP User in AlphaPro, '''Users & Stations'''. See article [[SIP phone as station]] for details. | ||
| − | + | == Firmware update of Snom phone== | |
The firmware of the Snom phone must be uploaded using a TFTP server. Upgrade procedure: | The firmware of the Snom phone must be uploaded using a TFTP server. Upgrade procedure: | ||
| Line 26: | Line 25: | ||
<br style="clear:both;" /> | <br style="clear:both;" /> | ||
| − | + | == Network and SIP account in Snom phone == | |
Factory default of the phone is done from the phones keyboard by pressing: | Factory default of the phone is done from the phones keyboard by pressing: | ||
* The button Menu | * The button Menu | ||
| Line 46: | Line 45: | ||
IP settings are changed in '''Advanced''' -> '''Network'''. | IP settings are changed in '''Advanced''' -> '''Network'''. | ||
| − | + | == Codec settings == | |
Codec must be changed to G.711u-law (pcmu) and the internal "telphone event". | Codec must be changed to G.711u-law (pcmu) and the internal "telphone event". | ||
| Line 53: | Line 52: | ||
<br style="clear:both;" /> | <br style="clear:both;" /> | ||
| − | + | == Pop up video image == | |
The screen display in the XML-Mini-Browser of Snom IP phones can be started and ended automatically. The following settings are necessary. | The screen display in the XML-Mini-Browser of Snom IP phones can be started and ended automatically. The following settings are necessary. | ||
| − | + | === Configuration in Snom Phone === | |
Firmware version 8.7.4.5t-SIP-r for the Snom phones 820, 821, 760 is required to get video pop up. | Firmware version 8.7.4.5t-SIP-r for the Snom phones 820, 821, 760 is required to get video pop up. | ||
| Line 89: | Line 88: | ||
| − | + | ===Configuration of the camera === | |
In the camera the authentication for the image/video display has to be deactivated. | In the camera the authentication for the image/video display has to be deactivated. | ||
Log on to the camera (default username: '''admin''', password: '''1234'''). Under '''System Settings'''->'''Network'''->'''System''', change the "''Authentication required for Picture/Video''" to "No". | Log on to the camera (default username: '''admin''', password: '''1234'''). Under '''System Settings'''->'''Network'''->'''System''', change the "''Authentication required for Picture/Video''" to "No". | ||
| Line 107: | Line 106: | ||
<br style="clear:both;" /> | <br style="clear:both;" /> | ||
| − | + | === Operating the Door Opening relay === | |
During conversation with the IP Video Door Station the integrated relay of the door station can be operated by pressing digit 6 on the Snom phone. The Snom phone uses DTMF by RFC2833 by default, which is supported by AlphaCom, so no settings are required in the phone. | During conversation with the IP Video Door Station the integrated relay of the door station can be operated by pressing digit 6 on the Snom phone. The Snom phone uses DTMF by RFC2833 by default, which is supported by AlphaCom, so no settings are required in the phone. | ||
| Line 127: | Line 126: | ||
| − | + | ==Manual video image (Optional) == | |
The video image of the IP Video Door Station in the Snom IP phones can be started and ended manually by pressing a function key. With this feature the video image can be displayed without setting up a conversation. | The video image of the IP Video Door Station in the Snom IP phones can be started and ended manually by pressing a function key. With this feature the video image can be displayed without setting up a conversation. | ||
| − | + | ===Configuration of the Snom phone === | |
In the web interface of the phone, select '''Function Keys''' in the menu, and enter the following parameters: | In the web interface of the phone, select '''Function Keys''' in the menu, and enter the following parameters: | ||
* '''Context''': Active | * '''Context''': Active | ||
| Line 140: | Line 139: | ||
<br style="clear:both;" /> | <br style="clear:both;" /> | ||
| − | + | === How to use === | |
* '''Start video image''': The video image is started by pressing the programmed key. | * '''Start video image''': The video image is started by pressing the programmed key. | ||
| Line 146: | Line 145: | ||
| − | + | === Authentication === | |
If the access of the camera is to be password protected, the following adjustments are necessary. | If the access of the camera is to be password protected, the following adjustments are necessary. | ||
Revision as of 13:10, 27 November 2014
The video image of the IP Video Door Station can be displayed on a Snom IP phone display. Following possibilities can be realized:
- Pop up video image. The video image of IP Video Door Station is shown automatically on an incoming call and end automatically when the communication is finished.
- Manual video image. The video image of the IP Video Door Station can be activated and ended by key press.
Conditions for displaying a video image by an incoming call:
- Compatible Snom phone (models 820, 821, 760)
- Registration on an AlphaCom, PULSE server or SIP-server.
- Snom firmware should be version 8.7.4.8.
Note: We do not recommend using newer beta versions like 8.7.5.10, 8.7.5.12 or 8.7.5.13 as they have known issues with the video handling.
Contents
AlphaCom configuration
The Snom phone must be configured as a SIP User in AlphaPro, Users & Stations. See article SIP phone as station for details.
Firmware update of Snom phone
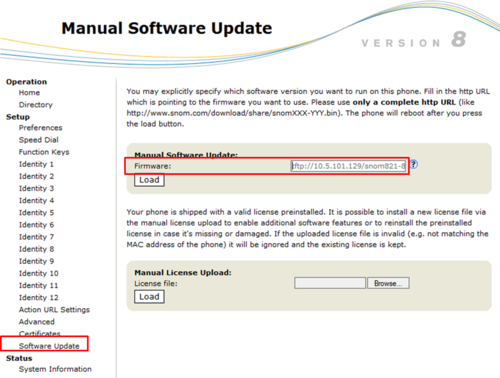
The firmware of the Snom phone must be uploaded using a TFTP server. Upgrade procedure:
- Download the software 8.7.4.5t from the AlphaWiki download site
- Unzip the file. Remember in which folder you stored the file
- Start a TFTP server, and browse to the folder which contains the file
- In the Snom webinterface, select Software Update and enter address tftp://[TFTPServer]/[file name], where [TFTPServer] = IP address of PC running the TFTP server and [file name] is the name of the downloaded .bin file. Example: tftp://10.5.101.129/snom821-8.7.4.5t-SIP-r.bin.
- Select Load, and watch the progress on the display of the Snom phone
Network and SIP account in Snom phone
Factory default of the phone is done from the phones keyboard by pressing:
- The button Menu
- 5 - Maintenance
- 4 - Reset Values
- Enter default password 0000. The phone will restart.
Follow the display setup wizard to set:
- Language
- Time Zone
- Tone scheme
- SIP Account = Directory number in AlphaCom
- Registrar = IP address of AlphaCom
- Select DHCP or enter IP settings of phone
The phone must be rebooted after this.
SIP account settings can be changed in Identity 1 in web access. IP settings are changed in Advanced -> Network.
Codec settings
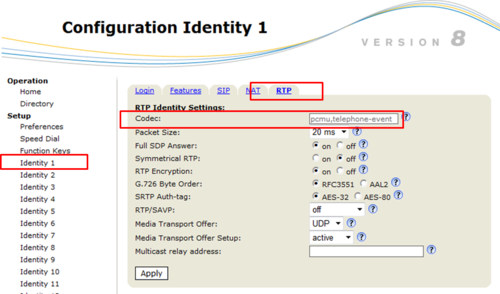
Codec must be changed to G.711u-law (pcmu) and the internal "telphone event".
In Identity 1 -> RTP, set the codec to: "pcmu,telephone-event", remove all other codecs:
Pop up video image
The screen display in the XML-Mini-Browser of Snom IP phones can be started and ended automatically. The following settings are necessary.
Configuration in Snom Phone
Firmware version 8.7.4.5t-SIP-r for the Snom phones 820, 821, 760 is required to get video pop up.
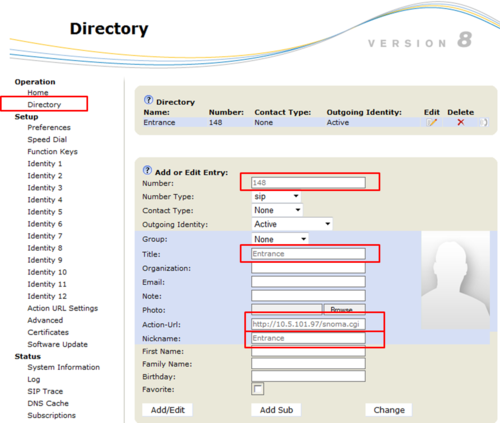
The IP Video Door Station(s) must be defined in the Directory of the Snom phone.
In the web interface of the phone, select Directory in the menu, and enter the following parameters:
- Number: The directory number of the IP Video Door Station, as entered in AlphaPro, Users & Stations.
- Title: Enter any text
- Action URL: http://<IP adress of the camera>/snoma.cgi. For example http://10.5.101.97/snoma.cgi
- Nickname: Enter any text
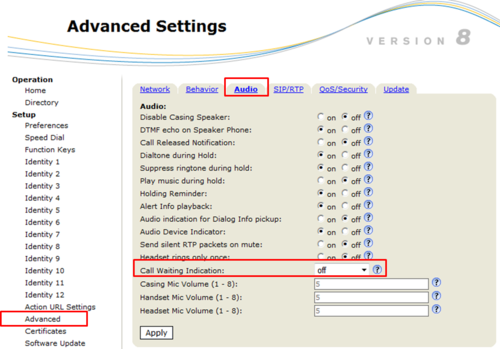
Set "Call Waiting Indication" to "Off":
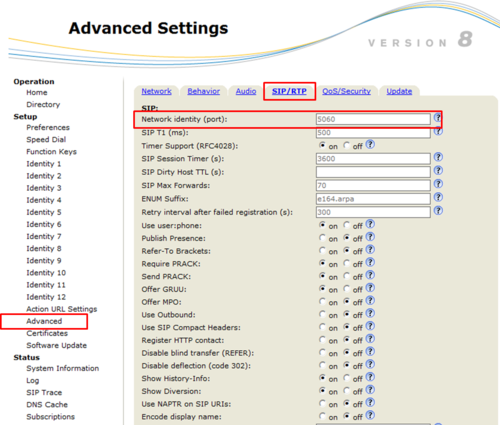
Set SIP port to 5060:
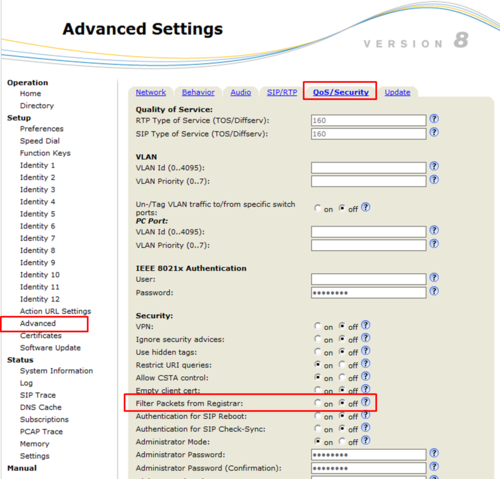
Disable "Filter packets from Registrar":
Configuration of the camera
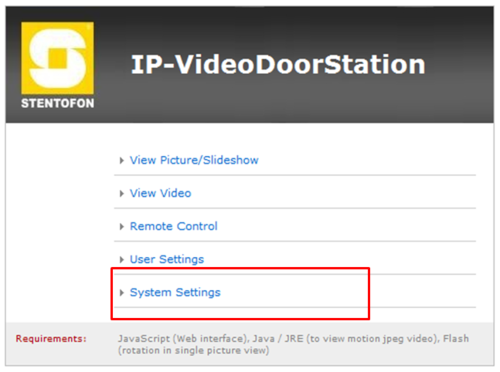
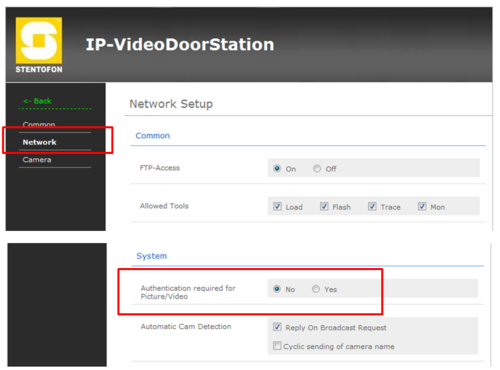
In the camera the authentication for the image/video display has to be deactivated. Log on to the camera (default username: admin, password: 1234). Under System Settings->Network->System, change the "Authentication required for Picture/Video" to "No".
Set the resolution to match the video display of the Snom phone, 320 x 240 pixels:
Operating the Door Opening relay
During conversation with the IP Video Door Station the integrated relay of the door station can be operated by pressing digit 6 on the Snom phone. The Snom phone uses DTMF by RFC2833 by default, which is supported by AlphaCom, so no settings are required in the phone.
In AlphaCom the relay must be mapped to a logical RCO, and an "Door Opening" event created to trigger this RCO.
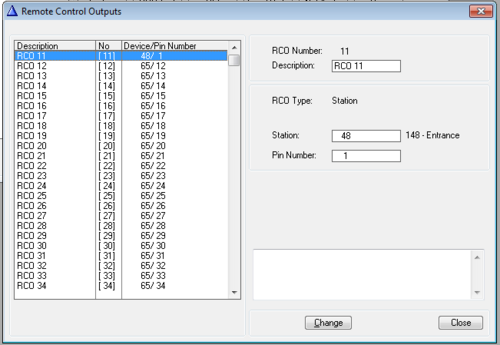
To map a logical RCO to the relay of the IP Station, select Exchange & System -> RCO. Pick a free RCO, select Change and set the RCO Type = Station, enter the physical number of the IP Station, and set pin number = 1. In the example below the relay of IP Video Door station 48 (directory number 148) is mapped to RCO 11.
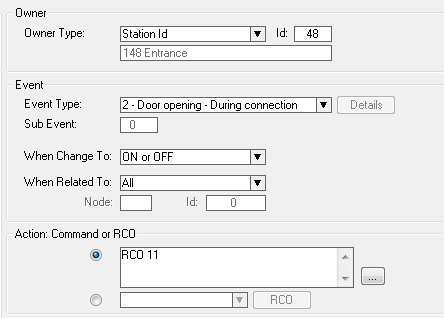
Create a "Door Opening" event with the IP Video Door Station as the event owner. Select Exchange & System -> Events, and Insert a new event with the following properties:
For connection details, see article: IP Station Board Connections and Indications
Manual video image (Optional)
The video image of the IP Video Door Station in the Snom IP phones can be started and ended manually by pressing a function key. With this feature the video image can be displayed without setting up a conversation.
Configuration of the Snom phone
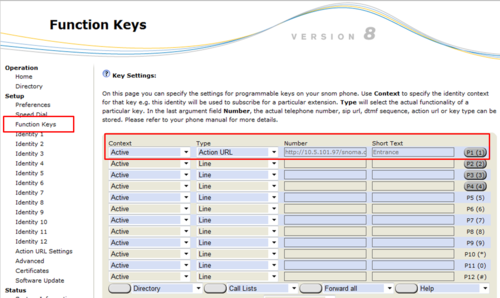
In the web interface of the phone, select Function Keys in the menu, and enter the following parameters:
- Context: Active
- Type: Action URL
- Number: http://<IP adress of the camera>/snoma.cgi. For example http://10.5.101.97/snoma.cgi
- Short text: Enter any text
How to use
- Start video image: The video image is started by pressing the programmed key.
- End video image: The video image is ended by pressing the "X-key".
Authentication
If the access of the camera is to be password protected, the following adjustments are necessary.
Configuration of the Snom phone
In the web interface of the phone, select Function Keys in the menu, and enter the following parameters:
- Context: Active
- Type: Action URL
- Number: http://<User name>:<Password>@<IP adress of the camera>/snoma.cgi. If for example username is "viewer" and the password is "1234", enter http://viewer:1234@10.5.101.97/snoma.cgi
- Short text: Enter any text
Configuration of the camera
In the camera the authentication for the image/video display has to be activated. Under System Settings->Network->System, change the "Authentication required for Picture/Video" to "Yes".

