Silent Alarm: Difference between revisions
From Zenitel Wiki
| Line 242: | Line 242: | ||
<br style="clear:both;" /> | <br style="clear:both;" /> | ||
{{ | {{Code2| | ||
IF %udd(%1.phy) | IF %udd(%1.phy) | ||
$SC L3%2.dir(2) | $SC L3%2.dir(2) | ||
Revision as of 15:35, 31 May 2022
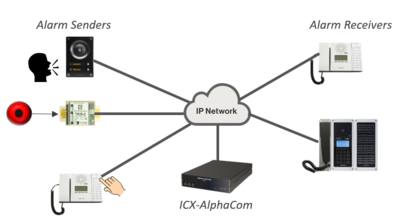 |
| Silent Alarm - principle diagram |
This article describes how to configure a Silent Alarm feature in an ICX-AlphaCom (or AlphaCom XE) system.
The Silent Alarm application can typically be used in:
- Social security offices
- Correctional facilities
- Mental hospitals
An example application is public offices which handles clients that can become threatening. As client handling is confidential, each employee sits alone in his/her office, and a possible attack will not be noticed by co-workers. Each office is equipped with an intercom station, plus an alarm button. When the alarm button is pressed, a special tone signal is heard in neighboring offices, and the these stations will display the alarm senders location, and they can activate a listen-in function.
General operation
- The silent alarm is triggered by pressing an alarm button associated to an Alarm Sender intercom.
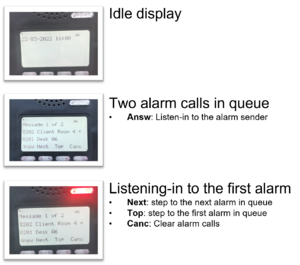
- Alarm Receiver intercoms will play a special tone signal, and display the alarm senders location.
- The Alarm Receiver can then press an "Answ" button. The microphone at the Alarm Sender intercom will then silently be activated, and the Alarm Receiver can listen in. The call LED or back light at the Alarm Sender will not turn on.
- Multiple Alarm Receiver intercoms can listen-in to the same Alarm Sender
- Talkback to the Alarm Sender is possible by pressing the "M-key"
- In case of multiple simultaneous alarms, the alarms will be queued at the Alarm Receiver intercom. The operator can scroll in the queue using "Next" and "Top" buttons, and select which one to listen to. Listen-in will automatically be activated when scrolling to a new alarm sender
- When the situation is under control, the Alarm Receiver station clears his alarm by pressing the "Canc" button.
Alarm Senders
There can be up to 100 Alarm Sender intercoms in one system. The alarm sender can be any Zenitel IP device, typically a
- Desktop intercom,
- A Turbine intercom station, or
- A VoIP kit with microphone and alarm button attached
The Sound Detection feature can also be used to trigger the Silent Alarm.
SIP devices, such as ITSV phones, cannot be used.
Configuration steps:
- The directory numbers of the alarm sender intercoms must be in a specific range
- Each Alarm Sender intercom must be configured as a Default Speaker in a Simplex Conference
- The Alarm Sender intercoms should be member of UDP Group 1. Each Alarm Sender must be linked to a station group, defining who should receive alarm from this Alarm Sender
- Configure the Alarm Button
An "Alarm Sender" may at the same time be an "Alarm Receiver".
Directory numbers of the alarm sender intercoms
There must be a certain relation between the directory numbers of the Alarm Sender intercoms and the directory numbers of the Simplex Conference used by the Alarm Sender. The last two digits must be identical. The directory numbers of the alarm sender intercoms must be in the range 301 - 399. (other number range might be used, but the configuration below assumes that this number range is used).
| Alarm Sender | Simplex Conf. |
| 301 | Conf. 1, 8201 |
| 302 | Conf. 2, 8202 |
| 303 | Conf. 3, 8203 |
| 304 | Conf. 4, 8204 |
Enter directory number 3xx for each of the alarm sender intercoms:
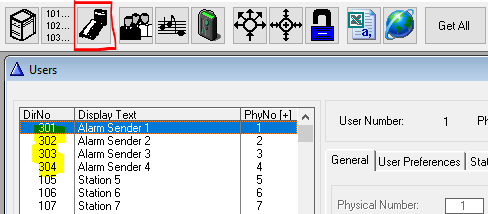 |
| Alarm Sender directory numbers |
Simplex Conference configuration
Configure an Alarm Sender as a Default Speaker in a Simplex Conference:
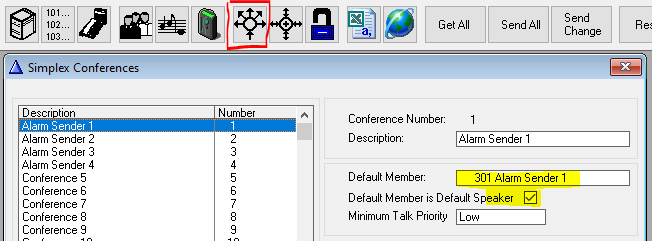 |
| Alarm Sender as Default Speaker in conference |
This must be done for each Alarm Sender station.
The name of the conference will show up in the display of the alarm receivers, hence the conference name should indicate the alarm location:
 |
| The conference name is used to show the alarm location |
UDP Group and Alarm Receiving Group
Include all Alarm Senders in UDP Group 1, and define in the %1.EXP field the alarm receiver group. The same alarm receiver group can be used by several Alarm Senders.
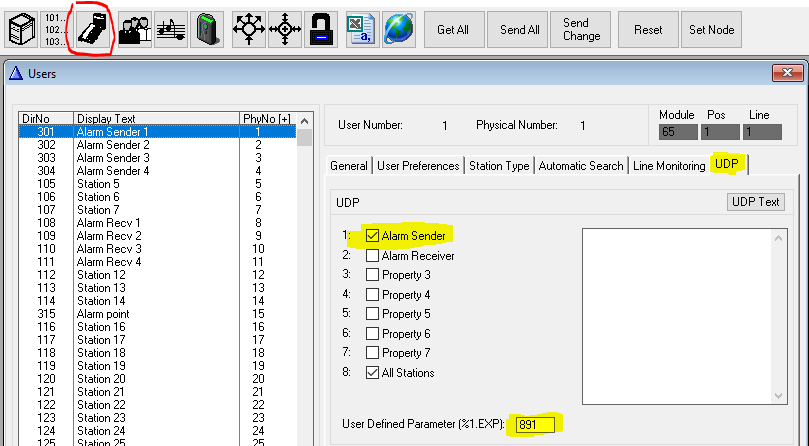 |
| Set UDP 1 membership, and define which group to receive alarms from this alarm sender |
Configure the Alarm Button
Configure the Alarm Button to dial event trigger number 9534 (feature 52). The number 9534 is included in a default database. Add the letter "E" in front of the number. That will ensure alarm triggering even if the alarm sender intercom is busy in a call.
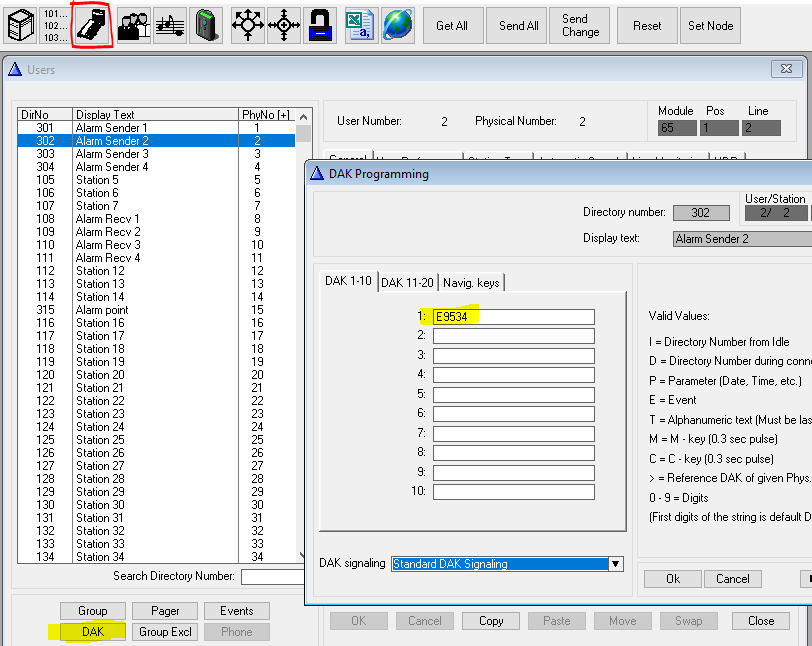 |
| Alarm Button = E9534 |
If the Alarm Sender is a Desktop station, and there is a need for an external alarm button, one can use an input of a TKIS-2 kit, and use the $DIAL_DAK command to simulate DAK press on the Desktop station. E.g. if a Desktop station with number 302 has "E9534" configured on DAK 1, one can trigger this DAK by the command $DIAL_DAK L302 U1.
Alarm Receivers
The alarm Receiver intercom must be a Zenitel IP station with display. Either
- Desktop intercom, or
- IP Flush Master
SIP devices, such as ITSV phones, cannot be used.
Directory numbers and Station Type
The Alarm Receiver stations can use any directory number. Correct display behavior is enabled by setting the Station Type to "CRM":
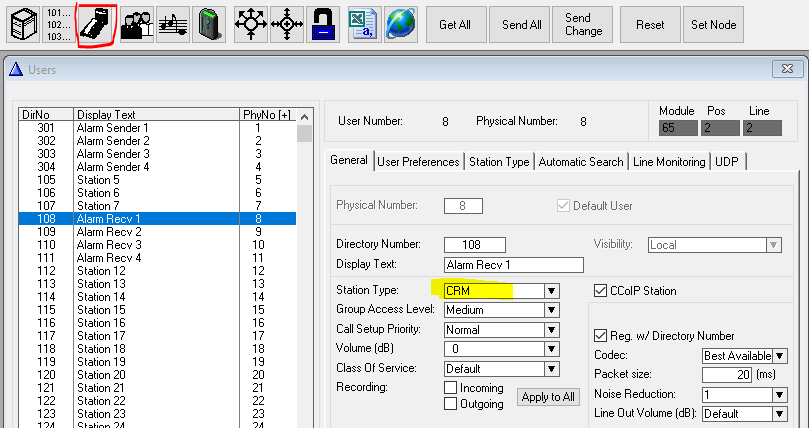 |
| Set "Station Type" to CRM |
When setting the station type to "CRM" the navigation buttons are automatically configured. Two of the default numbers needs to be changed. Enter number 9538 on the first button, and 9533 on the last button.
- 9538 will be the "Answer" button
- 9533 will be the "Cancel" button
The entries on line 2 (7639) and line 3 (7632) must remain.
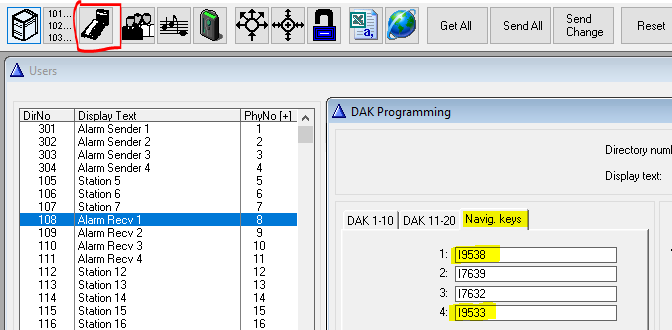 |
| Modifying the Navigation Buttons |
The number 9533 (feature 85) is included in a default database, but number 9538 has to be added to the database. In AlphaPro, select Directory & Features, and Insert a new number:
- Feature: 85
- Directory number: 9538
- Display Text: "Answer Alarm"
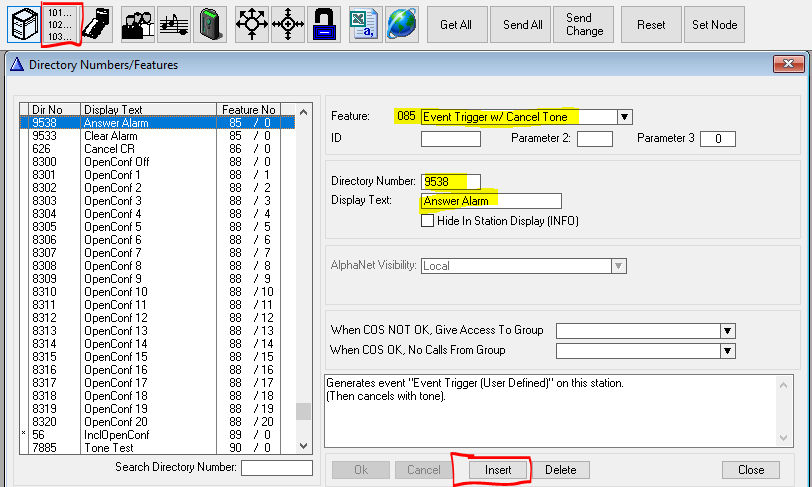 |
| Adding number 9538 to the system |
Membership in Alarm Groups
The Alarm Receiver stations must be included in one or more Alarm Groups. In AlphaPro select Groups > Local Groups, and select the alarm group from the list box. Add Alarm Receivers to the group:
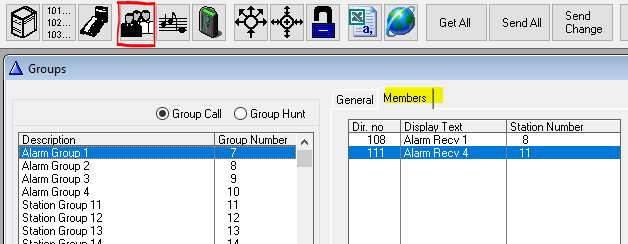 |
| Adding Alarm Receivers to group 891 |
Notification Tone
The Alarm Receivers will get a notification tone when an alarm is received. By default this is a 3 times dut-dut-dut-dut tone, repeated every 20 seconds. Often there will be a need to shorten that 20 second pause. See Urgent feature reminder for more details.
Event Handler configuration
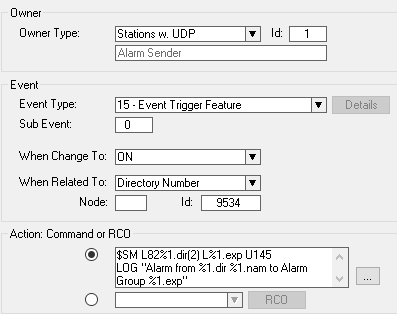
Alarm Button event
This event is triggered when an Alarm Sender station is dialing 9534.
Action commands:
$SM L82%1.dir(2) L%1.exp U145
LOG "Alarm from %1.dir %1.nam to Alarm Group %1.exp"
Explanation:
- When station 3xx dials 9534, Send Mail (Call Request) with the Simplex Conference 82xx as sender, and the alarm group specified in the EXP field as the receiver, using priority 145.
- Send info to the log
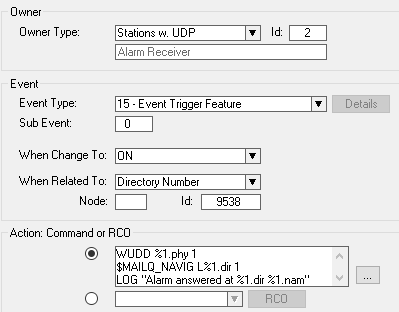
Answer event
This event is triggered when the Alarm Receiver dials 9538 (Answer button).
Action commands:
WUDD %1.phy 1
$MAILQ_NAVIG L%1.dir 1
LOG "Alarm answered at %1.dir %1.nam"
Explanation:
- When an Alarm Receiver dials the "answer" code 9534, set an "answer"-flag (UDD = 1)
- Re-trigger the event "23 - New Current Mail in station queue"
- Send info to the log
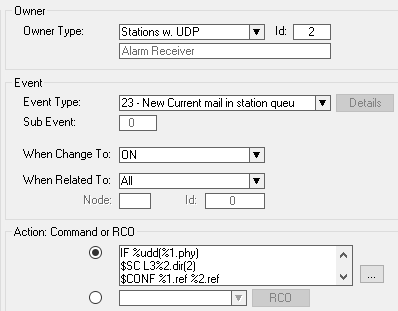
Connect event
This event is triggered when the alarm receiver has "answered" the alarm, and there is an alarm in queue.
Action commands:
IF %udd(%1.phy)
$SC L3%2.dir(2)
$CONF %1.ref %2.ref
LOG "Audio established from %1.dir %1.nam to %2.dir %2.nam"
$CPYM L%1.dir W%2.TAG L%1.dir U20
$DIP L%1.dir "ind stl 2 0"
$DIP L%1.dir "ind stl 0 1"
ENDIF
Explanation: When the Alarm Receiver gets a new "current mail":
- If the Alarm Receiver has answered/accepted the alarm call... ("answer"-flag = 1)
- ..enable "Silent Call" function for alarm sender 3xx. This will prevent LED and backlight to be turned on at the Alarm Sender.
- ..turn on the Simplex Conference related to the alarm sender
- ..send info to the log
- ..copy the mail to itself, but with priority 20. This low priority will stop the notification tone
- ..turn off flashing red LED in Alarm Receiver station, and
- ..turn on steady red LED in Alarm Receiver station
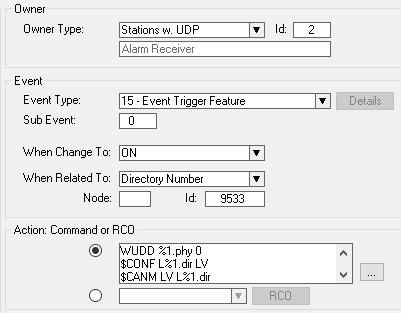
Cancel event
This event is triggered when the Alarm Receiver dials 9533 (Cancel button).
Action commands:
WUDD %1.phy 0
$CONF L%1.dir LV
$CANM LV L%1.dir
$DIP L%1.dir "ind stl 0 0"
LOG "Alarm cleared at %1.dir %1.nam"
Explanation: When the Alarm Receiver dials 9533 (Cancel button):
- Reset the "answer"-flag (UDD = 0)
- Turn off the Simplex Conference at this staion
- Delete all mails in this station
- Turn off steady red LED in this station
- Send info to the log
Logging
With the log events configured above, the log data in the System log will look like this:
Mar 18 15:56:45 AlphaCom1 AlphaLog: N001.D065:.Exch:Alarm from 302 Desk A6 to Alarm Group 891
Mar 18 15:56:51 AlphaCom1 AlphaLog: N001.D065:.Exch:Alarm answered at 109 Operator 4
Mar 18 15:56:51 AlphaCom1 AlphaLog: N001.D065:.Exch:Audio established from 109 Operator 4 to 8202 Desk A6
Mar 18 15:59:56 AlphaCom1 AlphaLog: N001.D065:.Exch:Alarm cleared at 109 Operator 4


