Serial communication - ICX-AlphaCom: Difference between revisions
From Zenitel Wiki
No edit summary |
No edit summary |
||
| (7 intermediate revisions by 2 users not shown) | |||
| Line 1: | Line 1: | ||
{{AI}} | {{AI}} | ||
[[File:NPort ICX Block.PNG|600px|right|thumb|Serial communication using Moxa NPort converter]] | [[File:NPort ICX Block.PNG|600px|right|thumb|Serial communication using Moxa NPort converter]] | ||
In case there is a need for serial communication between the ICX-500 and a remote application, an external Ethernet to Serial Converter is required. | In case there is a need for serial communication between the ICX-500 and a remote application, an external Ethernet to Serial Converter is required. | ||
| Line 8: | Line 6: | ||
This article describes how to use the [https://www.moxa.com/en/products/industrial-edge-connectivity/serial-device-servers/general-device-servers/nport-5200-series/nport-5230 Ethernet to Serial Converter NPort 5230 from Moxa] to achieve serial communication with the ICX-500. | This article describes how to use the [https://www.moxa.com/en/products/industrial-edge-connectivity/serial-device-servers/general-device-servers/nport-5200-series/nport-5230 Ethernet to Serial Converter NPort 5230 from Moxa] to achieve serial communication with the ICX-500. | ||
{{note|This article is also applicable to AlphaCom XE systems}} | {{note| | ||
==Configuration of the ICX-500== | * ''This article is also applicable to AlphaCom XE systems'' | ||
* ''The serial (RS232) port available on the ICX-500 is a console port used for debugging purposes only, and cannot be used for any applications}} | |||
== Configure for serial port based communication == | |||
=== License requirements === | |||
The ICX-500 requires the ILI-IF Interface Enabling License (P/N 1002602400) to enable serial port based communication. The ILI-API Licenses contain the ILI-IF license. | |||
===Configuration of the ICX-500=== | |||
In AlphaPro, [[Exchange_%26_System_(AlphaPro)#Serial_Ports|Exchange & System > Serial Ports]]: | In AlphaPro, [[Exchange_%26_System_(AlphaPro)#Serial_Ports|Exchange & System > Serial Ports]]: | ||
# | #From the list box select the Driver/protocol you want to use, and select '''Change'''. | ||
# '''Enable''' the data link, and set "Port Type" = '''TCP/IP Client''' | #'''Enable''' the data link, and set "Port Type" = '''TCP/IP Client''' | ||
# Enter the '''IP Address''' of the NPort device, and the TCP '''Port''' number to use for the communication between the ICX-500 and the NPort device. The same TCP port number must also be configured in the NPort device. | #Enter the '''IP Address''' of the NPort device, and the TCP '''Port''' number to use for the communication between the ICX-500 and the NPort device. The same TCP port number must also be configured in the NPort device. | ||
# Enable TCP '''Keep Alive''' to keep the connection established even if there is no traffic on the link | #Enable TCP '''Keep Alive''' to keep the connection established even if there is no traffic on the link | ||
# Enable '''Connect at AlphaCom Startup''' | #Enable '''Connect at AlphaCom Startup''' | ||
IF "ACDP Link" was chosen as driver/protocol, you also need to select "Link Type", "Broadcast | |||
IF "ACDP Link" was chosen as driver/protocol, you also need to select "Link Type", enable "Broadcast" and enter a "Destination" name (free text) | |||
[[File:NPort ICX Serial.PNG|600px|left|thumb|Configuration of data Link]] | [[File:NPort ICX Serial.PNG|600px|left|thumb|Configuration of data Link]] | ||
<br style="clear:both;" /> | <br style="clear:both;" /> | ||
==Configuration of NPort 5230== | ===Configuration of NPort 5230=== | ||
* Install '''NPort Administrator''' on your Windows laptop. Download the setup program from Moxa’s support website (https://www.moxa.com/support/), and run the installation. | |||
* Run NPort Administrator when the installation has been completed. | *Install '''NPort Administrator''' on your Windows laptop. Download the setup program from Moxa’s support website (https://www.moxa.com/support/), and run the installation. | ||
* In NPort Administrator, click '''Search''' to search your LAN for NPort devices. When your NPort unit appears in the search results, you may click Stop to end the search. You may also wait a few more moments for the search to complete. Since the Search function searches by MAC address and not IP address, all NPorts connected to the LAN will be located, regardless of whether or not they are part of the same subnet as your laptop. | *Run NPort Administrator when the installation has been completed. | ||
*In NPort Administrator, click '''Search''' to search your LAN for NPort devices. When your NPort unit appears in the search results, you may click Stop to end the search. You may also wait a few more moments for the search to complete. Since the Search function searches by MAC address and not IP address, all NPorts connected to the LAN will be located, regardless of whether or not they are part of the same subnet as your laptop. | |||
| Line 32: | Line 40: | ||
<br style="clear:both;" /> | <br style="clear:both;" /> | ||
* Before configuring the NPort, you will need to unlock the NPort first. Right-click the unit in the Configuration screen and select '''Unlock''' in the pop-up menu. Enter password '''moxa''' (default). | *Before configuring the NPort, you will need to unlock the NPort first. Right-click the unit in the Configuration screen and select '''Unlock''' in the pop-up menu. Enter password '''moxa''' (default). | ||
[[File:NPort Unlock.PNG|600px|left|thumb|Unlocking the device]] | [[File:NPort Unlock.PNG|600px|left|thumb|Unlocking the device]] | ||
<br style="clear:both;" /> | <br style="clear:both;" /> | ||
* Now right-click your unit in the Configuration screen and select '''Configure''' in the pop-up menu. | *Now right-click your unit in the Configuration screen and select '''Configure''' in the pop-up menu. | ||
* In the Configuration window, select the tab '''Network''', and '''Modify''' the IP address and other network settings as required. | *In the Configuration window, select the tab '''Network''', and '''Modify''' the IP address and other network settings as required. | ||
[[File:NPort Network.PNG|600px|left|thumb|Network settings]] | [[File:NPort Network.PNG|600px|left|thumb|Network settings]] | ||
<br style="clear:both;" /> | <br style="clear:both;" /> | ||
* In the Configuration window, select the tab '''Operating Mode''', enable '''Modify'''. Highlight Port 1 (= RS232) (or Port 2 = RS422/485), and select '''Settings'''. Set ''Operation Mode'' = '''TCP Server Mode''', and select which '''TCP port''' to use for the communication between the ICX-500 and the NPort device. | *In the Configuration window, select the tab '''Operating Mode''', enable '''Modify'''. Highlight Port 1 (= RS232) (or Port 2 = RS422/485), and select '''Settings'''. Set ''Operation Mode'' = '''TCP Server Mode''', and select which '''TCP port''' to use for the communication between the ICX-500 and the NPort device. | ||
[[File:NPort Opmode.PNG|600px|left|thumb|Setting port 1 to TCP Server mode, using TCP port 4001]] | [[File:NPort Opmode.PNG|600px|left|thumb|Setting port 1 to TCP Server mode, using TCP port 4001]] | ||
<br style="clear:both;" /> | <br style="clear:both;" /> | ||
* In the Configuration window, select the tab '''Serial''', enable '''Modify'''. Highlight Port 1 (= RS232) (or Port 2 = RS422/485), and select '''Settings'''. Set the communication parameters are required by the remote application. | *In the Configuration window, select the tab '''Serial''', enable '''Modify'''. Highlight Port 1 (= RS232) (or Port 2 = RS422/485), and select '''Settings'''. Set the communication parameters are required by the remote application. | ||
[[File:NPort Serial.PNG|600px|left|thumb|Setting communication parameters on port 1]] | [[File:NPort Serial.PNG|600px|left|thumb|Setting communication parameters on port 1]] | ||
Latest revision as of 15:20, 23 August 2024
In case there is a need for serial communication between the ICX-500 and a remote application, an external Ethernet to Serial Converter is required.
This article describes how to use the Ethernet to Serial Converter NPort 5230 from Moxa to achieve serial communication with the ICX-500.

|
|
Configure for serial port based communication
License requirements
The ICX-500 requires the ILI-IF Interface Enabling License (P/N 1002602400) to enable serial port based communication. The ILI-API Licenses contain the ILI-IF license.
Configuration of the ICX-500
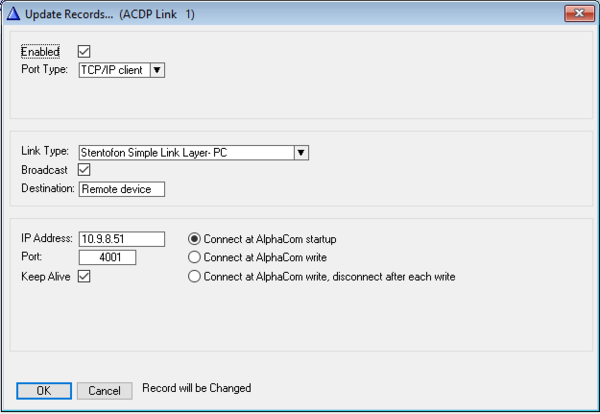
In AlphaPro, Exchange & System > Serial Ports:
- From the list box select the Driver/protocol you want to use, and select Change.
- Enable the data link, and set "Port Type" = TCP/IP Client
- Enter the IP Address of the NPort device, and the TCP Port number to use for the communication between the ICX-500 and the NPort device. The same TCP port number must also be configured in the NPort device.
- Enable TCP Keep Alive to keep the connection established even if there is no traffic on the link
- Enable Connect at AlphaCom Startup
IF "ACDP Link" was chosen as driver/protocol, you also need to select "Link Type", enable "Broadcast" and enter a "Destination" name (free text)
Configuration of NPort 5230
- Install NPort Administrator on your Windows laptop. Download the setup program from Moxa’s support website (https://www.moxa.com/support/), and run the installation.
- Run NPort Administrator when the installation has been completed.
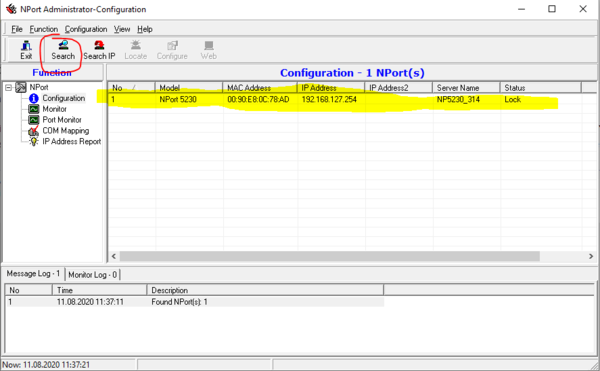
- In NPort Administrator, click Search to search your LAN for NPort devices. When your NPort unit appears in the search results, you may click Stop to end the search. You may also wait a few more moments for the search to complete. Since the Search function searches by MAC address and not IP address, all NPorts connected to the LAN will be located, regardless of whether or not they are part of the same subnet as your laptop.
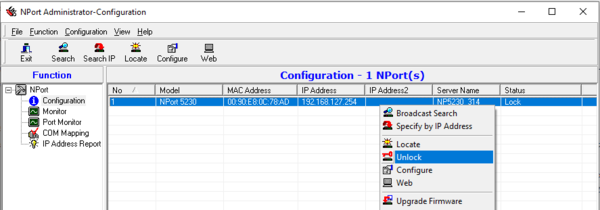
- Before configuring the NPort, you will need to unlock the NPort first. Right-click the unit in the Configuration screen and select Unlock in the pop-up menu. Enter password moxa (default).
- Now right-click your unit in the Configuration screen and select Configure in the pop-up menu.
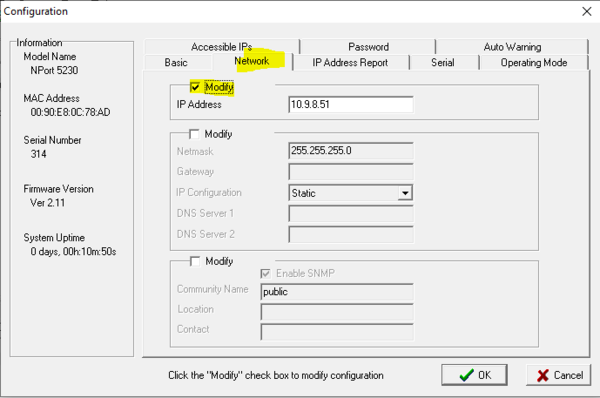
- In the Configuration window, select the tab Network, and Modify the IP address and other network settings as required.
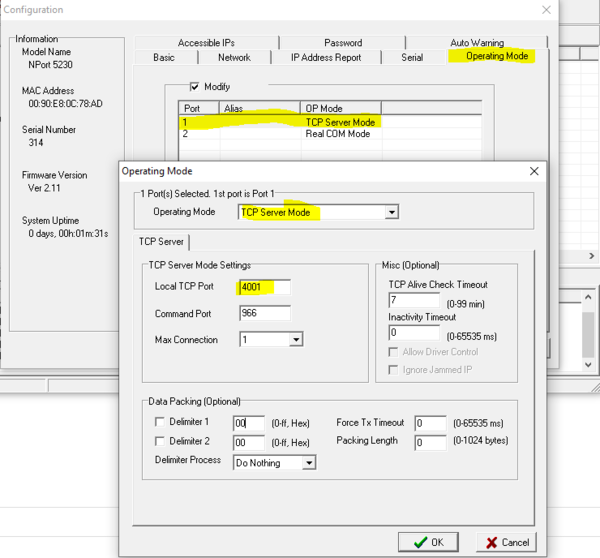
- In the Configuration window, select the tab Operating Mode, enable Modify. Highlight Port 1 (= RS232) (or Port 2 = RS422/485), and select Settings. Set Operation Mode = TCP Server Mode, and select which TCP port to use for the communication between the ICX-500 and the NPort device.
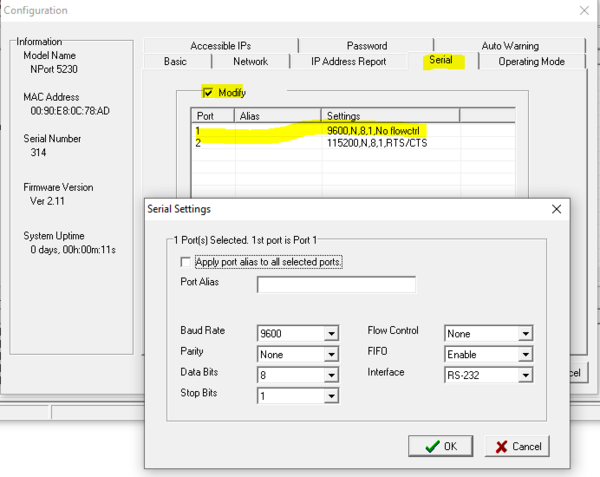
- In the Configuration window, select the tab Serial, enable Modify. Highlight Port 1 (= RS232) (or Port 2 = RS422/485), and select Settings. Set the communication parameters are required by the remote application.


