Difference between revisions of "AudioCodes MP114/118, v4.8 and higher"
From Zenitel Wiki
(→Group Hunt) |
|||
| Line 300: | Line 300: | ||
Directory number 0 must be programmed in the '''AlphaCom directory | Directory number 0 must be programmed in the '''AlphaCom directory | ||
table''' with ''feature 83/<node>''. See [http://10.5.2.54/wiki/index.php/Configuration_guide_for_AudioCodes_MP114/118#Create_Prefix_number Create Prefix Number] | table''' with ''feature 83/<node>''. See [http://10.5.2.54/wiki/index.php/Configuration_guide_for_AudioCodes_MP114/118#Create_Prefix_number Create Prefix Number] | ||
| + | |||
| + | [[image:Configuration guide for AudioCodes MP114 118 - Endpoint Phone Number.jpg|thumb|left|250px|]] | ||
| + | |||
| + | If there are unused lines, leave the fields for that line blank. | ||
| + | |||
| + | ==== FXO Line Select ==== | ||
| + | In installations with different types of equipment connected to the | ||
| + | various FXO lines the user must be able to select which FXO port to | ||
| + | use. On a ship, for instance, there could be a mix of shore lines, GSM | ||
| + | interface and SatCom lines. Line selection is achieved by assigning | ||
| + | each port a '''Phone Number''' in the '''Endpoint Phone Number Table'''. | ||
| + | These directory numbers must be programmed in the AlphaCom | ||
| + | '''directory table''' ''with feature 83/<node>''. See [http://10.5.2.54/wiki/index.php/Configuration_guide_for_AudioCodes_MP114/118#Create_Prefix_number Create Prefix Number] | ||
| + | |||
| + | Replace “0” with four lines, “41” to “44”. | ||
| + | |||
| + | [[image:Configuration guide for AudioCodes MP114 118 - FXO Line Select.jpg|thumb|left|250px|]] | ||
| + | |||
| + | In this table the four FXO lines are selected by dialing 41 – 44 | ||
| + | |||
| + | If there are unused lines, leave all fields for that line blank. | ||
| + | |||
| + | Group hunt is not used in this call mode, and the '''IP to Hunt Routing | ||
| + | Table''' must be empty. | ||
| + | |||
| + | [[image:Configuration guide for AudioCodes MP114 118 - FXO Line Select (2).jpg|thumb|left|250px|]] | ||
| + | |||
| + | === Telephone Network to AlphaCom === | ||
| + | You can choose between three different ways of handling an incoming | ||
| + | call from the telephone line: | ||
| + | |||
| + | * Selective Dialing | ||
| + | * Automatic Dialing | ||
| + | * Delayed Automatic Dialing | ||
| + | |||
| + | ==== Selective Dialing ==== | ||
| + | A second dial tone will be presented when calling in, and the user can | ||
| + | dial the desired intercom number. The fields in the '''Automatic Dialing''' | ||
| + | table must be left blank (Default setting). | ||
| + | ('''Protocol Management > Endpoint Settings > Automatic Dialing'''). | ||
| + | |||
| + | [[image:Configuration guide for AudioCodes MP114 118 - Selective Dialing.jpg|thumb|left|250px|]] | ||
| + | |||
| + | In this mode the gateway collects digits from the line, and sets up the | ||
| + | call towards the AlphaCom when a predefined number of digits are | ||
| + | collected and no more digits are received within a preset time (default 4 | ||
| + | seconds), or when the ‘#’ key is dialed. | ||
| + | In Protocol Management > Protocol Definition > DTMF & Dialing, | ||
| + | set Max Digits In Phone Num equal to the number of digits used on the | ||
| + | AlphaCom stations, normally 3 or 4. The parameter Inter Digit Timeout | ||
| + | specifies the waiting time for more digits before setting up the call. | ||
Revision as of 12:18, 5 July 2007
Config guide SIP Gateway - AudioCodes MP114/118 here
Contents
AlphaCom Configuration
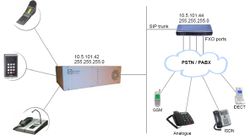
The configuration of AlphaCom E with SIP gateway includes the following steps:
Using AlphaWeb
- Assign IP address to the AlphaCom Ethernet port
- Insert SIP Trunk licenses
- Firewall (filter) settings
Using AlphaPro
- Create a SIP Trunk Node
- Create AlphaCom / SIP Audio links
- Define the AlphaCom / SIP routing
- Create prefix numbers
- Update the exchange
AlphaWeb Configuration
Assign IP address to the AlphaCom E Ethernet port(s)
Log on to AlphaWeb and enter a valid IP address on the Ethernet port. In the example below, Ethernet port 1 is used. Consult your network administrator to obtain the IP address.
Insert SIP Trunk licenses
Log on to AlphaWeb and install the SIP Trunk license.
Firewall (filter) settings
Enable the SIP protocol on the desired Ethernet port (default enabled for Ethernet port1).
AlphaPro Configuration
Create a SIP Trunk Node
From the AlphaPro main menu, use the ‘+’ button next to the ‘Select Exchange’ dropdown list to create a new exchange. The exchange type must be set to ‘SIP Node’.
Set the parameters as follows:
The SIP Trunk IP address must be identical to the IP address of the SIP Gateway.
Note: If the AlphaCom is configured with a SIP Registar node in addition to the SIP Trunk node, the SIP Registar node must have a lower node number than the SIP Trunk node.
Create AlphaCom/SIP Audion links
This paragraph is only relevant for AMC software 10.04 or earlier.
From AMC 10.05 the audio links are assigned dynamically whenever needed, and there is no need to specify the links in AlphaPro. Proceed Define the AlphaCom / SIP routing.
However, if you want to reserve VoIP channels for the SIP Gateway, you can do so by following the description below.
In Exchange & System > NetAudio use the Insert button to create one or several audio (VoIP) links between the AlphaCom and the SIP Gateway. The physical number specifies the VoIP channel and must be in the range 605 – 634 (start with 605). Normally the number of audio links will be equal to the number of phone lines connected to the SIP Gateway.
Define the AlphaCom / SIP routing
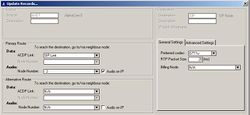
In Exchange & System > Net Routing use the Insert button to create a route between the AlphaCom and SIP Gateway. Set Preferred codec to G711u and RTP Packet Size to 10 ms.
Create Prefix number
The directory number (prefix) used to access the telephone line must be programmed in the AlphaCom directory table with feature 83 and Node = SIP Trunk node number (100 in this example). In the example below the default directory number 0 has been modified to be used as a prefix.
Update the exchange
Log on to the exchange and update the exchange by pressing the SendAll button.
AudioCodes MP-144/118 Configuration
Configure Network Parameters
The AudioCodes MP-114/118 VoIP Gateway comes with default network parameters (factory default parameters).
Before you can set up the gateway in the network, you have to change the default IP address to a fixed IP address in your network environment. The unit is configured from a web browser, e.g. Internet Explorer or Navigator. Consult the network administrator to get the correct IP address.
Follow these steps:
Load factory network parameters and reset the username and password to its default settings (username: Admin, password: Admin) by pressing the reset button at the rear of the AudioCodes MP-114/118 unit for minimum 6 seconds.
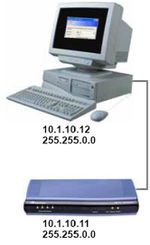
- The VoIP Gateway will now get the IP address 10.1.10.11, submask
255.255.0.0.
Change the IP address of your PC to 10.1.10.12, submask 255.255.0.0.
Connect the LAN port of the PC to the Ethernet port of the Gateway. Use a crossed cable or connect the PC and the VoIP Gateway to a common switch using straight cables.
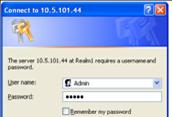
Start your Web Browser and type '''http://10.1.10.11''' in the URL field.
Type in user name Admin and password Admin. (Case-sensitive!)
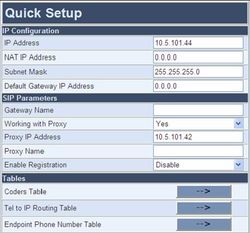
The ‘Quick Setup’ screen opens.
IP Configuration Enter the IP Address and Subnet Mask of the AudioCodes Gateway. This IP address must be identical to the IP address of the SIP Trunk Node created in AlphaPro. The NAT IP Address and Default Gateway IP Address are set to 0.0.0.0
SIP Parameters Set Working with Proxy to Yes. Enter the IP address of the AlphaCom in the Proxy IP Address field. Set Enable Registration to Disable. Leave Gateway Name and Proxy Name blank.
Click Reset button and OK button to apply the changes.
Disconnect the PC from the Gateway.
Reconnect the Gateway and PC to the LAN. The PC and Gateway must be on the same sub-net.
Restore the PC’s IP address and subnet mask to what they originally
were, and re-access the Gateway using the new assigned IP address.
Audio Codec
In the Quick Setup screen, select Coders Table. Choose G.711U-law codec, 10 ms packet size and silence suppression Disabled.
- Press Submit to save changes.
About Saving Changes
The Submit button will save the data to the running volatile memory. The changes take effect on-the-fly. The changes will not survive hardware reset or power off.
To permanently save the configuration data, store the data to flash memory by selecting the Save Configuration from the main menu.
Note: Parameters proceeded by an exclamation mark (!) is not changeable on-the-fly and require that the device is reset.
Backup and Restore =
The configuration of the AudioCodes Gateway can be stored to a file on your PC.
Use the Configuration File menu to store or restore the configuration (Advanced Configuration > Configuration File).
AlphaCom to Telephone Network
There are two ways of selecting a FXO line from the AlphaCom.
- Group Hunt, where a prefix is dialed and you are connected to one
out of several lines
- Direct FXO line selection, where there is one prefix assigned for
each of the FXO lines. Both methods can be combined.
Group Hunt
Dial a prefix and get connected to a free FXO line.
Hunt Group Settings
In the Hunt Group Settings, specify a Hunt Group ID = 1,
In Channel Select Mode, select Cyclic Ascending. (Protocol Management > Hunt Group Settings).
IP to Hunt Group Routing
When dialing the prefix from AlphaCom, the call needs to be routed to the right Hunt Group.
In the example below the call is routed to group hunt ID 1. (Protocol Management > Routing Tables > IP to Hunt Group Routing).
Endpoint Phone Number In the Endpoint Phone Number Table the FXO lines are linked to the prefix in AlphaCom and to the hunt group ID. Protocol Management > Endpoint Phone Numbers).
In the example below all four FXO lines belong to Hunt Group ID 1. When dialing 0 on a station the first available line will be granted. Directory number 0 must be programmed in the AlphaCom directory table with feature 83/<node>. See Create Prefix Number
If there are unused lines, leave the fields for that line blank.
FXO Line Select
In installations with different types of equipment connected to the various FXO lines the user must be able to select which FXO port to use. On a ship, for instance, there could be a mix of shore lines, GSM interface and SatCom lines. Line selection is achieved by assigning each port a Phone Number in the Endpoint Phone Number Table. These directory numbers must be programmed in the AlphaCom directory table with feature 83/<node>. See Create Prefix Number
Replace “0” with four lines, “41” to “44”.
In this table the four FXO lines are selected by dialing 41 – 44
If there are unused lines, leave all fields for that line blank.
Group hunt is not used in this call mode, and the IP to Hunt Routing Table must be empty.
Telephone Network to AlphaCom
You can choose between three different ways of handling an incoming call from the telephone line:
- Selective Dialing
- Automatic Dialing
- Delayed Automatic Dialing
Selective Dialing
A second dial tone will be presented when calling in, and the user can dial the desired intercom number. The fields in the Automatic Dialing table must be left blank (Default setting). (Protocol Management > Endpoint Settings > Automatic Dialing).
In this mode the gateway collects digits from the line, and sets up the call towards the AlphaCom when a predefined number of digits are collected and no more digits are received within a preset time (default 4 seconds), or when the ‘#’ key is dialed. In Protocol Management > Protocol Definition > DTMF & Dialing, set Max Digits In Phone Num equal to the number of digits used on the AlphaCom stations, normally 3 or 4. The parameter Inter Digit Timeout specifies the waiting time for more digits before setting up the call.

