Mediatrix 1204: Difference between revisions
From Zenitel Wiki
| Line 178: | Line 178: | ||
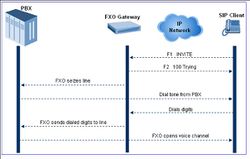
Two-stage dialing is when the AlphaCom station is required to first dial a prefix to access the the FXO gateway, and after receiving a dial tone from the PBX (via the FXO gateway), dials the destination telephone number. | Two-stage dialing is when the AlphaCom station is required to first dial a prefix to access the the FXO gateway, and after receiving a dial tone from the PBX (via the FXO gateway), dials the destination telephone number. | ||
[[image:Configuration guide for Mediatrix 1204 - Two Stage Dialing.jpg|thumb| | [[image:Configuration guide for Mediatrix 1204 - Two Stage Dialing.jpg|thumb|right|250px|Call flow for Two-Stage dialing]] | ||
<br style="clear:both;" /> | <br style="clear:both;" /> | ||
Revision as of 13:39, 29 August 2007
Configuration from Web Interface
Configure Network Parameters
By default the Mediatrix Gateway is set to automatically obtain IP address and other network parameters from a DHCP server on the network it is connected to.
If you do not want to use a DHCP server, perform a Recovery Mode procedure, as explained below. This will provide the Mediatrix Gateway with a fixed (static) IP address. This way, you know the IP address associated with the unit. The recovery mode does not alter any persistent configuration data of the Mediatrix Gateway.
To trigger the Recovery Mode:
- Connect the LAN port of the PC to the Ethernet port of the Gateway. Use a crossed cable. Alternatively connect the PC and the Gateway to a network switch using straight cables.
- Reconfigure the IP address of your computer to 192.168.0.10 and enter the Subnet Mask of 255.255.255.0.
- Insert a small, unbent paper clip into the Default Settings switch hole located at the rear of the Mediatrix Gateway.
- Hold the Default Settings switch between 5 and 10 seconds – until the LEDs start blinking.
- Release the paper clip.
- The Gateway will now get the IP address 192.168.0.1, submask 255.255.255.0.
Only the Power and Ready LEDs should go on blinking to inform you that the recovery reset has been performed.
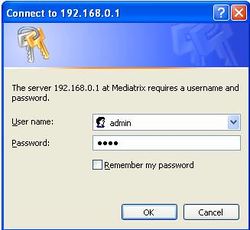
In your web browser’s address field, type the IP address of the Mediatrix Gateway (if you have performed a recovery mode, this is 192.168.0.1). The logon window appears:
Enter the proper user name and password. Default factory values are:
- User Name: admin
- Password: 1234
You have now accessed the Mediatrix Web interface:
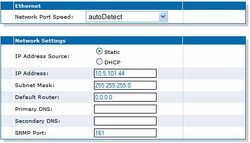
Select Management -> Network Settings and enter the IP Address and Subnet Mask of the Mediatrix Gateway. This IP address must be identical to the IP address of the SIP Trunk Node created in AlphaPro.
Click Submit to store the changes.
Turn off the unit, plug it on the network, and turn it on again. When restarting, the Mediatrix Gateway will not be in Recovery mode and will use the new IP address.
Restore the PC’s IP address and subnet mask to what they originally were, and re-access the Gateway using the new assigned IP address.
About Submitting Changes
When you perform changes in the web interface and click the Submit button, the Mediatrix Gateway validates the changes. A message informs you that the Mediatrix Gateway must be restarted if one or more non-dynamic value was changed. If at least one modified value is invalid, a message informs you that some values are invalid. Most changes are not dynamic and require restarting the Mediatrix Gateway. The Reboot page then opens. You must click Reboot. This restarts the Mediatrix Gateway. If the unit is in use when you click Reboot, all calls are terminated.
SIP Configuration
Select SIP -> Configuration. Configure following parameters:
- SIP Server Source: Static
- SIP Port: 5060
- Proxy Host: AlphaCom IP address
- Proxy Port: 5060
- Outbound Proxy Host: 0.0.0.0
- Outbound Proxy Port: 0
Caller ID
Select SIP -> Configuration. Use the SIP User Configuration table to send display information to the intercom station that receives the call. The number and name configured here will be displayed in AlphaCom stations when receiving calls from the line.
If Caller ID name is detected on the FXO line, this will be used instead of the Caller ID name in the table above.
Codec
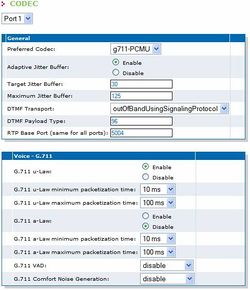
Select Telephony -> CODEC. Here the audio codec parameters are set. Select Port 1, and set the parameters as follows:
If you use more than one FXO port, select Port 2 and set the same codec parameters. Do the same for port 3 and 4.
Country Selection
In the Telephony -> Misc -> Country Selection, select the country in which the Mediatrix Gateway is located. This parameter is set for all the lines of the Mediatrix Gateway. You cannot have a different country for each line.
This choice sets a number of parameters: tones, rings, impedances, line attenuations and the Caller ID detection method from the FXO line.
Configuration from UnitManager
Some configuration is only available from the Mediatrix’ configuration tool – the Unit Manager Network UMN - which is found on the CD coming with the Mediatrix Gateway. Please refer to the "Unit Manager Network Administration Manual" how to install and configure the UMN software on your PC. Once installed, the UMN can manage up to three Mediatrix units without a license key.
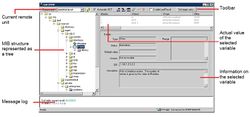
The Edit SNMP window can configure remote Mediatrix units by performing SNMP GET and SNMP SET operations on MIB variables.
To open the Edit SNMP window:
- In the UMN’s left pane, right click the Mediatrix unit to modify.
- Select the Edit SNMP option in the context sensitive menu that opens.
The Edit SNMP window opens
Digit Signaling on SIP
The AlphaCom is using the SIP INFO signaling method for digit signaling between the AlphaCom and the Mediatrix Gateway. The Gateway must be configured to use the same method. The variable sipInteropDtmfTransportMethod must be changed from the UMN:
To select the DTMF transport method over the SIP protocol:
- Locate the mediatrixExperimental branch of the MIB structure
- In sipInteropMIB locate sipInteropDtmfTransportBySipProtocol
- Set the sipInteropDtmfTransportMethod to infoDtmfRelay
Two Stage Dialing
Two-stage dialing is when the AlphaCom station is required to first dial a prefix to access the the FXO gateway, and after receiving a dial tone from the PBX (via the FXO gateway), dials the destination telephone number.
Two-Stage dialing is configured by setting the variable analogScnGwDialEnable = Disable.
In the mediatrixConfig branch of the MIB structure, locate the analogScnGWMIB and open the analogScnGwIfDialingTable. Set the analogScnGwDialEnable = disable for all four lines.
Customized Disconnect Detection
The far end disconnect signal can be detected with a loop current or a far end disconnect tone. The far end disconnect tone is preconfigured by the Country Selection in the web interface (Telephony -> Misc -> Country Selection), however you can customize it in the MIB at:
mediatrixConfig/fxoMIB/fxoForceEndOfCallCustomization/ Change the variable fxoFeocOnToneDetectionMode to custome Tone Then set the 3 following variable to the value of your country setting. fxoEndOfCallToneCustomeFrequency fxoEndOfCallToneCustomeCadence fxoEndOfCallToneCustomeRepetition
Answering Delay
The answering delay is the period the Mediatrix Gateway waits before answering an incoming PSTN call. The default value is 8 seconds if Caller ID is not detected. You might want to shorten this time, for instance to 3 seconds.
To configure the answering delay:
- In the fxoMIB, set the answering delay in the fxoPreAnswerDelay variable. This value is expressed in milliseconds (ms). If the delay expires before the caller ID signal is decoded, the call proceeds without caller ID information.
- The answering on caller ID detection is by default enabled. The fxoAnswerOnCallerIdDetectionEnable variable is set to enable. When enabled, an incoming PSTN call is answered on the first occurrence of either:
- The reception of the caller ID signal.
- The expiration of the delay configured by the fxoPreAnswerDelay variable.
Telephone Network to AlphaCom
You can choose between different ways of handling an incoming call from the telephone line:
- Direct Dial-In
- Selective Dial-In
The automatic call feature of the Mediatrix Gateway is used to define a directory number in the AlphaCom that is automatically dialed when seizing a FXO line.
To set the automatic call feature:
- In the telephonyAttributesMIB, locate telephonyAttributesIfFeaturesTable group. This group contains all of the variables required to set the automatic call feature.
- Define the number to dial when the handset is taken off hook in the telephonyAttributesAutomaticCallTargetAddress variable. This could be:
- Direct dial-in: Enter the Intercom station number (e.g. 101).
- Selective dial-in: Enter an AlphaNet Area Code, feature 81, pointing to own AlphaCom node. (e.g. 54, this is the default area code to node 1). This will give the caller a second dial-tone, and the caller can dial the required intercom number. Because this variable is located in a table, you can define a different number for each line of the Mediatrix Gateway.
3. Enable the automatic call feature by setting the telephonyAttributesAutomaticCallEnable variable to enable. Because this variable is located in a table, you can enable/disable the feature on a per-line basis.

