SIP trunk node - configuration: Difference between revisions
From Zenitel Wiki
| Line 39: | Line 39: | ||
=== Create access numbers === | === Create access numbers === | ||
The | The SIP device can be accessed in three different ways: | ||
* Prefix number: Dial Prefix + Phone number. “Phone number” will be called | * Prefix number: Dial Prefix + Phone number. “Phone number” will be called | ||
* Integrated Prefix number: Dial Prefix + Phone number. The prefix will be included as a part of the called telephone number. | * Integrated Prefix number: Dial Prefix + Phone number. The prefix will be included as a part of the called telephone number. | ||
| Line 47: | Line 47: | ||
The directory number must be programmed in the AlphaCom directory table with ''feature 81'' and '''Node''' = SIP Trunk node number (100 in this example). In the field “Collect N more digits (SIP)” you must enter the maximum number of digits in a phone number. | The directory number must be programmed in the AlphaCom directory table with ''feature 81'' and '''Node''' = SIP Trunk node number (100 in this example). In the field “Collect N more digits (SIP)” you must enter the maximum number of digits in a phone number. | ||
When the prefix is dialed, the AlphaCom will wait for more digits. When the number of digits specified in the “Collect N more digits (SIP)” is collected, a call setup message is sent to the | When the prefix is dialed, the AlphaCom will wait for more digits. When the number of digits specified in the “Collect N more digits (SIP)” is collected, a call setup message is sent to the SIP Device. If fewer digits are entered, the AlphaCom will time out after 4 seconds, and the call setup message will be sent. You can also terminate the digit collection by pressing the M-key. The call setup message will then be sent immediately. | ||
[[Image:Configuration guide for Cisco Call Manager 4.1 - Prefix number.JPG|thumb|right|350px]] | [[Image:Configuration guide for Cisco Call Manager 4.1 - Prefix number.JPG|thumb|right|350px]] | ||
| Line 61: | Line 61: | ||
The directory number must be programmed in the AlphaCom directory table with ''feature 83'' and '''Node''' = SIP Trunk node number (100 in this example). In the field “Collect N more digits (SIP)” you must enter the maximum number of digits in a phone number. | The directory number must be programmed in the AlphaCom directory table with ''feature 83'' and '''Node''' = SIP Trunk node number (100 in this example). In the field “Collect N more digits (SIP)” you must enter the maximum number of digits in a phone number. | ||
When the prefix is dialed, the AlphaCom will wait for further digits. When the number of digits specified in the “Collect N more digits (SIP)” is collected, a call setup message is sent to the | When the prefix is dialed, the AlphaCom will wait for further digits. When the number of digits specified in the “Collect N more digits (SIP)” is collected, a call setup message is sent to the SIP Device. If fewer digits are entered, the AlphaCom will time out after 4 seconds, and the call setup message will be sent. You can also terminate the digit collection by pressing the M-key. The call setup message will then be sent immediately. | ||
[[Image:Configuration guide for Cisco Call Manager 4.1 - Integrated Prefix number.JPG|thumb|right|350px]] | [[Image:Configuration guide for Cisco Call Manager 4.1 - Integrated Prefix number.JPG|thumb|right|350px]] | ||
| Line 75: | Line 75: | ||
The directory number must be programmed in the AlphaCom directory table with ''feature 83'' and '''Node''' = SIP Trunk node number (100 in this example). The field “Collect N more digits (SIP)” must be left blank. | The directory number must be programmed in the AlphaCom directory table with ''feature 83'' and '''Node''' = SIP Trunk node number (100 in this example). The field “Collect N more digits (SIP)” must be left blank. | ||
When the global number is dialed, the AlphaCom will immediately send a call setup message to the | When the global number is dialed, the AlphaCom will immediately send a call setup message to the SIP Device. | ||
[[Image:Configuration guide for Cisco Call Manager 4.1 - Global number.JPG|thumb|right|350px]] | [[Image:Configuration guide for Cisco Call Manager 4.1 - Global number.JPG|thumb|right|350px]] | ||
''In the example to the right the directory number 12345678 is defined as a global number.''<br/> | ''In the example to the right the directory number 12345678 is defined as a global number.''<br/> | ||
When dialing this number a call setup message is sent to the | When dialing this number a call setup message is sent to the SIP Device, instructing it to call this phone number. | ||
<br style="clear:both;" /> | <br style="clear:both;" /> | ||
Revision as of 08:25, 6 April 2011
AlphaWeb Configuration
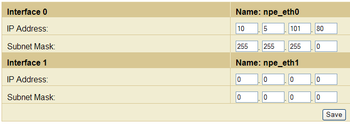
Assign IP address to the AlphaCom E Ethernet Port(s)
Log on to AlphaWeb and enter a valid IP address on the Ethernet port. In the example below, Ethernet port 1 is used. Consult your network administrator to obtain the IP address.
Assign IP routing to the AlphaCom E Ethernet Port(s)
Log on to AlphaWeb and create a default routing. This is essential if the SIP device and ACE are on two different networks.
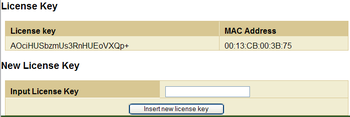
Insert SIP Trunk licenses
Log on to AlphaWeb and install the SIP Trunk License.
Firewall (filter) settings
Enable the SIP protocol on the desired Ethernet port (deafult enabled for Ethernet port1).
AlphaPro Configuration
Create a SIP Trunk Node
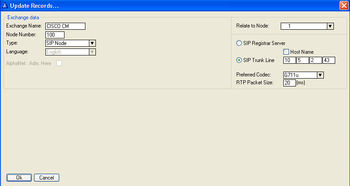
From the AlphaPro main menu, use the ‘+’ button next to the ‘Select Exchange’ dropdown list to create a new exchange. The exchange type must be set to ‘SIP Node’.
Set the parameters as shown in the figure to the right.
The SIP Trunk IP address must be identical to the IP address of the SIP Device.
Define the AlphaCom / SIP routing
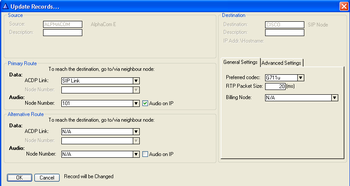
In Exchange & System > Net Routing use the Insert button to create a route between the AlphaCom and the SIP Device.
Set Preferred codec to G711u and RTP Packet Size to 20 ms.
Create access numbers
The SIP device can be accessed in three different ways:
- Prefix number: Dial Prefix + Phone number. “Phone number” will be called
- Integrated Prefix number: Dial Prefix + Phone number. The prefix will be included as a part of the called telephone number.
- Global number: Dial the phone number without using prefix
Prefix number
The directory number must be programmed in the AlphaCom directory table with feature 81 and Node = SIP Trunk node number (100 in this example). In the field “Collect N more digits (SIP)” you must enter the maximum number of digits in a phone number.
When the prefix is dialed, the AlphaCom will wait for more digits. When the number of digits specified in the “Collect N more digits (SIP)” is collected, a call setup message is sent to the SIP Device. If fewer digits are entered, the AlphaCom will time out after 4 seconds, and the call setup message will be sent. You can also terminate the digit collection by pressing the M-key. The call setup message will then be sent immediately.
In the example to the right the directory number 0 is used as a prefix.
Dialing examples:
- 0 + 12345678: Telephone number 12345678 will be called
- 0 + 1234: After a 4 second timeout, telephone number 1234 will be called
- 0 + 1234 + M: Telephone number 1234 will be called
Integrated Prefix number
The directory number must be programmed in the AlphaCom directory table with feature 83 and Node = SIP Trunk node number (100 in this example). In the field “Collect N more digits (SIP)” you must enter the maximum number of digits in a phone number.
When the prefix is dialed, the AlphaCom will wait for further digits. When the number of digits specified in the “Collect N more digits (SIP)” is collected, a call setup message is sent to the SIP Device. If fewer digits are entered, the AlphaCom will time out after 4 seconds, and the call setup message will be sent. You can also terminate the digit collection by pressing the M-key. The call setup message will then be sent immediately.
In the example to the right the directory number 57 is used as a prefix.
Dialing examples:
- 57 + 12345678: Telephone number 5712345678 will be called
- 57 + 1234: After a 4 second timeout, telephone number 571234 will be called
- 57 + 1234 + M: Telephone number 571234 will be called
Global number
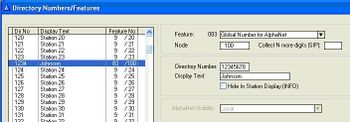
The directory number must be programmed in the AlphaCom directory table with feature 83 and Node = SIP Trunk node number (100 in this example). The field “Collect N more digits (SIP)” must be left blank.
When the global number is dialed, the AlphaCom will immediately send a call setup message to the SIP Device.
In the example to the right the directory number 12345678 is defined as a global number.
When dialing this number a call setup message is sent to the SIP Device, instructing it to call this phone number.
Update the exchange
Log on to the exchange and update the exchange by pressing the SendAll button. Reset the exchange when the transfer is finnished.

