2-3c. SIP trunk with MP114 (solution): Difference between revisions
From Zenitel Wiki
No edit summary |
|||
| (19 intermediate revisions by one other user not shown) | |||
| Line 2: | Line 2: | ||
<br style="clear:both;" /> | <br style="clear:both;" /> | ||
===AlphaWeb Configurations=== | ===AlphaWeb Configurations=== | ||
* Assign IP address 10.1.10.1 to the AlphaCom XE Ethernet port 1 | |||
[[File:2-3c solution.PNG|thumb|left|500px|Setting IP address on ethernet port 1]] | |||
<br style="clear:both;" /> | |||
* Firewall (filter) settings: Verify that the '''SIP protocol''' and '''VoIP Audio''' on the Ethernet port 1 are enabled. | |||
[[File:2-3c solution2.PNG|thumb|left|500px|Enable SIP and VoIP Audio]] | |||
<br style="clear:both;" /> | |||
[[ | |||
Enable | |||
=== AlphaPro Configuration === | === AlphaPro Configuration === | ||
| Line 33: | Line 22: | ||
Set the parameters as follows: | Set the parameters as follows: | ||
[[ | [[File:2-3c solution3.PNG|thumb|left|500px|Create a SIP trunk node]] | ||
<br style="clear:both;" /> | |||
The SIP Trunk IP address must be identical to the IP address of the SIP Gateway. | The SIP Trunk IP address must be identical to the IP address of the SIP Gateway, '''10.1.10.51'''. | ||
==== Define the AlphaCom - SIP Trunk routing ==== | |||
In '''Exchange & System > Net Routing''' use the '''Insert''' button to create a route between the AlphaCom and the SIP Trunking node. Set '''Preferred codec''' to G711u and '''RTP Packet Size''' to 20 ms. | |||
[[File:2-3c solution4.PNG|thumb|left|500px|Define internal routing to the SIP node 100]] | |||
<br style="clear:both;" /> | |||
[[ | |||
====Create Prefix number==== | ====Create Prefix number==== | ||
The directory number (prefix) used to access the telephone line must be programmed in the AlphaCom directory table with feature 83 and Node = SIP Trunk node number (100 in this example) | The directory number (prefix) used to access the telephone line must be programmed in the AlphaCom directory table with feature 83 and Node = SIP Trunk node number (100 in this example). | ||
[[ | [[File:2-3c solution5.PNG|thumb|left|500px|Digit "0" as prefix to access the line]] | ||
<br style="clear:both;" /> | |||
====Update the exchange==== | ====Update the exchange==== | ||
Log on to the exchange and update the exchange by pressing the SendAll button. Reset the exchange after the send operation is finished. | Log on to the exchange and update the exchange by pressing the '''SendAll''' button. '''Reset''' the exchange after the send operation is finished. | ||
<br><br><br><br> | <br><br><br><br> | ||
| Line 61: | Line 51: | ||
===Related articles === | ===Related articles === | ||
* [[2-3c. SIP trunk with MP114 (practice)]] | * [[2-3c. SIP trunk with MP114 (practice)]] | ||
[[Category: AlphaCom practice]] | |||
Latest revision as of 09:07, 30 June 2022
AlphaWeb Configurations
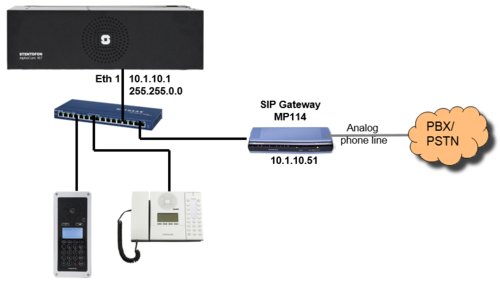
- Assign IP address 10.1.10.1 to the AlphaCom XE Ethernet port 1
- Firewall (filter) settings: Verify that the SIP protocol and VoIP Audio on the Ethernet port 1 are enabled.
AlphaPro Configuration
Create a SIP Trunk Node
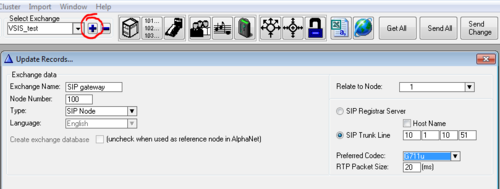
From the AlphaPro main menu, use the ‘+’ button next to the ‘Select Exchange’ dropdown list to create a new exchange. The exchange type must be set to ‘SIP Node’.
Set the parameters as follows:
The SIP Trunk IP address must be identical to the IP address of the SIP Gateway, 10.1.10.51.
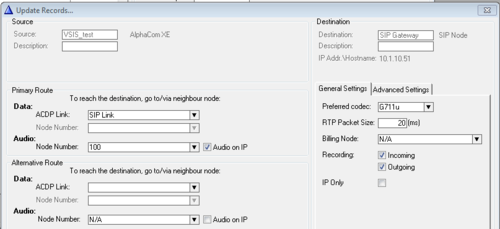
Define the AlphaCom - SIP Trunk routing
In Exchange & System > Net Routing use the Insert button to create a route between the AlphaCom and the SIP Trunking node. Set Preferred codec to G711u and RTP Packet Size to 20 ms.
Create Prefix number
The directory number (prefix) used to access the telephone line must be programmed in the AlphaCom directory table with feature 83 and Node = SIP Trunk node number (100 in this example).
Update the exchange
Log on to the exchange and update the exchange by pressing the SendAll button. Reset the exchange after the send operation is finished.


