IP School Intercom Station Restore Factory Defaults: Difference between revisions
From Zenitel Wiki
(Created page with "An IP Station may have to be reset to its original factory default settings if, for instance, the password to the webserver is forgotten. The defaults can be either be set to...") |
No edit summary |
||
| (8 intermediate revisions by 2 users not shown) | |||
| Line 1: | Line 1: | ||
{{APS}} | |||
{{note|This procedure is applicable for the [[School IP Intercom - 1402001000]].}} | |||
This procedure is | |||
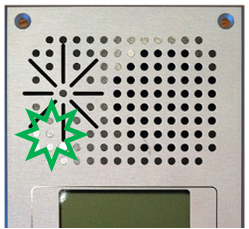
[[File:SchoolIndications1.png|right|300px]] | [[File:SchoolIndications1.png|right|300px]] | ||
'''Procedure:'''<br> | |||
This procedure will load factory defalt settings in the station. The unit can be set to use either '''Static IP''' or '''DHCP'''. | |||
# While pressing the '''emergency button''', power up the station and keep the button pressed. | |||
# Release the button '''after exactly 2 flashes''' of the LED. | |||
# Let the LED flash for '''exactly 2 more times''' (Static IP) or '''exactly 4 more times''' (DHCP), then press the button again. | |||
# Keep the button pressed until the LED '''flashes fast 2 time'''s (Static IP) or '''flashes fast 4 times''' (DHCP) indicating a successful reset. | |||
# Release the button and the station will restart with the factory default settings. | |||
'''Factory default values:''' | |||
*Station Mode: '''Pulse''' | |||
*Station IP address: '''169.254.1.100''' (Static) or '''DHCP''' | |||
*Username: '''admin''' | |||
*Password: '''alphaadmin''' | |||
[[Category: INCA - Restore Factory Defaults and Software Upgrade]] | [[Category: INCA - Restore Factory Defaults and Software Upgrade]] | ||
Latest revision as of 16:24, 31 January 2023

|
This procedure is applicable for the School IP Intercom - 1402001000. |
Procedure:
This procedure will load factory defalt settings in the station. The unit can be set to use either Static IP or DHCP.
- While pressing the emergency button, power up the station and keep the button pressed.
- Release the button after exactly 2 flashes of the LED.
- Let the LED flash for exactly 2 more times (Static IP) or exactly 4 more times (DHCP), then press the button again.
- Keep the button pressed until the LED flashes fast 2 times (Static IP) or flashes fast 4 times (DHCP) indicating a successful reset.
- Release the button and the station will restart with the factory default settings.
Factory default values:
- Station Mode: Pulse
- Station IP address: 169.254.1.100 (Static) or DHCP
- Username: admin
- Password: alphaadmin


