Difference between revisions of "SDS-1"
From Zenitel Wiki
(→Related information) |
Kastorsand (talk | contribs) |
||
| (13 intermediate revisions by 4 users not shown) | |||
| Line 1: | Line 1: | ||
| − | {{ | + | {{AEIPS}} |
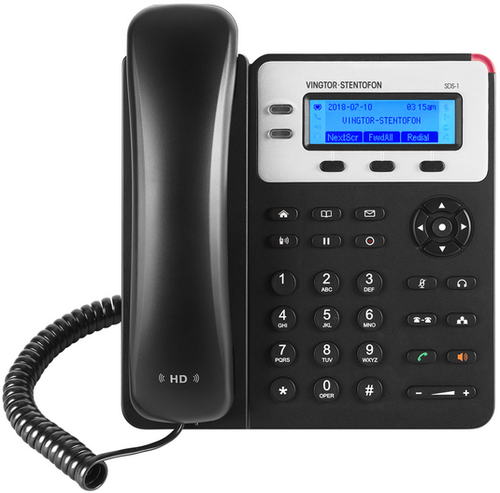
| − | [[Image:SDS-1.png|thumb|500px|IP Phone SDS-1]] | + | [[Image:SDS-1.png|thumb|500px|IP Phone SDS-1 (1490000010)]] |
== Getting Started == | == Getting Started == | ||
| Line 38: | Line 38: | ||
<br style="clear:both;" /> | <br style="clear:both;" /> | ||
| − | Register the account on the SDS-1 by selecting '''ACCOUNTS > Account 1/2 > General Settings''' to configure '''Account Name''', '''SIP Server''' (AlphaCom or | + | Register the account on the SDS-1 by selecting '''ACCOUNTS > Account 1/2 > General Settings''' to configure '''Account Name''', '''SIP Server''' (ICX-AlphaCom or IC-EdgePulse), '''SIP User ID''' (Extension Number). |
[[File:SDS config2.png|thumb|left|500px]] | [[File:SDS config2.png|thumb|left|500px]] | ||
<br style="clear:both;" /> | <br style="clear:both;" /> | ||
| − | ===Register to AlphaCom server=== | + | ===Register to ICX-AlphaCom server=== |
====Account setup==== | ====Account setup==== | ||
* Select ACCOUNTS > Account 1 > General Settings | * Select ACCOUNTS > Account 1 > General Settings | ||
| Line 50: | Line 50: | ||
Enter the values shown above for the parameters | Enter the values shown above for the parameters | ||
* Account Active: Check Yes button | * Account Active: Check Yes button | ||
| − | * SIP Server: IP address of AlphaCom server | + | * SIP Server: IP address of ICX-AlphaCom server |
* SIP User ID: Directory Number of SDS-1 phone | * SIP User ID: Directory Number of SDS-1 phone | ||
* Authenticate ID: Same as SIP User ID | * Authenticate ID: Same as SIP User ID | ||
| Line 64: | Line 64: | ||
Set all codecs from the Preferred Vocoder list to the one defined in AlphaPro, i.e. G722. | Set all codecs from the Preferred Vocoder list to the one defined in AlphaPro, i.e. G722. | ||
| − | ===Register to | + | ===Register to IC-Edge Controller=== |
====Account setup==== | ====Account setup==== | ||
Select ACCOUNTS > Account 1 > General Settings | Select ACCOUNTS > Account 1 > General Settings | ||
| Line 72: | Line 72: | ||
Enter the values shown above for the parameters | Enter the values shown above for the parameters | ||
* Account Active: Check Yes button | * Account Active: Check Yes button | ||
| − | * SIP Server: IP address of intercom station set as | + | * SIP Server: IP address of intercom station set as Edge Controller |
* SIP User ID: Directory Number of the SDS-1 phone | * SIP User ID: Directory Number of the SDS-1 phone | ||
* Authenticate ID: Same as SIP User ID | * Authenticate ID: Same as SIP User ID | ||
| − | ==== | + | ====Edge Group Call==== |
| − | The | + | <div style="text-align:left;"> <youtube width="300" height="180">vaiUmx7kRiI</youtube> </div> |
| − | * Log into the | + | <br><br> |
| − | * Select | + | The Edge Controller transmits group calls using IP multicast paging. Each group call uses its own unique multicast IP address. To find the multicast IP address: |
| − | [[File: | + | * Log into the Edge Controller |
| + | * Select Edge Controller > Group Call | ||
| + | [[File:Edge GroupCall.PNG|thumb|left|500px]] | ||
<br style="clear:both;" /> | <br style="clear:both;" /> | ||
| − | Make a note of the multicast addresses under Group | + | Make a note of the multicast addresses under '''Group Audio Address'''. |
* Log into the SDS-1 | * Log into the SDS-1 | ||
| − | * Select | + | * Select Setting > Multicast Paging |
[[File:SDS config7.png|thumb|left|500px]] | [[File:SDS config7.png|thumb|left|500px]] | ||
<br style="clear:both;" /> | <br style="clear:both;" /> | ||
* Set Multicast Paging Codec to G722 | * Set Multicast Paging Codec to G722 | ||
* Enter the multicast addresses under Listening Address | * Enter the multicast addresses under Listening Address | ||
| − | * Click Save and Apply | + | * Click Save and Apply |
When a Group Call is activated, the SDS-1 will automatically broadcast the audio in the loudspeaker. The SDS-1 will display the text of the Group Call as entered under '''Nickname'''. If the SDS-1 is busy in a regular call when a Group Call is made, it will by default not play the Group Call audio. If '''Paging Barge''' is set to value '''2''' or higher, the current call will be placed On Hold, and the Group Call audio will be broadcast. When the Group Call is ended, press the Hold button to resume the regular call. | When a Group Call is activated, the SDS-1 will automatically broadcast the audio in the loudspeaker. The SDS-1 will display the text of the Group Call as entered under '''Nickname'''. If the SDS-1 is busy in a regular call when a Group Call is made, it will by default not play the Group Call audio. If '''Paging Barge''' is set to value '''2''' or higher, the current call will be placed On Hold, and the Group Call audio will be broadcast. When the Group Call is ended, press the Hold button to resume the regular call. | ||
| + | |||
| + | ===Tips for using SDS-1=== | ||
| + | Do not Disturb mode: Toggling "Do not disturb" mode is done by pressing the mute button on the keypad. Status is shown in the display. | ||
| + | |||
| + | [[File:SDS1dnd.png|thumb|left|500px]] | ||
| + | <br style="clear:both;" /> | ||
| + | |||
| + | The mute key function can be changed in the web interface, under Settings and Call Features. | ||
| + | |||
| + | [[File:SDS1_mute_web.png|thumb|left|500px]] | ||
| + | <br style="clear:both;" /> | ||
== Dimensions == | == Dimensions == | ||
| Line 106: | Line 119: | ||
== Related information == | == Related information == | ||
| − | * [https://www.zenitel.com/product/sds-1 Documentation on Zenitel.com] | + | * [https://www.zenitel.com/product/sds-1 Additional Documentation on Zenitel.com] |
[[Category: Other IP based devices]] | [[Category: Other IP based devices]] | ||
Latest revision as of 09:02, 23 July 2024
Contents
Getting Started
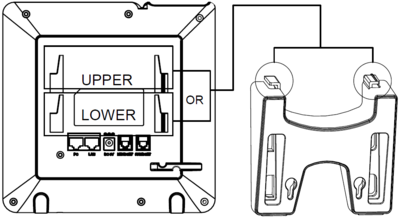
Installing the Phone with Phone Stand
- Insert the hooks on top of the stand into the slots on the back of the phone. (You can either use the upper OR the lower slots)
- Firmly slide the stand upward to lock it in place
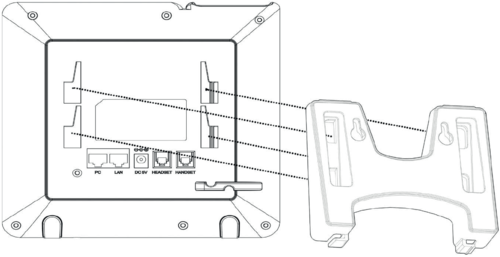
Installing the Phone with Wall Mount
- Insert all 4 hooks located at the front of the wallmount into the slots on the back of the phone.
- Firmly slide the wall mount upward to lock it in place.
- Attach the phone to the wall via the wall mount holes.
- Pull out the tab from the handset cradle (see figure below).
- Rotate the tab and plug it back into the slot with the extension up to hold the handset while the phone is mounted on the wall.
Connecting the phone
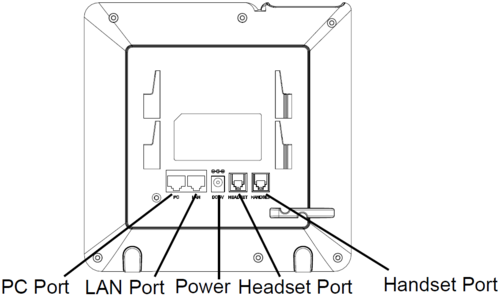
- Connect the handset and main phone case with the phone cord.
- Connect the LAN port of the phone to the RJ-45 socket of a PoE switch using the Ethernet cable.
The LCD will display provisioning or firmware upgrading information. Before continuing, please wait for the date/time display to appear. - Using the web configuration interface or the keypad configuration menu, you can further configure the phone using either a static IP or DHCP.
Configuration
The IP phone can only operate in SIP mode.
- Ensure your phone is properly powered up and connected to the Internet.
- Press the Menu key to enter the menu of the phone.
- Navigate to Status > Network Status and press the Menu key to check the IP address.
- Enter the phone’s IP address in your PC’s browser
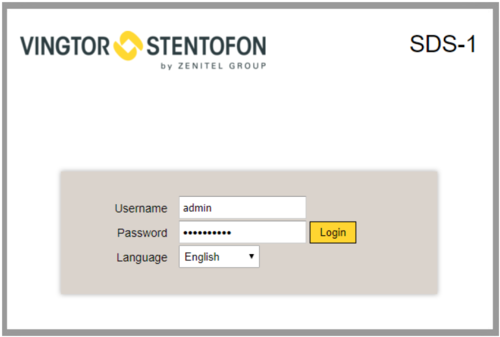
- Log in by entering the default Username: admin and Password: alphaadmin
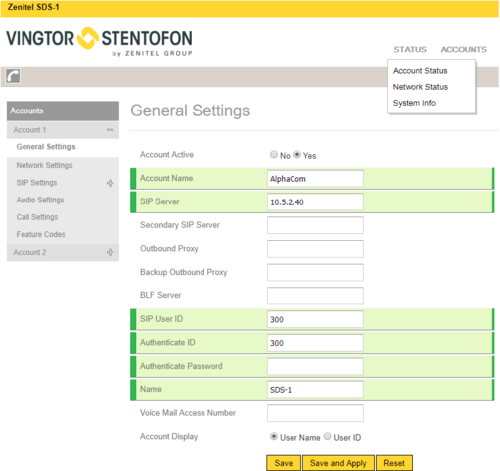
Register the account on the SDS-1 by selecting ACCOUNTS > Account 1/2 > General Settings to configure Account Name, SIP Server (ICX-AlphaCom or IC-EdgePulse), SIP User ID (Extension Number).
Register to ICX-AlphaCom server
Account setup
- Select ACCOUNTS > Account 1 > General Settings
Enter the values shown above for the parameters
- Account Active: Check Yes button
- SIP Server: IP address of ICX-AlphaCom server
- SIP User ID: Directory Number of SDS-1 phone
- Authenticate ID: Same as SIP User ID
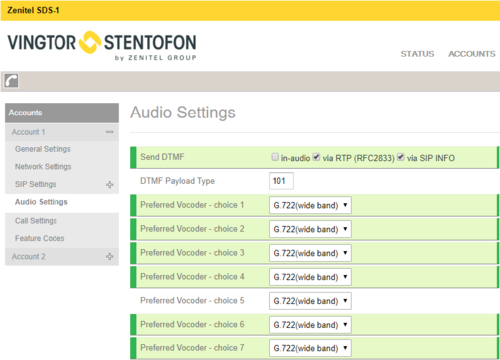
Audio Settings
- Check in AlphaPro under Users & Stations the codec that has been selected for the SIP phone (normally G722)
- Select Account 1 > Audio Settings
Set all codecs from the Preferred Vocoder list to the one defined in AlphaPro, i.e. G722.
Register to IC-Edge Controller
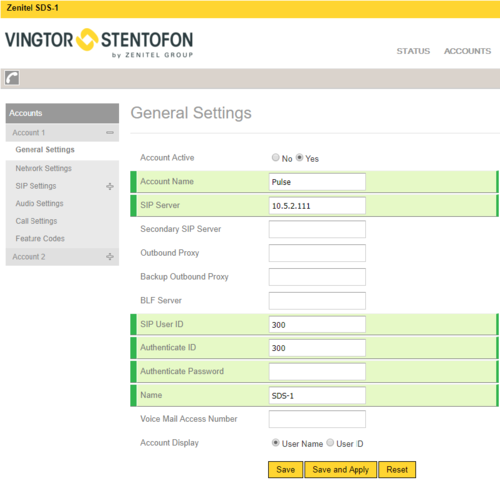
Account setup
Select ACCOUNTS > Account 1 > General Settings
Enter the values shown above for the parameters
- Account Active: Check Yes button
- SIP Server: IP address of intercom station set as Edge Controller
- SIP User ID: Directory Number of the SDS-1 phone
- Authenticate ID: Same as SIP User ID
Edge Group Call
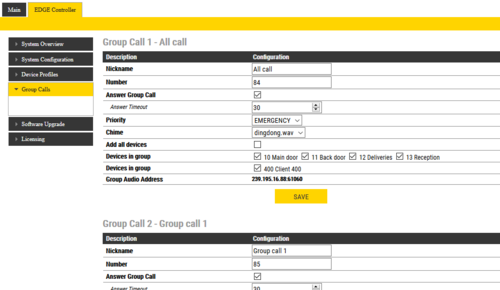
The Edge Controller transmits group calls using IP multicast paging. Each group call uses its own unique multicast IP address. To find the multicast IP address:
- Log into the Edge Controller
- Select Edge Controller > Group Call
Make a note of the multicast addresses under Group Audio Address.
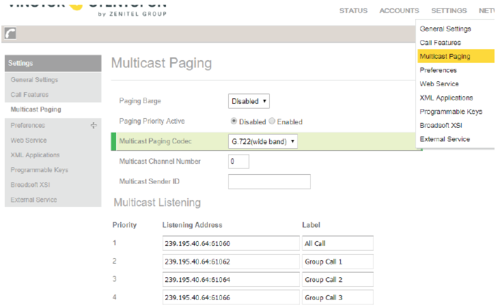
- Log into the SDS-1
- Select Setting > Multicast Paging
- Set Multicast Paging Codec to G722
- Enter the multicast addresses under Listening Address
- Click Save and Apply
When a Group Call is activated, the SDS-1 will automatically broadcast the audio in the loudspeaker. The SDS-1 will display the text of the Group Call as entered under Nickname. If the SDS-1 is busy in a regular call when a Group Call is made, it will by default not play the Group Call audio. If Paging Barge is set to value 2 or higher, the current call will be placed On Hold, and the Group Call audio will be broadcast. When the Group Call is ended, press the Hold button to resume the regular call.
Tips for using SDS-1
Do not Disturb mode: Toggling "Do not disturb" mode is done by pressing the mute button on the keypad. Status is shown in the display.
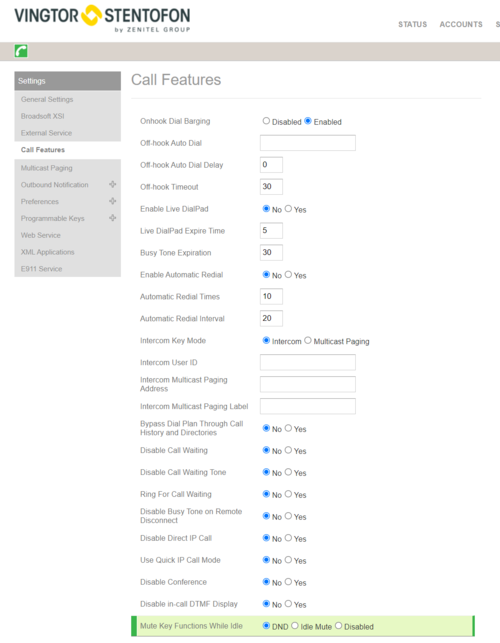
The mute key function can be changed in the web interface, under Settings and Call Features.
Dimensions
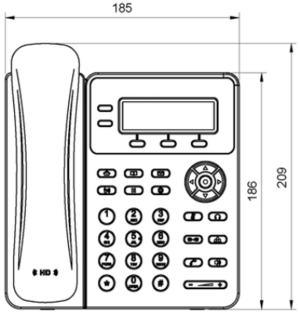
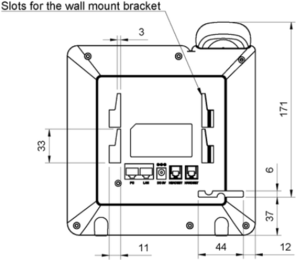
- Phone dimensions
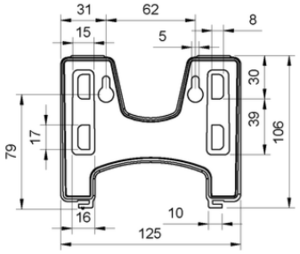
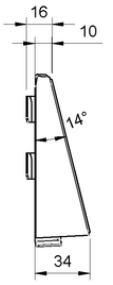
- Bracket dimensions


