Mobotix Hub - IC-EDGE Integration: Difference between revisions
From Zenitel Wiki
Thalvorsen (talk | contribs) |
No edit summary |
||
| (7 intermediate revisions by 2 users not shown) | |||
| Line 1: | Line 1: | ||
{{E}} | |||
== Introduction == | == Introduction == | ||
The interface between IC-EDGE and MOBOTIX HUB is through an integration module which is available on the [[Downloads#Interface_modules|Downloads page]] of Zenitel Wiki. | The interface between IC-EDGE and MOBOTIX HUB is through an integration module which is available on the [[Downloads#Interface_modules|Downloads page]] of Zenitel Wiki. | ||
| Line 30: | Line 32: | ||
== Installation == | == Installation == | ||
* | This section describes how to install the integration plugin. | ||
* | It is assumed that Mobotix Hub has been installed and is running. It is also assumed that the Mobotix Hub has been licensed appropriately.<br> | ||
*When installing (or uninstalling) the plugin all Mobotix Hub clients must be closed. | |||
*The plugin is to be installed on the same machine where the Mobotix HUB Desk Client is. | |||
<br> | |||
#[[Downloads#Interface_modules|Download the msi setup file]] from the Downloads section on Zenitel Wiki. | |||
#Run the setup file, and follow the instructions on the screen | |||
#When prompted for the installation location, select the Mobotix/MIP installation folder (e.g. C:\Program Files\Mobotix\MIP). | |||
#Click "Finish" to complete the installation.<br> | |||
<br style="clear:both;" /> | |||
== Configuration == | == Configuration == | ||
<br> | <br> | ||
====Basic plugin configuration==== | ====Basic plugin configuration==== | ||
*Open the | *Open the MOBOTIX HUB client. | ||
*Open the "Configuration" window by clicking the "Configuration" icon in the toolbar. | *Open the "Configuration" window by clicking the "Configuration" icon in the toolbar. | ||
*In the "Configuration" window enter the IP address and port number of your Zenitel intercom system acting as the IC-Edge controller in the "IP Address" and "Port" fields, respectively. | *In the "Configuration" window enter the IP address and port number of your Zenitel intercom system acting as the IC-Edge controller in the "IP Address" and "Port" fields, respectively. | ||
| Line 46: | Line 53: | ||
*Select the operator's device by choosing its directory number from the drop-down list. | *Select the operator's device by choosing its directory number from the drop-down list. | ||
<br> | <br> | ||
[[File:ZenitelCallHandler IC-EdgeConfigurationGif Mobotix.gif|thumb|center|800px|Animation of the Zenitel | [[File:ZenitelCallHandler IC-EdgeConfigurationGif Mobotix.gif|thumb|center|800px|Animation of the Zenitel Call Handler configuration process]] | ||
<br> | <br> | ||
====Associating cameras with devices==== | ====Associating cameras with devices==== | ||
*Open the camera settings window. | *Open the camera settings window. | ||
*On the left side, there will be a list of devices registered with the IC-Edge controller. On the right side, there will be a list of cameras registered within the | *On the left side, there will be a list of devices registered with the IC-Edge controller. On the right side, there will be a list of cameras registered within the MOBOTIX HUB system. | ||
*Click on a device in the left list to select it. | *Click on a device in the left list to select it. | ||
*Click on an item in the right list to preview the video feed from that camera. | *Click on an item in the right list to preview the video feed from that camera. | ||
| Line 59: | Line 66: | ||
*Click "Save and Close" on the configuration window to save the changes. | *Click "Save and Close" on the configuration window to save the changes. | ||
<br> | <br> | ||
[[File:ZenitelCallHandlerCameraConfiguration IC-Edge Mobotix.JPG|thumb|center|800px|Screenshot of the camera | [[File:ZenitelCallHandlerCameraConfiguration IC-Edge Mobotix.JPG|thumb|center|800px|Screenshot of the camera association process]] | ||
<br> | <br> | ||
== Using the Call Handler == | == Using the Call Handler == | ||
The Zenitel Call Handler (IC-Edge) plugin can be used for two scenarios: initiating calls and | The Zenitel Call Handler (IC-Edge) plugin can be used for two scenarios: initiating calls and handling incoming calls. | ||
<br> | |||
Note that SIP audio is routed through IC-EDGE, so the call is established on a Zenitel desktop station or softclient. | |||
<br> | |||
If the Operator uses a desktop station, the Call Handler transfers the call from the MOBOTIX HUB client to the desktop station where the operator gets audio through the station connected handset, speaker or headset. | |||
<br> | |||
If the Operator uses the Zenitel softclient, the Call Handler transfers the call from the MOBOTIX HUB client to the softclient, which runs in background on the PC, and the operator gets audio through the PC connected microphone, speakers or headset. | |||
<br> | <br> | ||
====Initiating Calls==== | ====Initiating Calls==== | ||
In | In the MOBOTIX HUB client on the Zenitel Audio tab select a device you wish to call and click on the green "Call" button.<br> | ||
A popup window will be displayed showing the active call, along with a video preview from an associated camera. | A popup window will be displayed showing the active call, along with a video preview from an associated camera. | ||
<br> | <br> | ||
| Line 74: | Line 90: | ||
====Answering queued Calls==== | ====Answering queued Calls==== | ||
#When a call is received, a popup window will be displayed showing the incoming call, along with a video preview from an associated camera. | |||
#To answer the call, the operator has to answer it using the desktop station or softclient that is set as the operator directory number. | |||
#If there are multiple incoming calls, they will be displayed in call list. | |||
[[File:ZenitelCallHandlerOperation2 IC-Edge Mobotix.JPG|thumb|center|800px|Screenshot of popup window displaying the active call and his associated camera with two queued calls]] | [[File:ZenitelCallHandlerOperation2 IC-Edge Mobotix.JPG|thumb|center|800px|Screenshot of popup window displaying the active call and his associated camera with two queued calls]] | ||
<br> | <br> | ||
====Using the Popup Window==== | ====Using the Popup Window==== | ||
* The popup window displays the active call (if it was initiated by the operator) or a list of | * The popup window displays the active call (if it was initiated by the operator) or a list of incoming calls, along with a video preview from an associated camera. | ||
* The popup window will display the camera feed from the first associated camera of the active call (if present) or if there are no active calls, the first queued device-associated camera will be displayed. | * The popup window will display the camera feed from the first associated camera of the active call (if present) or if there are no active calls, the first queued device-associated camera will be displayed. | ||
* To manually switch the camera video feed to any active or queued device, select the desired device from the dropdown list in the popup window. | * To manually switch the camera video feed to any active or queued device, select the desired device from the dropdown list in the popup window. | ||
* To hang up the active call, click the red "Hang-Up" button. | * To hang up the active call, click the red "Hang-Up" button. | ||
* To answer a queued call, the operator has to answer it using | * To answer a queued call, the operator has to answer it using the desktop station or softclient set as the operator directory number. | ||
<br> | <br> | ||
| Line 98: | Line 112: | ||
[[Category:3rd party integration]] | [[Category:3rd party integration]] | ||
[[Category:IC-EDGE Integrations]] | |||
Latest revision as of 13:58, 24 October 2024
Introduction
The interface between IC-EDGE and MOBOTIX HUB is through an integration module which is available on the Downloads page of Zenitel Wiki.
This integration requires an Zenitel desktop station or softclient to be associated with the MOBOTIX HUB client, as SIP audio is routed through IC-Edge.
This article assumes that the reader is:
- familiar with setup and operation of MOBOTIX HUB
- that MOBOTIX HUB is operational, with all to the system connected cameras configured
- that IC-EDGE is operational, with all the system connected intercom devices and softclients configured
Only points which are specific to this integration and to connected intercom stations/softclients and IP speakers are described.
Licensing
MOBOTIX HUB
The integration interface does not require a specific license from MOBOTIX.
However, note that Zenitel stations are typically registered as ONVIF devices in MOBOTIX HUB, to e.g. stream and record audio/video from stations. This requires separate station licenses from MOBOTIX.
For an overview of the ONVIF features supported in Zenitel devices, please read our article ONVIF_Settings
IC-EDGE
The integration does not require a license from Zenitel.
Installation
This section describes how to install the integration plugin.
It is assumed that Mobotix Hub has been installed and is running. It is also assumed that the Mobotix Hub has been licensed appropriately.
- When installing (or uninstalling) the plugin all Mobotix Hub clients must be closed.
- The plugin is to be installed on the same machine where the Mobotix HUB Desk Client is.
- Download the msi setup file from the Downloads section on Zenitel Wiki.
- Run the setup file, and follow the instructions on the screen
- When prompted for the installation location, select the Mobotix/MIP installation folder (e.g. C:\Program Files\Mobotix\MIP).
- Click "Finish" to complete the installation.
Configuration
Basic plugin configuration
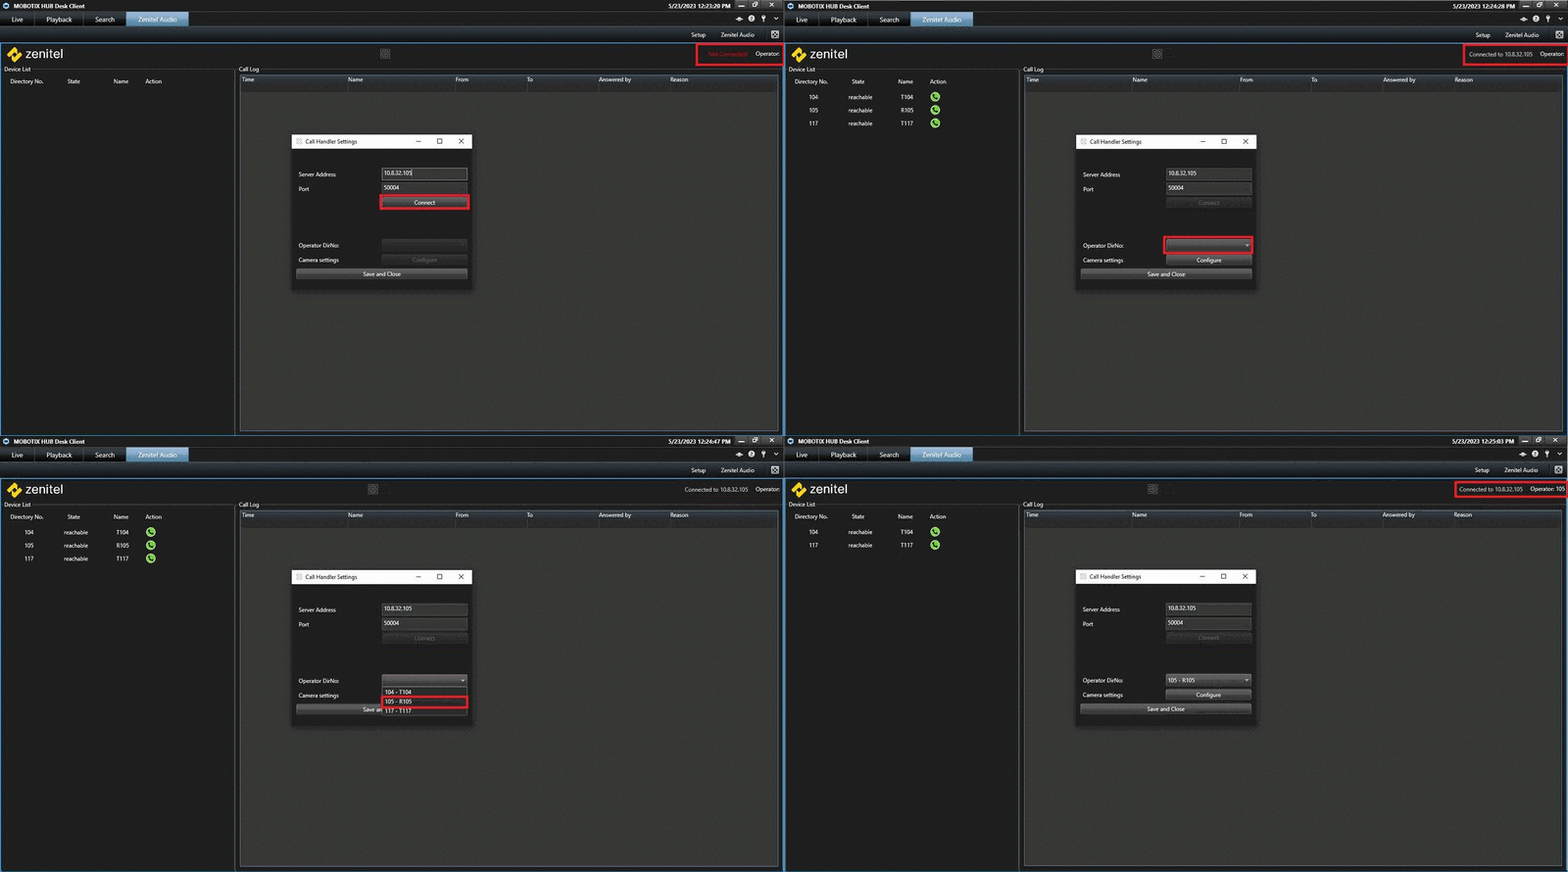
- Open the MOBOTIX HUB client.
- Open the "Configuration" window by clicking the "Configuration" icon in the toolbar.
- In the "Configuration" window enter the IP address and port number of your Zenitel intercom system acting as the IC-Edge controller in the "IP Address" and "Port" fields, respectively.
- Click the "Connect" button and wait for the system to retrieve the list of available devices.
- Select the operator's device by choosing its directory number from the drop-down list.
Associating cameras with devices
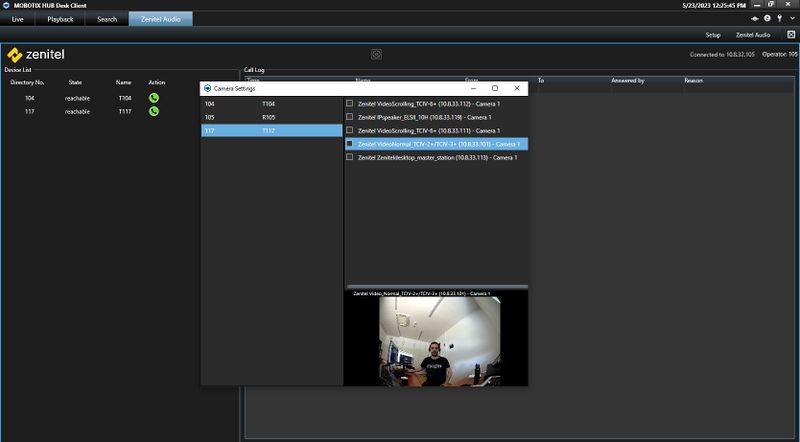
- Open the camera settings window.
- On the left side, there will be a list of devices registered with the IC-Edge controller. On the right side, there will be a list of cameras registered within the MOBOTIX HUB system.
- Click on a device in the left list to select it.
- Click on an item in the right list to preview the video feed from that camera.
- To associate a camera with a selected device, click the checkbox next to the camera's name.
- Repeat steps 3-5 to associate additional cameras with the selected device.
- Once satisfied with the configuration, close the camera settings window.
- Click "Save and Close" on the configuration window to save the changes.
Using the Call Handler
The Zenitel Call Handler (IC-Edge) plugin can be used for two scenarios: initiating calls and handling incoming calls.
Note that SIP audio is routed through IC-EDGE, so the call is established on a Zenitel desktop station or softclient.
If the Operator uses a desktop station, the Call Handler transfers the call from the MOBOTIX HUB client to the desktop station where the operator gets audio through the station connected handset, speaker or headset.
If the Operator uses the Zenitel softclient, the Call Handler transfers the call from the MOBOTIX HUB client to the softclient, which runs in background on the PC, and the operator gets audio through the PC connected microphone, speakers or headset.
Initiating Calls
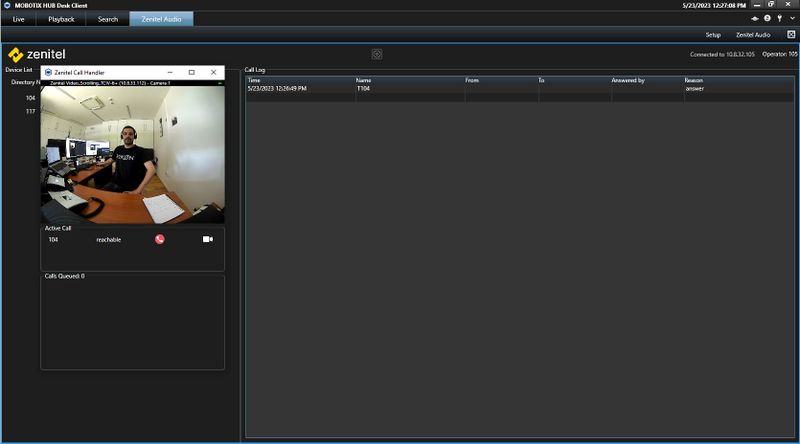
In the MOBOTIX HUB client on the Zenitel Audio tab select a device you wish to call and click on the green "Call" button.
A popup window will be displayed showing the active call, along with a video preview from an associated camera.
Answering queued Calls
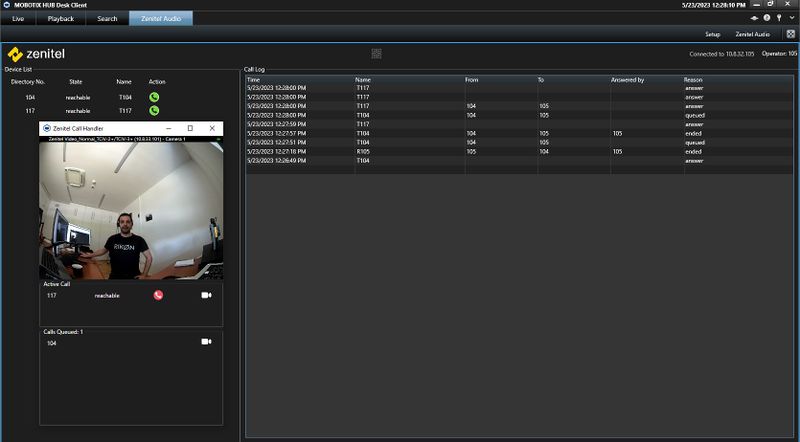
- When a call is received, a popup window will be displayed showing the incoming call, along with a video preview from an associated camera.
- To answer the call, the operator has to answer it using the desktop station or softclient that is set as the operator directory number.
- If there are multiple incoming calls, they will be displayed in call list.
Using the Popup Window
- The popup window displays the active call (if it was initiated by the operator) or a list of incoming calls, along with a video preview from an associated camera.
- The popup window will display the camera feed from the first associated camera of the active call (if present) or if there are no active calls, the first queued device-associated camera will be displayed.
- To manually switch the camera video feed to any active or queued device, select the desired device from the dropdown list in the popup window.
- To hang up the active call, click the red "Hang-Up" button.
- To answer a queued call, the operator has to answer it using the desktop station or softclient set as the operator directory number.
Previous versions
For configuration of previous versions of the plugin go to:


