Logging (VS-Operator): Difference between revisions
From Zenitel Wiki
(Created page with "{{AI}} This article shows how to configure the VS-Operator to control Remote Control Outputs (RCO) by clicking on a dedicated RCO icon on t...") |
No edit summary |
||
| (74 intermediate revisions by the same user not shown) | |||
| Line 1: | Line 1: | ||
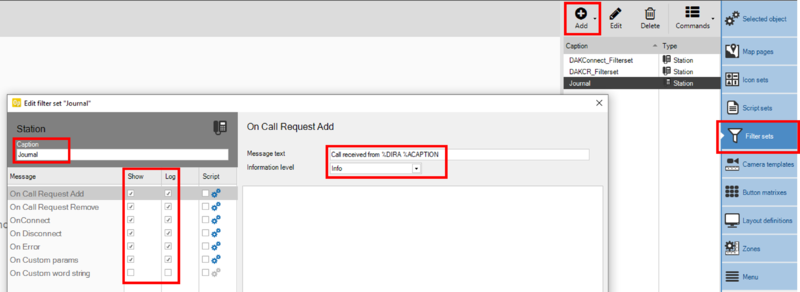
{{AI}} This article shows how to configure the [[VS-Operator]] to | {{AI}} This article shows how to configure basic logging in the [[VS-Operator]]. Information can be logged to the on-screen journal ('''Show''') and/or to disk ('''Log'''). | ||
In the | In the VSOP Client, select '''Filter sets''', and '''Add''' a filter set for '''Station''', and in the '''Caption''' field assign a descriptive name to the filter set, e.g. "Journal". | ||
[[Image:VSOP Journal 1.png|thumb|800px|left|Configuring Filter Set "Journal" for logging. Here "Call Received from <number> <name>" is logged when a call request is received]] | |||
<br style="clear:both;" /> | |||
The text to send to the log is defined in the field '''Message text'''. | |||
Here are some examples that can be used: | |||
{| border="1" | |||
! style="background:#ffd400;" width="200" |'''Event''' | |||
! style="background:#ffd400;" width="350" |'''Text in "Message text" field''' | |||
! style="background:#ffd400;" width="180" |'''Information Level''' | |||
! style="background:#ffd400;" width="600" |'''Comment''' | |||
|- | |||
| align=center| On CallRequest Add || align=center| Call received from %DIRA %ACAPTION ||align=center| Info || Triggered when a Ringing Group call (or Call Request) is received | |||
|- | |||
| align=center| On CallRequest Remove || align=center| Call from %DIRA %ACAPTION removed from queue ||align=center| Info || Triggered when a call is removed from the call queue | |||
|- | |||
| align=center| OnConnect || align=center| Conversation with %DIRB %BCAPTION ||align=center| Info || Triggered when a conversation is established | |||
|- | |||
| align=center| OnDisconnect || align=center| Conversation with %DIRB %BCAPTION ended ||align=center| Info || Triggered when a conversation is terminated | |||
|- | |||
| align=center| OnError|| align=center| Device error at %DIRA %ACAPTION ||align=center| Alarm || Triggered when a station or device is reported faulty | |||
|- | |||
| align=center| On Custom params|| align=center| Door Opening triggered at %DIRA %ACAPTION ||align=center| Warning || Triggers on "custom parameter" send from ICX-AlphaCom when Door Opening is activated | |||
|- | |||
| align=center| On Custom word string || align=center| <depends on the event> ||align=center| <depends on the event>|| Triggers on "custom parameter" including text parameters | |||
|- | |||
|} | |||
Different icons will be used in the journal depending on the "Information level": | |||
[[Image:VSOP | [[Image:VSOP Journal 5.png|thumb|700px|left|Alarm, Warning and Info icons]] | ||
<br style="clear:both;" /> | <br style="clear:both;" /> | ||
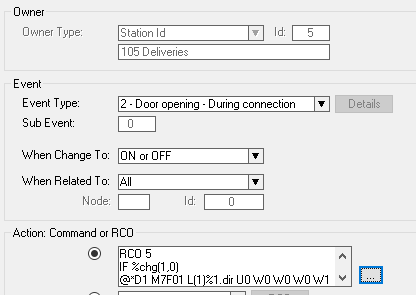
If | If there is a need to log Door Opening, some additional configuration is required in the ICX-AlphaCom. One have to add a "custom parameter" command in the Door Opening event. For each door opening event one need to add the following code: | ||
{{code2| | |||
IF %chg(1,0) | |||
@*D1 M7F01 L(1)%1.dir U0 W0 W0 W0 W1 W1 | |||
ENDIF}} | |||
[[Image:VSOP | Example of a Door Opening event: | ||
[[Image:VSOP Journal 3.png|thumb|700px|left|Door Opening event in AlphaPro event handler]] | |||
<br style="clear:both;" /> | <br style="clear:both;" /> | ||
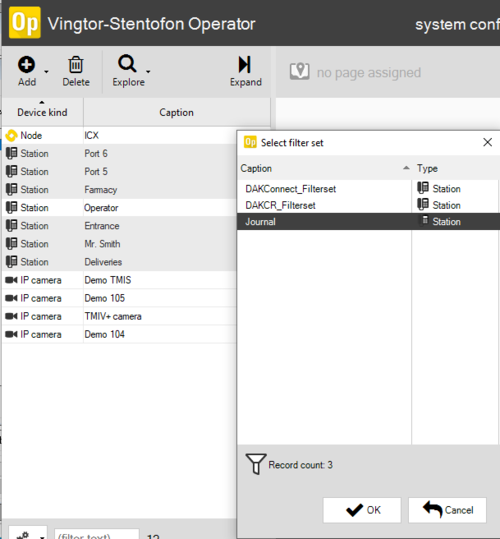
Finally all stations that should be logged (typically all stations except the operator station) needs to be assigned to the new Filter Set. This can be done in one operation. Select '''Selected object''', and from the Device List select all stations using Shift + Click, then deselect the Operator station by Ctrl + Click. Now right-click and assign the new filter set to the stations: | |||
[[Image:VSOP Journal 4.png|thumb|500px|left|Assigning the filter set "Journal" to stations]] | |||
<br style="clear:both;" /> | |||
[[Image:VSOP | |||
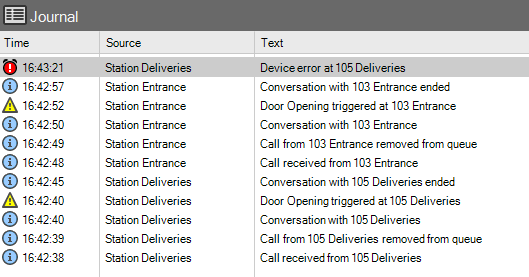
Now change the mode of operation to '''Operational''', and verify that the on-screen Journal displays the correct information: | |||
[[Image:VSOP Journal 2.png|thumb|700px|left|Output to the log when using the "Message text" and "Information Level" from examples in the table above]] | |||
<br style="clear:both;" /> | <br style="clear:both;" /> | ||
[[Image:VSOP | '''Accessing the Log file''':<br> | ||
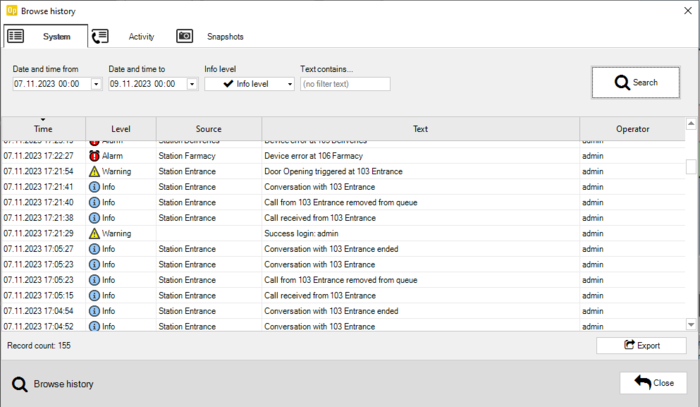
Depending on the rights of the operator, a '''History''' button [[Image:VSOP Journal History.png]] may be available on the status bar. Click this button to bring up a dialog to view the System log, the Activity log or available Snapshots. Use the filters to search the entries in the log for the required information. In the Activity log, it is possible to select '''Show paired'''. When this is selected, call requests and calls will be shown on one line with begin time, end time and duration. | |||
Click '''Export''' to export logs to a comma delimited text file. This file can be imported into Excel for further investigation. Snapshots can be exported to a specified directory. Not every operator may be able to view or export all information; this will depend on the access rights that have been assigned to the particular operator. | |||
[[Image:VSOP | [[Image:VSOP Journal History2.png|thumb|700px|left|History]] | ||
<br style="clear:both;" /> | <br style="clear:both;" /> | ||
Note that in the Activity log it is possible that a Disconnected call is shown without a matching Connected entry. Under certain circumstances a call may, as far as the ICX-AlphaCom is concerned, get disconnected before it was ever connected. This can for instance be the case for a call to an | |||
intercom that is set to Private mode and which times out or is cancelled before the call has been accepted. | |||
== Related articles == | |||
* [[Prison_Applications_using_VS-Operator#Journal_Entry|Customized logging in VS-Operator]] | |||
[[Category: VS-Operator - Configuration examples]] | [[Category: VS-Operator - Configuration examples]] | ||
Latest revision as of 12:43, 8 November 2023
This article shows how to configure basic logging in the VS-Operator. Information can be logged to the on-screen journal (Show) and/or to disk (Log).
In the VSOP Client, select Filter sets, and Add a filter set for Station, and in the Caption field assign a descriptive name to the filter set, e.g. "Journal".
The text to send to the log is defined in the field Message text.
Here are some examples that can be used:
| Event | Text in "Message text" field | Information Level | Comment |
|---|---|---|---|
| On CallRequest Add | Call received from %DIRA %ACAPTION | Info | Triggered when a Ringing Group call (or Call Request) is received |
| On CallRequest Remove | Call from %DIRA %ACAPTION removed from queue | Info | Triggered when a call is removed from the call queue |
| OnConnect | Conversation with %DIRB %BCAPTION | Info | Triggered when a conversation is established |
| OnDisconnect | Conversation with %DIRB %BCAPTION ended | Info | Triggered when a conversation is terminated |
| OnError | Device error at %DIRA %ACAPTION | Alarm | Triggered when a station or device is reported faulty |
| On Custom params | Door Opening triggered at %DIRA %ACAPTION | Warning | Triggers on "custom parameter" send from ICX-AlphaCom when Door Opening is activated |
| On Custom word string | <depends on the event> | <depends on the event> | Triggers on "custom parameter" including text parameters |
Different icons will be used in the journal depending on the "Information level":
If there is a need to log Door Opening, some additional configuration is required in the ICX-AlphaCom. One have to add a "custom parameter" command in the Door Opening event. For each door opening event one need to add the following code:
Action commands:
IF %chg(1,0)
@*D1 M7F01 L(1)%1.dir U0 W0 W0 W0 W1 W1
ENDIF
Example of a Door Opening event:
Finally all stations that should be logged (typically all stations except the operator station) needs to be assigned to the new Filter Set. This can be done in one operation. Select Selected object, and from the Device List select all stations using Shift + Click, then deselect the Operator station by Ctrl + Click. Now right-click and assign the new filter set to the stations:
Now change the mode of operation to Operational, and verify that the on-screen Journal displays the correct information:
Accessing the Log file:
Depending on the rights of the operator, a History button ![]() may be available on the status bar. Click this button to bring up a dialog to view the System log, the Activity log or available Snapshots. Use the filters to search the entries in the log for the required information. In the Activity log, it is possible to select Show paired. When this is selected, call requests and calls will be shown on one line with begin time, end time and duration.
may be available on the status bar. Click this button to bring up a dialog to view the System log, the Activity log or available Snapshots. Use the filters to search the entries in the log for the required information. In the Activity log, it is possible to select Show paired. When this is selected, call requests and calls will be shown on one line with begin time, end time and duration.
Click Export to export logs to a comma delimited text file. This file can be imported into Excel for further investigation. Snapshots can be exported to a specified directory. Not every operator may be able to view or export all information; this will depend on the access rights that have been assigned to the particular operator.
Note that in the Activity log it is possible that a Disconnected call is shown without a matching Connected entry. Under certain circumstances a call may, as far as the ICX-AlphaCom is concerned, get disconnected before it was ever connected. This can for instance be the case for a call to an intercom that is set to Private mode and which times out or is cancelled before the call has been accepted.


