HTTP string: Send from AlphaCom: Difference between revisions
From Zenitel Wiki
ZenitelAus (talk | contribs) No edit summary |
ZenitelAus (talk | contribs) No edit summary |
||
| (6 intermediate revisions by the same user not shown) | |||
| Line 65: | Line 65: | ||
}} | }} | ||
== Sending Authentication details == | ==Sending Authentication details== | ||
If the receiving device requires the Username and Password to be sent with the request in the format <username>:<password>@<URL> then some additional fields must be added to the event. | If the receiving device requires the Username and Password to be sent with the request in the format <username>:<password>@<URL> then some additional fields must be added to the event. | ||
The below Action Command will trigger the relay on a TCIV+ device for 3 seconds. Note the Authorization field which contains a Base64 coded version of the username admin and the password alphaadmin. Replace the "Host" field with the IP Address of your ICX-AlphaCom. | The below Action Command will trigger the relay on a TCIV+ device for 3 seconds. Note the Authorization field which contains a Base64 coded version of the username admin and the password alphaadmin. Replace the "Host" field with the IP Address of your ICX-AlphaCom. | ||
{{Code2| | {{Code2| | ||
EDO 1 "GET /goform/zForm_webcall?activate=Activate&relaytimer=3&username=admin&password=alphaadmin HTTP/1.1\r\n" | EDO 1 "GET /goform/zForm_webcall?activate<nowiki>=</nowiki>Activate&relaytimer<nowiki>=</nowiki>3&username<nowiki>=</nowiki>admin&password<nowiki>=</nowiki>alphaadmin HTTP/1.1\r\n" | ||
EDO 1 "Host: 192.168.10.7\r\n" | EDO 1 "Host: 192.168.10.7\r\n" | ||
EDO 1 "User-Agent: Zenitel ICX-AlphaCom\r\n" | EDO 1 "User-Agent: Zenitel ICX-AlphaCom\r\n" | ||
EDO 1 "Accept: */*\r\n" | EDO 1 "Accept: */*\r\n" | ||
EDO 1 "Connection: keep-alive\r\n" | EDO 1 "Connection: keep-alive\r\n" | ||
EDO 1 "Authorization: Basic YWRtaW46YWxwaGFhZG1pbg==\r\n\r\n" | EDO 1 "Authorization: Basic YWRtaW46YWxwaGFhZG1pbg<nowiki>=</nowiki><nowiki>=</nowiki>\r\n\r\n"}} | ||
}} | |||
A web utility for calculating the Authorization field can be found here - [https://www.debugbear.com/basic-auth-header-generator Generate HTTP Basic Auth Header] | A web utility for calculating the Authorization field can be found here - [https://www.debugbear.com/basic-auth-header-generator Generate HTTP Basic Auth Header] | ||
Latest revision as of 23:56, 25 March 2024
HTTP GET can be sent to third-party systems using EDO ports and Event Handler.
Configuration
Set up EDO port
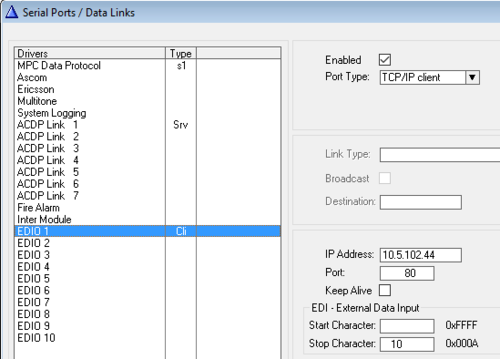
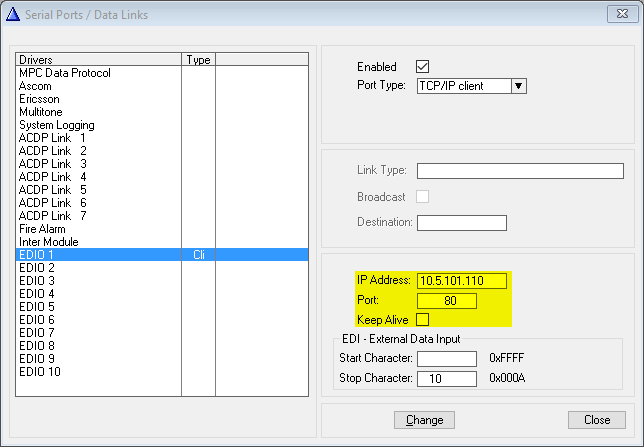
In AlphaPro select Exchange & System > Serial Ports, and select the EDIO port to configure.
Port-Type: TCP/IP Client
IP-Address: destination IP
Port: destination port, usually 80 when HTTP.
Keep-Alive: off
Create Event
Use EDO command to send HTTP GET on the configured port.
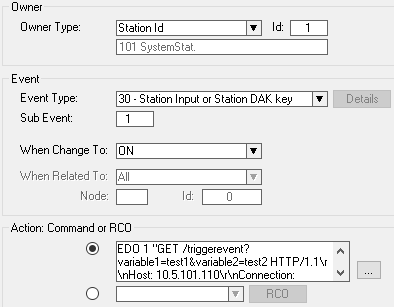
Example using DAK 1 to send HTTP GET:
Action commands:
EDO 1 "GET /triggerevent?variable1=test1&variable2=test2 HTTP/1.1\r\nHost: 10.5.101.110\r\nConnection: Keep-Alive\r\n"
EDO 1 "Accept: */*\r\n\r\n"
A string generated by the EDO command can contain maximum 128 characters. If the http string exceeds this length, one can simply use multiple EDO commands.
Example: Control PTZ on an Axis camera
Example scenario: Every time DAK 1 is pushed on intercom station 179 you want to pan an Axis camera with IP address 10.5.102.44 10 degrees to the left. Pushing DAK 2 should pan the camera 10 degrees to the right.
Each EDO port can control one camera. There are 10 EDO ports, so in total one can control up to 10 cameras using the method described in this article.
HTTP commands used by Axis
- Relative pan: 10 degrees right
http://myserver/axis-cgi/com/ptz.cgi?rpan=10
|
- Relative pan: 10 degrees left
http://myserver/axis-cgi/com/ptz.cgi?rpan=-10
|
EDIO port configuration
Event configuration
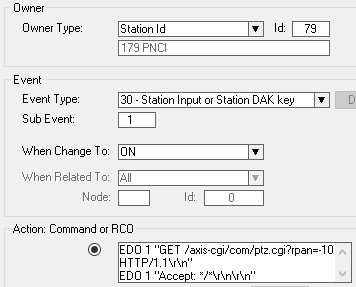
Station 179 presses DAK 1 (= Sub Event 1):
Action commands:
EDO 1 "GET /axis-cgi/com/ptz.cgi?rpan=-10 HTTP/1.1\r\n"
EDO 1 "Accept: */*\r\n\r\n"
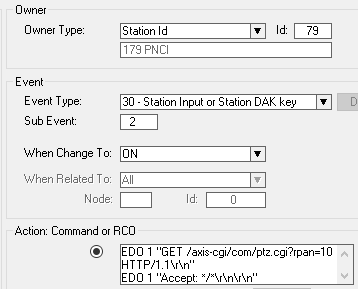
Station 179 presses DAK 2 (= Sub Event 2):
Action commands:
EDO 1 "GET /axis-cgi/com/ptz.cgi?rpan=10 HTTP/1.1\r\n"
EDO 1 "Accept: */*\r\n\r\n"
Sending Authentication details
If the receiving device requires the Username and Password to be sent with the request in the format <username>:<password>@<URL> then some additional fields must be added to the event.
The below Action Command will trigger the relay on a TCIV+ device for 3 seconds. Note the Authorization field which contains a Base64 coded version of the username admin and the password alphaadmin. Replace the "Host" field with the IP Address of your ICX-AlphaCom.
Action commands:
EDO 1 "GET /goform/zForm_webcall?activate=Activate&relaytimer=3&username=admin&password=alphaadmin HTTP/1.1\r\n"
EDO 1 "Host: 192.168.10.7\r\n"
EDO 1 "User-Agent: Zenitel ICX-AlphaCom\r\n"
EDO 1 "Accept: */*\r\n"
EDO 1 "Connection: keep-alive\r\n"
EDO 1 "Authorization: Basic YWRtaW46YWxwaGFhZG1pbg==\r\n\r\n"
A web utility for calculating the Authorization field can be found here - Generate HTTP Basic Auth Header
Simply put the required username and password in the provided boxes and the result is automatically presented.


