Flowire Software Upgrade Procedure: Difference between revisions
From Zenitel Wiki
| Line 31: | Line 31: | ||
[[File:FlowirePCSetup.png|thumb|left|300px|PC Setup]] | [[File:FlowirePCSetup.png|thumb|left|300px|PC Setup]] | ||
<br style="clear:both;" /> | <br style="clear:both;" /> | ||
* Connect the USB-Serial cable | * Connect the USB-Serial cable | ||
* Check the "Windows Device Manager" to see which serial port it chooses. It will be listed under “Ports (COM % LPT)” as USB Serial COM port #x, where x represents the COM port number. Double click it and change the port settings from 9600 baud to 115200 baud. | * Check the "Windows Device Manager" to see which serial port it chooses. It will be listed under “Ports (COM % LPT)” as USB Serial COM port #x, where x represents the COM port number. Double click it and change the port settings from 9600 baud to 115200 baud. | ||
Revision as of 13:11, 17 April 2015
This is a step by step guide to upgrading the software in Flowire through the serial interface.
Requirements
- Windows PC
- TFTPS server, for example Tftpd32 or Tftpd64 by Ph. Jounin (http://tftpd32.jounin.net)
- Telnet software, for example PuTTY by Simon Tatham (http://www.chiark.greenend.org.uk/~sgtatham/putty/)
- Simple network switch
- 2 Ethernet cables
- Special USB-Serial cable with JTAG connector
- Flowire unit
- Flowire power supply
Create the special USB-Serial cable
- You need an RS232 cable with 3,3V TTL level. For example: http://au.element14.com/ftdi/ttl-232r-3v3/connector-type-a/dp/1329311
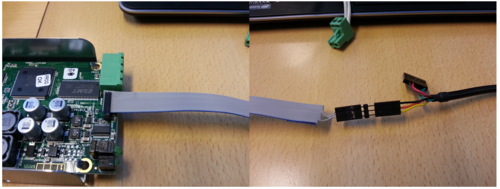
- Create an adapter cable to connect to the debug connector on Flowire:
Suggested type: http://no.farnell.com/harwin/m50-9011042/receptacle-to-dip-150mm-20way/dp/2289813
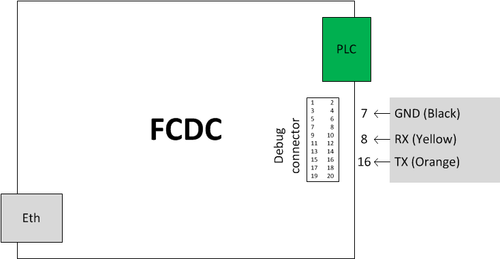
- On the Flowire, you must connect to these pins:
- 7: GND
- 8: UART1_TX – Connect this to Rx on the serial cable
- 16: UART1_RX – Connect this to Tx on the serial cable
PC setup
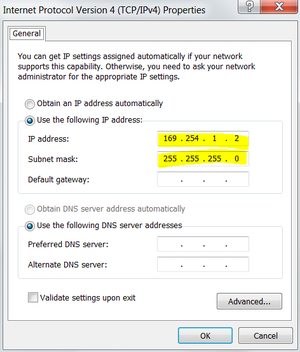
- Set static IP address 169.254.1.2 on your PC
- Connect the USB-Serial cable
- Check the "Windows Device Manager" to see which serial port it chooses. It will be listed under “Ports (COM % LPT)” as USB Serial COM port #x, where x represents the COM port number. Double click it and change the port settings from 9600 baud to 115200 baud.


