Flowire Software Upgrade Procedure: Difference between revisions
From Zenitel Wiki
| Line 30: | Line 30: | ||
=== TFTP Server Setup === | === TFTP Server Setup === | ||
* Start the | * Start the TFTP server and '''Browse''' to the folder where the software files are stored. Choose the PC LAN port as the server interface: | ||
[[File:FlowireTFTP.png|thumb|left|500px|TFTP server setup]] | [[File:FlowireTFTP.png|thumb|left|500px|TFTP server setup]] | ||
<br style="clear:both;" /> | <br style="clear:both;" /> | ||
Revision as of 09:40, 23 October 2015
This article describes how to upgrade the software in Flowire devices.
There are different ways, depending on how old the current software is:
- If the current software is 4.x.x.x, the upgrade can be done from the web page of the Flowire unit, or by using the VS-IMT tool
- If the current software is 1.2.1, the upgrade must be done via the serial interface of the Flowire unit
Requirements
The following equipment is required to perform the upgrade:
- Windows PC
- TFTP server, for example Tftpd32 or Tftpd64 by Ph. Jounin (http://tftpd32.jounin.net)
- Telnet software*, for example PuTTY by Simon Tatham (http://www.chiark.greenend.org.uk/~sgtatham/putty/)
- A network switch
- 2 Ethernet cables
- USB-Serial cable with JTAG connector*
- Flowire unit
- Flowire power supply
- Software for the Flowire. Download the software here.
* Only required for upgrade from old software version 1.2.1
Upgrading from software version 4.00
Flowire units with software version 4.x.x.x can be upgraded through the web interface of the Flowire.
PC Setup
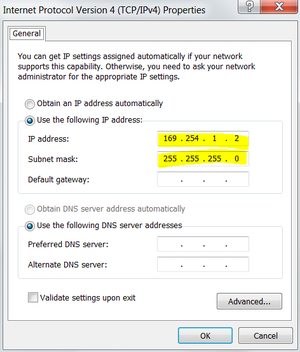
- Set the IP address of your computer to 169.254.1.2, subnet mask 255.255.255.0:
TFTP Server Setup
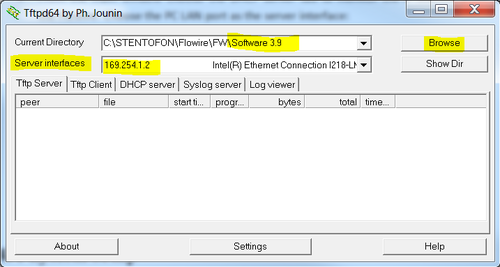
- Start the TFTP server and Browse to the folder where the software files are stored. Choose the PC LAN port as the server interface:
Physical Setup
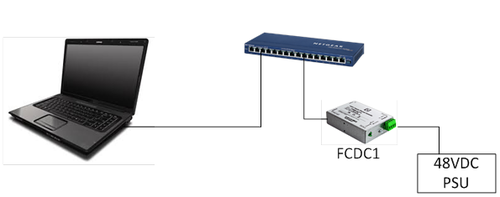
- Connect the PC to the switch using an ethernet cable
- Connect the Flowire to the switch using an ethernet cable
- Connect the power supply to the Flowire unit
Upgrade through web interface
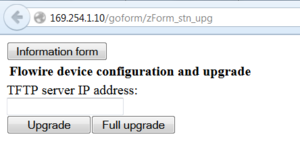
Use a standard web browser and type http://169.254.1.10/goform/zForm_stn_upg in the address field.
Enter the TFTP server IP address and select either Upgrade or Full Upgrade.
Upgrade: Upgrades the software and keeps all custom settings
Full Upgrade: Upgrades the software and performs a reset to factory settings
Upgrading using IMT
xxx
Upgrade from software version 1.2.1
Flowire units running software version 1.2.1 must be upgraded via its serial interface.
Requirements
The following equipment is required to perform the upgrade:
- TFTP server, for example Tftpd32 or Tftpd64 by Ph. Jounin (http://tftpd32.jounin.net)
- Telnet software, for example PuTTY by Simon Tatham (http://www.chiark.greenend.org.uk/~sgtatham/putty/)
- A network switch
- USB-Serial cable with JTAG connector*
- Flowire unit with power supply
- Software for the Flowire. Download the software here.
USB-Serial cable
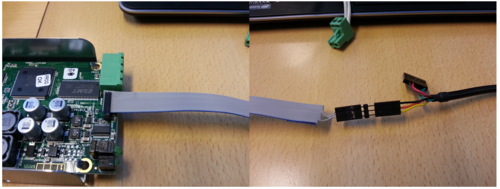
A special USB to Serial cable has to be used for the software upgrade. The cable can be made out of two items:
- An USB to RS232 cable with 3,3V TTL level. For example: http://au.element14.com/ftdi/ttl-232r-3v3/connector-type-a/dp/1329311
- A ribbon cable. Suggested type: http://no.farnell.com/harwin/m50-9011042/receptacle-to-dip-150mm-20way/dp/2289813
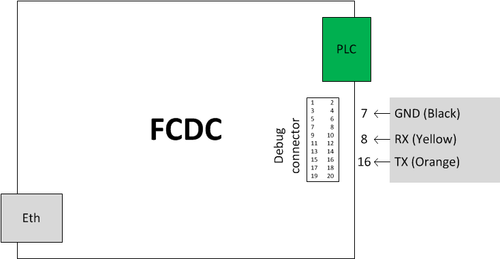
With these two items, make an adapter cable which connects the debug connector of the Flowire to the USB port of the PC:
- On the Flowire, connect to these pins:
- Pin 7: GND
- Pin 8: TX (Transmit) – Connect this to Rx on the serial cable
- Pin 16: RX (Receive) – Connect this to Tx on the serial cable
PC setup
- Set the IP address of your computer to 169.254.1.2, subnet mask 255.255.255.0:
- Connect the USB-Serial cable to the USB port of the PC
- In the Control Panel, open the Device Manager to see which serial port has been assigned. It will be listed under Ports (COM & LPT) as USB Serial COM port #x, where x represents the COM port number. Double click it and change the port settings from 9600 baud to 115200 baud.
TFTP server setup
- Start the Tftpd program on the PC
- From the main window browse to the folder where the software files are stored. Choose the PC LAN port as the server interface:
Physical setup
- Do not connect the power supply to the Flowire unit yet
- Take of the top lid of the Flowire by unscrewing the two screws
- Locate the JTAG and connect the cable, cable pointing away from the PCB
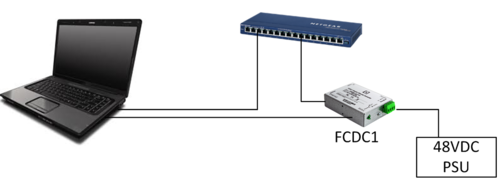
- Connect the PC to the switch using an ethernet cable
- Connect the Flowire to the switch using an ethernet cable
Upgrade through Telnet
Telnet Setup
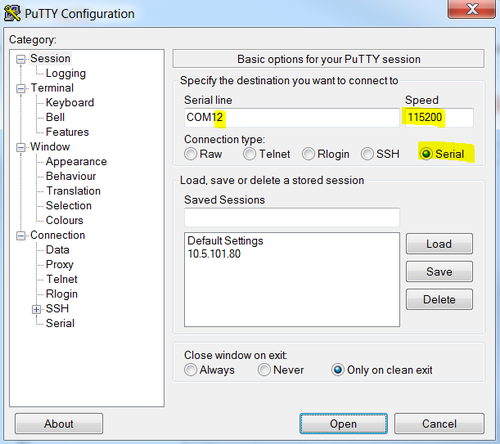
- Open PuTTY
- Choose Connection Type Serial, change Speed to 115200 and make sure it has the right COM port number:
When all settings are correct press the Open button. A new command window will open.
Version check
By running this command you can see the current software version:
cat /proc/net/plc/version
Upgrade
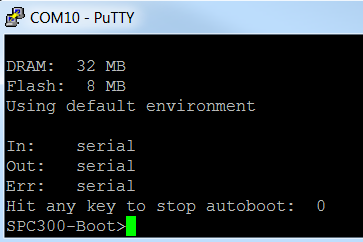
- While holding down the space bar (or actually any key), power up the Flowire. You should see data in the command window. Once you see data, release the space bar.
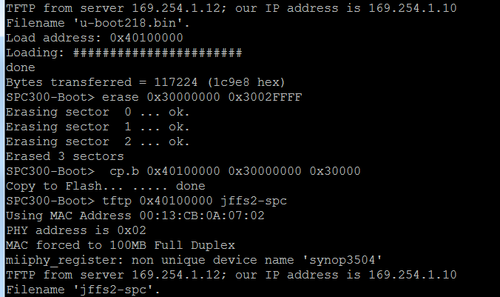
- Enter these commands, one at a time, and press [Enter] after each command:
- setenv serverip 169.254.1.2
- setenv ipaddr 169.254.1.10
- protect off all
- tftp 0x40100000 u-boot218.bin
- erase 0x30000000 0x3002FFFF
- cp.b 0x40100000 0x30000000 0x30000
- tftp 0x40100000 jffs2-spc
- erase 0x30040000 0x3013FFFF
- cp.b 0x40100000 0x30040000 0x100000
- tftp 0x40100000 linux-spc
- erase 0x30140000 0x3049FFFF
- cp.b 0x40100000 0x30140000 0x360000
- reset
Example:
TIP! Mark the text line and copy it (right click > copy, or Ctrl+C). In the PuTTY window right click with the mouse and the text is instantly pasted. Hit [enter]. Copy/paste one line at a time.
- When the Flowire is back online you can login with root.
- By running this command you can see the new software version:
- cat /proc/net/plc/version
- The procedure is now finished. The Flowire can be disconnected and the next unit can be upgraded.

