Flowire clusters: Difference between revisions
From Zenitel Wiki
| Line 45: | Line 45: | ||
== Setting the NMK in an installation with TFIX stations == | == Setting the NMK in an installation with TFIX stations == | ||
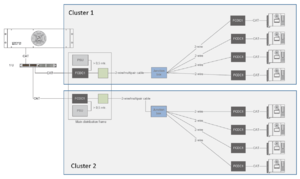
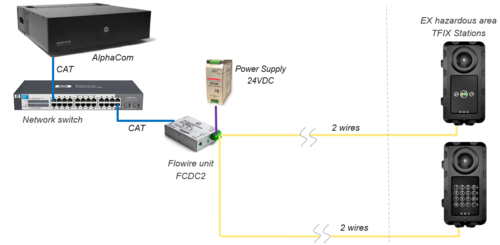
[[File:Flowire TFIX.PNG|thumb|right|500px|A typical TFIX installation]] | |||
The TFIX station has an embedded Flowire unit. | The TFIX station has an embedded Flowire unit. | ||
Change the NMK Password in the TFIX units first, and finally change the password in the central Flowire unit. | Change the NMK Password in the TFIX units first, and finally change the password in the central Flowire unit. | ||
Revision as of 12:26, 26 August 2015
When there are several Flowire clusters in an installation, the different clusters must be separated to avoid crosstalk between the clusters. When crosstalk is present, a Flowire unit on one cluster might "jump over" to the other cluster, causing errors in the communication.
Cluster separation can be achieved in two ways:
- Separation by Network Management Key (NMK) (recommended)
- Physical separation
Separation by Network Management Key (NMK)
The recommended way is to separate clusters by using different Network Management Key. The NMK is a kind of a encryption key used by the communication between Flowire units. When implementing different NMKs, it will not be possible for a Flowire unit to "jump" to another cluster with a different NMK.
All Flowires within the same cluster must have same NMK in order to communicate with each other.
Setting the NMK
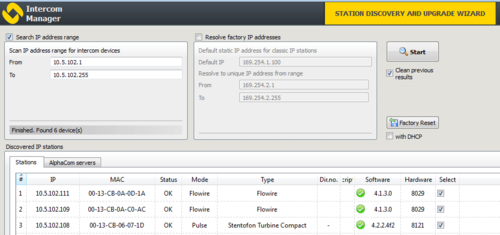
The NMK is set by logging on to the Flowire unit using a web browser. The Flowire units are automatically assigned an IP address from the network if there is a DHCP server present. You can use the IMT tool to discover the IP addresses of the Flowire units.
If there is no DHCP server on the network, the Flowire units will have a static IP address 169.254.1.10. In order to access the web interface you need to isolate the Flowire units one by one, and access it via 169.254.1.10. Although it is not necessary for the Flowire to perform its function, it is good practice to change the static IP to something unique at the same time, for easier maintenance in the future.
When you have accessed the web interface, it will show you some device information, including the current NMK Password and the software version. Check that the Flowire unit has the latest software, else it should be upgraded. The easiest way to do a software upgrade, is from the IMT tool.
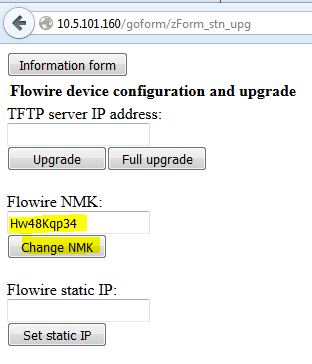
To set a new NMK, select the button "Upgrade form", and enter a new Flowire NMK:
It is good practice to label the Flowire unit with the new NMK.
The default NMK is HomePlugAV0123.
Physical separation
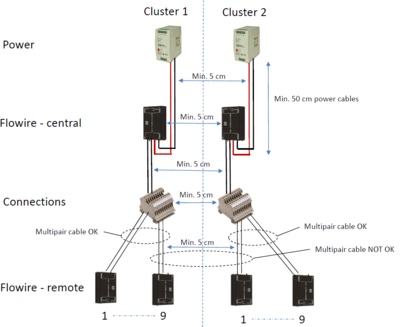
Both the Flowire units, the power cable, and the link cable must have have a certain distance between them. Minimum distance is 5 cm. Crosstalk might appear if for instance the cables for two different clusters are running on each side of a wall.
Setting the NMK in an installation with TFIX stations
The TFIX station has an embedded Flowire unit.
Change the NMK Password in the TFIX units first, and finally change the password in the central Flowire unit.
If there is no DHCP server present, you first need to isolate on of the central Flowire (disconnect the line to the TFIXs), and access it via 169.254.1.10. Then change its IP address to something different, say 169.254.1.11. Leave the NMK Password to the default value. Then connect one TFIX to the line, and access it at 169.254.1.10. Change the IP address to something not default, say 169.254.1.12, and access it on the new address and set a new NMK Password. Now connect the second TFIX and access it by 169.254.1.10, and follow the same procedure. Change IP address first, then the NMK Password. Give it the same NMK password as the first TFIX. Do the same with the remaining TFIX units. Finally log on to the central Flowire unit (e.g. 169.254.1.11) and change to the new NMK Password.
NOTE!! You must write down the new password! We recommend to stick a label with the NMK inside TFIX unit. If the central Flowire fails in the future, and you don't know the password of the TFIX Flowire, you will not be able to access the TFIX unit any longer and it will be permanently out of service.

