Zenitel PAVA Integration (Zenitel Connect Pro): Difference between revisions
From Zenitel Wiki
No edit summary |
No edit summary |
||
| Line 1: | Line 1: | ||
{{CL}}[[Image:Principle zcp pava v2.png|right|700px]] | {{CL}}[[Image:Principle zcp pava v2.png|right|700px]] | ||
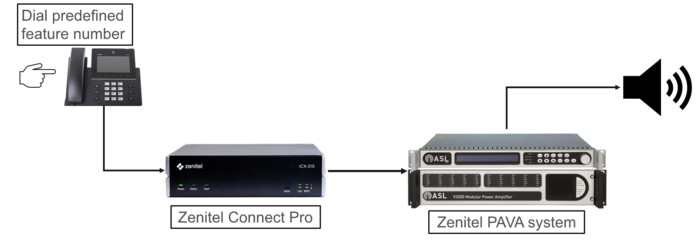
This article describes the integration between a Zenitel Connect Pro system and a Vipedia PAVA system, and how to configure both sides of the integration. The integration makes it possible from a user in the Zenitel Connect Pro to trigger features within the Vipedia PAVA system. | This article describes the '''integration between a Zenitel Connect Pro system and a Vipedia PAVA system''', and how to configure both sides of the integration. The integration makes it possible from a user in the Zenitel Connect Pro to trigger features within the Vipedia PAVA system. | ||
Extension numbers dialed within Zenitel Connect Pro can be linked to 4 different features in the Vipedia PAVA system: | Extension numbers dialed within Zenitel Connect Pro can be linked to 4 different features in the Vipedia PAVA system: | ||
Revision as of 10:22, 25 October 2024
This article describes the integration between a Zenitel Connect Pro system and a Vipedia PAVA system, and how to configure both sides of the integration. The integration makes it possible from a user in the Zenitel Connect Pro to trigger features within the Vipedia PAVA system.
Extension numbers dialed within Zenitel Connect Pro can be linked to 4 different features in the Vipedia PAVA system:
- Live announcement
- Store and Forward announcement
- Play a prerecorded DVA message
- Menu that gives a choice between the first three options
The integration does not require any additional hardware. In Zenitel Connect Pro there is a separate software container taking care of the integration. The communication betweeen Zenitel Connect Pro and this container is SIP based. The other side of this container communicates with the Vipedia PAVA system using a proprietary protocol.
Requirements
The integration is supported from the following versions:
- Zenitel Connect Pro: Version 1.3 or later
- PAVA (Vipedia): Software bundle V5
In the SCT configuration VIPA zones must have already been set up.
Zenitel Connect Pro configuration
The setup part in Zenitel Connect Pro consists of three steps:
- Defining the SIP Trunk, and
- Defining the number range towards the PAVA system.
- Uploading DVA messages to be played
Defining the SIP Trunk
In the web interface of Zenitel Connect Pro select External Communication. Under the Trunk Type "PAVA" click the Plus icon to add the Trunk to the VIPA container.
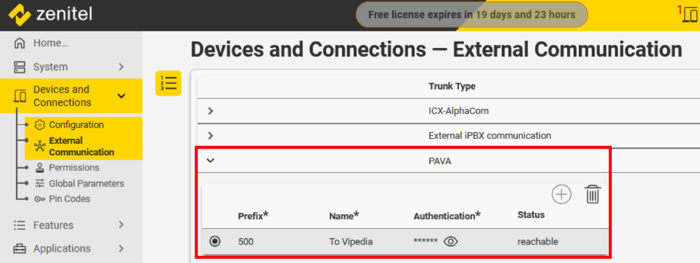 |
| Defining the Trunk |
There are 4 fields to fill in:
- Directory Number
- Name
- Username
- Password
The password will later be used in the configuration on the PAVA side. After filling in the information you can click the check mark to save the settings.
Defining the number range
Define the numbers to be used to access features in the PAVA system.
- Expand the right hand side menu to see the number range configuration
- Select the Trunk you just made
- Click the plus icon at the Outgoing Numbers Range section
- Fill in the start and end number. These numbers will later be used in the configuration on the PAVA side.
 |
| Defining the number range. In this example: 501 to 599. |
Uploading DVA messages
The DVA messages that you can play from Zenitel Connect Pro to the Zenitel PAVA system are stored on the Zenitel Connect Pro server. All audio messages are in a 48kHz sampling WAV format. If you upload a message with a different sample rate it wil be resampled to 48 kHz.
To distinguish between messages to be played within Zenitel Connect Pro and messages to be played to the Zenitel PAVA system the file name must start with dva_. This is the same as when uploading DVA messages to a Vipedia. The messages are uploaded in the menu for Audio Messages. The file name the DVA message gets in Zenitel Connect Pro is needed for the configuration on the Zenitel PAVA system side.
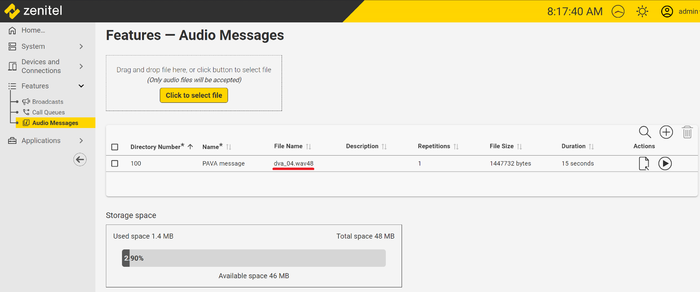 |
| Uploading a DVA message |
Vipedia system configuration
General
In the System Configuration Tool SCT, go to System > Telephony Gateway and tick "Enable Telephony Gateway". Configure the IP Address, Netmask and Gateway. The IP Address is the IP Address of the Zenitel Connect Pro.
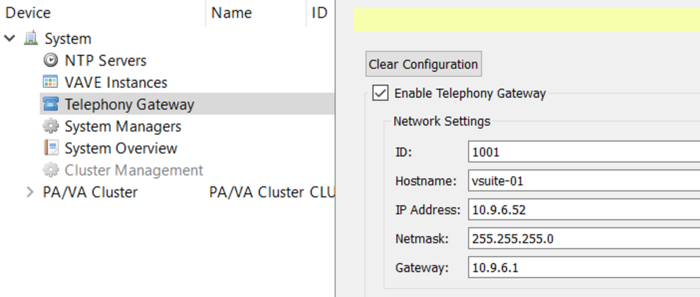 |
| Configuration of network parameters towards Zenitel Connect Pro |
Global tab
In Telephony Gateway under the SIP Settings section, select the Global tab. Here there are a few settings dedicated to SIP and how the system responds to calls.
- In the General field you can define the Chime that is to be used for announcements made from Zenitel Connect Pro and a possible gain.
- Under PMC Audio Stream you can change the multicast address used for the audio stream.
- Enabling Ring Before Answering will let the call ring for a few seconds before being answered by the VIPA container.
- Play Answer Message plays an answer message before the audio prompt. Reserved for future release.
- PIN protected is to secure who can make an announcement. Only people with this pin can access the PAVA system.
- Under Authentication is the secret that is used in Zenitel Connect Pro for the trunk.
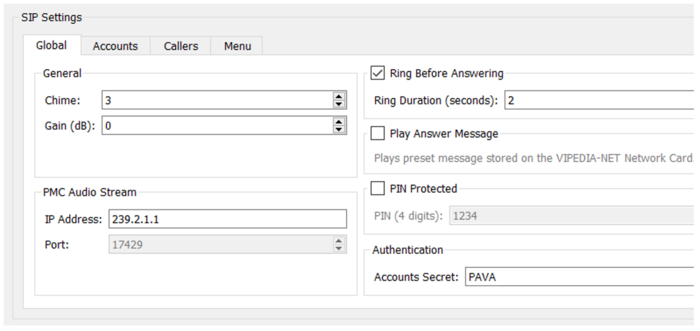 |
| Global SIP settings |
Accounts tab
Under the Accounts tab the extension numbers that can be called from Zenitel Connect Pro are defined. Click the button Add to start adding these extensions.
The information to fill in:
- Name: The extension number to be called
- Priority The priority used when setting up the audio route
- Announcement: Selects the mode of the announcement
- Live: A voice prompt will be heard at the caller side telling you to start speaking after the beep. The system will play a chime out to the zone after which you will hear the beep at the caller and you can do the announcement.
- Store and forward: A voice prompt will be heard at the caller side telling you to start talking after the beep and end with a #. The announcement will be played back to the caller and after confirming again with a # it will be played out to the zones.
- Play DVA: This will play a specified prerecorded DVA message out to specified zones. The DVA messages for this function are stored in the VIPA container.
- Menu: The Caller will be prompted to enter a 2 digit code to select a function.
- VIPA Zones: Select which VIPA zones this extension number should address.
Pressing the Add button adds the extension to the table but keeps the pop up open to keep adding more numbers. The pop up closes when clicking the Finished button.
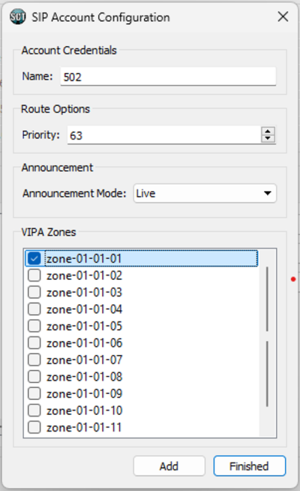 |
| Calling account number 502 will trigger live announcement with priority 63 to selected zone(s). |
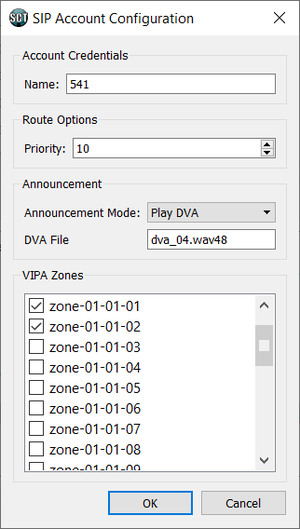 |
| Calling account number 541 will play a DVA message with file name dva_04.wav48. |
Callers tab
All numbers in Zenitel Connect Pro can call to the Zenitel PAVA system but in the Callers tab you have an option to define certain numbers to have higher priority than others. By clicking the Add button you can define these numbers. You will get a pop up where you can fill in the needed information.
- Extension: The extension number the call is originating from
- Priority Adjustment: This is the value added or subtracted from the basis priority given in the Accounts tab
- Accounts: The called extension numbers this adjustment is valid for
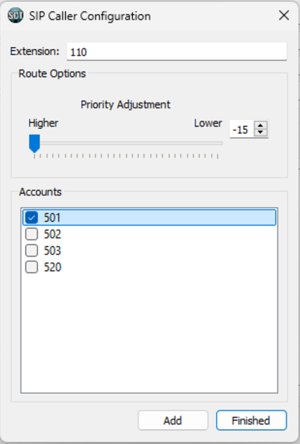 |
| When user 110 calls account 501, the priority is increased by 15 steps |
Menu tab
The Menu tab lets you configure the menu items to be available when dialing an Account which is configured with the Announcement mode = "menu". When clicking the Add button you will get a pop up that is very similar as the one for Accounts except for an Account name you have the 2 digit DTMF code. There is no setting for Priority as this has already been done in the Accounts tab.
Example: Calling 560 + 03 will trigger a live announcement with priority 10 to selected zones:
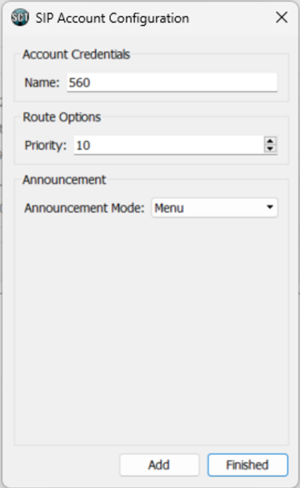 |
| Account 560 configured to be a menu access |
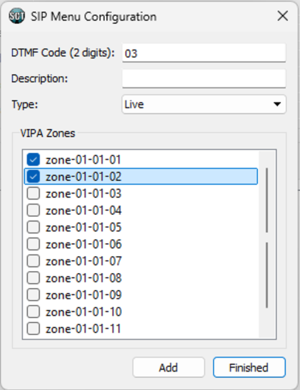 |
| A menu item configured in the menu tab. The code 03 gives live announcements to VIPA zones 1 and 2. |

