Flowire Software Upgrade Procedure: Difference between revisions
From Zenitel Wiki
| Line 74: | Line 74: | ||
==== Upgrade ==== | ==== Upgrade ==== | ||
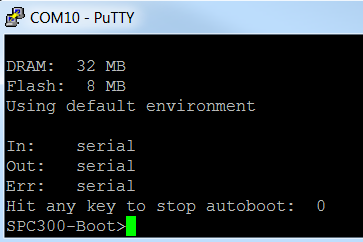
* While holding down the space bar (or actually any key), power up the Flowire. You should see data in the command window. Once you see data, release the space bar. | * While holding down the space bar (or actually any key), power up the Flowire. You should see data in the command window. Once you see data, release the space bar. | ||
[[File:Flowire Upgrade 2.PNG|thumb|left|500px]] | |||
<br style="clear:both;" /> | |||
*Enter these commands, one at a time, and press [Enter] after each command: | *Enter these commands, one at a time, and press [Enter] after each command: | ||
** ''setenv serverip 169.254.1.2'' | ** ''setenv serverip 169.254.1.2'' | ||
Revision as of 11:36, 10 June 2015
This step by step guide to upgrading the software in Flowire through its serial interface only applies to software version PLC-1.2.1.
For newer version jump to Upgrading through web interface
Requirements
The following equipment is required to perform the upgrade:
- Windows PC
- TFTP server, for example Tftpd32 or Tftpd64 by Ph. Jounin (http://tftpd32.jounin.net)
- Telnet software*, for example PuTTY by Simon Tatham (http://www.chiark.greenend.org.uk/~sgtatham/putty/)
- A network switch
- 2 Ethernet cables
- USB-Serial cable with JTAG connector*
- Flowire unit
- Flowire power supply
- Software for the Flowire. Download the software here.
* Only required for upgrade from old software version 1.2.1
Upgrade from old software version 1.2.1
USB-Serial cable
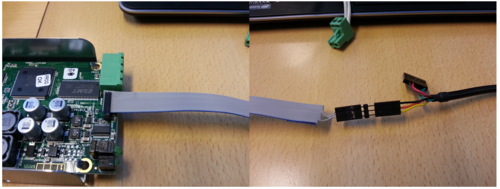
A special USB to Serial cable has to be used for the software upgrade. The cable can be made out of two items:
- An USB to RS232 cable with 3,3V TTL level. For example: http://au.element14.com/ftdi/ttl-232r-3v3/connector-type-a/dp/1329311
- A ribbon cable. Suggested type: http://no.farnell.com/harwin/m50-9011042/receptacle-to-dip-150mm-20way/dp/2289813
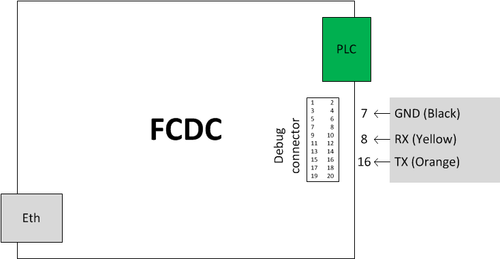
With these two items, make an adapter cable which connects the debug connector of the Flowire to the USB port of the PC:
- On the Flowire, connect to these pins:
- Pin 7: GND
- Pin 8: TX (Transmit) – Connect this to Rx on the serial cable
- Pin 16: RX (Receive) – Connect this to Tx on the serial cable
PC setup
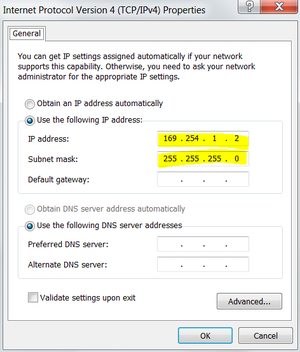
- Set the IP address of your computer to 169.254.1.2, subnet mask 255.255.255.0:
- Connect the USB-Serial cable to the USB port of the PC
- In the Control Panel, open the Device Manager to see which serial port has been assigned. It will be listed under Ports (COM & LPT) as USB Serial COM port #x, where x represents the COM port number. Double click it and change the port settings from 9600 baud to 115200 baud.
TFTP server setup
- Start the Tftpd program on the PC
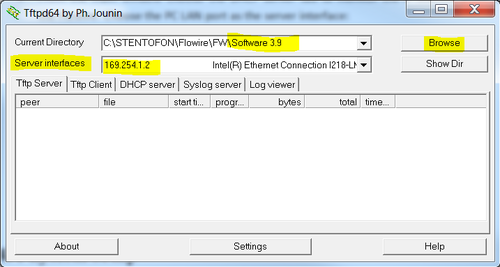
- From the main window browse to the folder where the software files are stored. Choose the PC LAN port as the server interface:
Physical setup
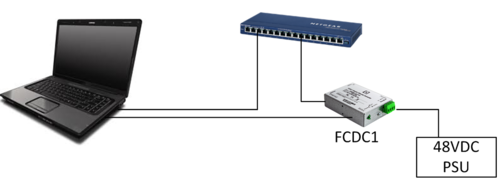
- Do not connect the power supply to the Flowire unit yet
- Take of the top lid of the Flowire by unscrewing the two screws
- Locate the JTAG and connect the cable, cable pointing away from the PCB
- Connect the PC to the switch using an ethernet cable
- Connect the Flowire to the switch using an ethernet cable
Upgrade through Telnet
Telnet Setup
- Open PuTTY
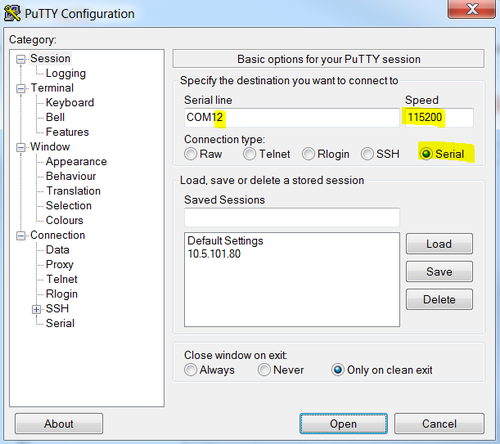
- Choose Connection Type Serial, change Speed to 115200 and make sure it has the right COM port number:
When all settings are correct press the Open button. A new command window will open.
Version check
By running this command you can see the current software version:
cat /proc/net/plc/version
Upgrade
- While holding down the space bar (or actually any key), power up the Flowire. You should see data in the command window. Once you see data, release the space bar.
- Enter these commands, one at a time, and press [Enter] after each command:
- setenv serverip 169.254.1.2
- setenv ipaddr 169.254.1.10
- protect off all
- tftp 0x40100000 u-boot218.bin
- erase 0x30000000 0x3002FFFF
- cp.b 0x40100000 0x30000000 0x30000
- tftp 0x40100000 jffs2-spc
- erase 0x30040000 0x3013FFFF
- cp.b 0x40100000 0x30040000 0x100000
- tftp 0x40100000 linux-spc
- erase 0x30140000 0x3049FFFF
- cp.b 0x40100000 0x30140000 0x360000
- reset
TIP! Mark the text line and copy it (right click > copy, or Ctrl+C). In the PuTTY window right click with the mouse and the text is instantly pasted. Hit [enter]. Copy/paste one line at a time.
- When the Flowire is back online you can login with root.
- By running this command you can see the new software version:
- cat /proc/net/plc/version
- The procedure is now finished. The Flowire can be disconnected and the next unit can be upgraded.
Upgrading from new software version 4.00
Flowire units with software version zenitel-rel-4.00 can be upgraded through the web interface.
PC Setup
- Set the IP address of your computer to 169.254.1.2, subnet mask 255.255.255.0:
TFTP Server Setup
- Start the Tftpd program on the PC
- From the main window browse to the folder where the software files are stored. Choose the PC LAN port as the server interface:
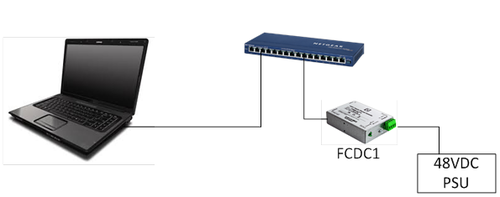
Physical Setup
- Connect the PC to the switch using an ethernet cable
- Connect the Flowire to the switch using an ethernet cable
- Connect the power supply to the Flowire unit
Upgrade through web interface
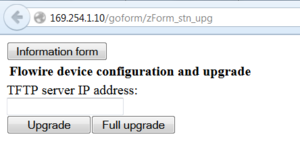
Use a standard web browser and type http://169.254.1.10/goform/zForm_stn_upg in the address field.
Enter the TFTP server IP address and select either Upgrade or Full Upgrade.
Upgrade: Upgrades the software and keeps all custom settings
Full Upgrade: Upgrades the software and performs a reset to factory settings
Upgrading using IMT
xxx

