Gooseneck Microphone - 1007007010: Difference between revisions
From Zenitel Wiki
No edit summary |
No edit summary |
||
| Line 6: | Line 6: | ||
* [[Dual Display Station - 1007007000]] | * [[Dual Display Station - 1007007000]] | ||
== Installing the Gooseneck Microphone == | |||
* Flip the station over so that the bottom side is facing up | * Flip the station over so that the bottom side is facing up | ||
* Slide the tab on the microphone foot into the slot on the side of the station | * Slide the tab on the microphone foot into the slot on the side of the station | ||
| Line 15: | Line 15: | ||
The internal microphone is automatically disconnected when the gooseneck microphone jack is inserted. | The internal microphone is automatically disconnected when the gooseneck microphone jack is inserted. | ||
== | == Related Articles == | ||
* [[IP Dual Display station: Noise from gooseneck mic]] | * [[IP Dual Display station: Noise from gooseneck mic]] | ||
* [http://www.zenitel.com/product/microphone-dual-display-station Additional Documentation on Zenitel.com] | |||
[[Category: INCA Backboxes and accessories]] | [[Category: INCA Backboxes and accessories]] | ||
[[Category: Backboxes and accessories for Analogue Stations]] | [[Category: Backboxes and accessories for Analogue Stations]] | ||
Revision as of 15:45, 16 March 2017
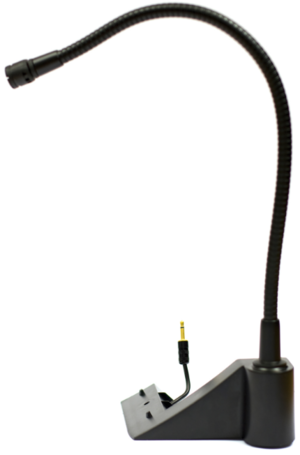
Gooseneck Microphone for:
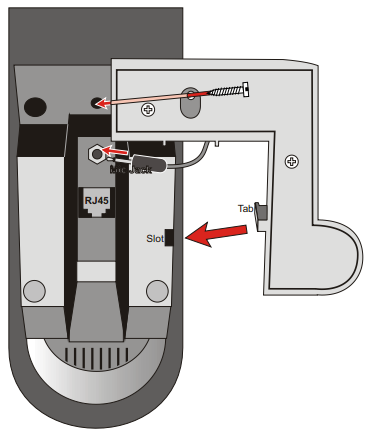
Installing the Gooseneck Microphone
- Flip the station over so that the bottom side is facing up
- Slide the tab on the microphone foot into the slot on the side of the station
- Secure the microphone foot to the station with a screw as shown
- Plug the microphone jack into the socket just above the RJ45 port
The internal microphone is automatically disconnected when the gooseneck microphone jack is inserted.


