Flowire clusters
From Zenitel Wiki
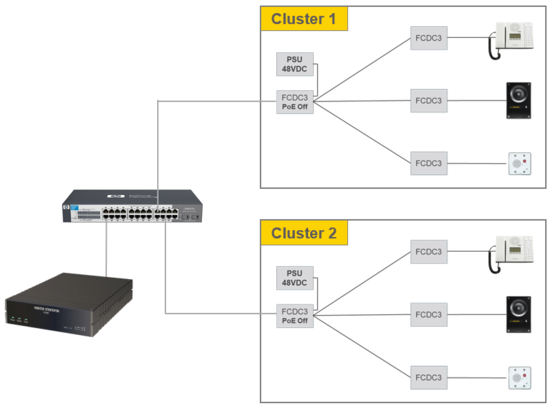
This article describes special considerations that must be considered when having multiple Flowire Clusters in an installation.
Power Supply
When using the Flowire model FCDC-3, it is possible to use the same Power Supply Unit (PSU) to power multiple Flowire clusters.

|
When using FCDC-1 or FCDC-2, each cluster must have its own Power Supply Unit (PSU). Failing to do so will cause major operational issues. |
Cluster separation
When there are several Flowire clusters in an installation, the different clusters must be separated to avoid crosstalk between the clusters. When crosstalk is present, a Flowire unit on one cluster might "jump over" to the other cluster, causing errors in the communication, and an unstable system. Cluster separation is achieved by using Network Password (NMK).
All Flowire units within the same cluster must have the same Network Password.
Setting the NMK
The NMK is set from the web interface of the Flowire unit. Find the IP address of the Flowire unit, and log on using a standard web browser. Default user/password: admin/alphaadmin.
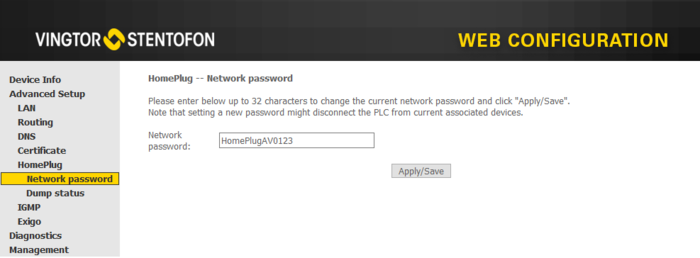
To set a new NMK select Advanced Setup > HomePlug > Network password:
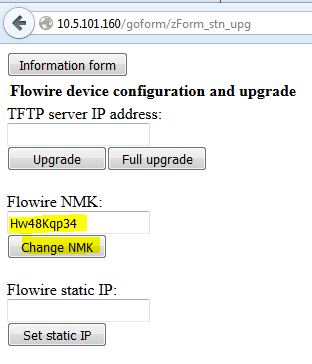
To set a new NMK in FCDC1 or FCDC2, select the button "Upgrade form", and enter a new Flowire NMK:
The NMK Password must be between 8 and 64 characters long, and is case sensitive.
It is good practice to label the Flowire unit with the new NMK.
The default NMK is HomePlugAV0123.
Setting the NMK in an installation with TFIX stations
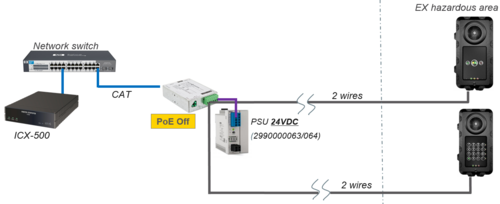
The TFIX station is an explosion proof station with an embedded Flowire unit.
If there is a need to change the NMK password, you must change it in the TFIX stations first, and finally change it in the central Flowire unit.
If there is no DHCP server present, all Flowire units will by default have the 169.254.1.10 IP address. The first step is to isolate the central Flowire by disconnect the line to the TFIX stations, and power off any other Flowire units in the installation. Access the web interface of the Flowire unit via address 169.254.1.10. Then change its IP address to something different, say 169.254.1.11. At this stage, leave the NMK Password to the default value. Then connect one TFIX to the line, and access it at 169.254.1.10. Change the IP address to something not default, say 169.254.1.12, and access it again on the new address. Now you can change the NMK Password on the TFIX station. The station will now temporarily loose connection with the central Flowire unit.
Now connect the second TFIX station to the line, access it by 169.254.1.10, and follow the same procedure. Change IP address first, then the NMK Password. Give it the same NMK password as the first TFIX station. Do the same with the remaining TFIX stations. Finally log on to the central Flowire unit (e.g. 169.254.1.11) and change the NMK Password also here. Now the communication should be up and running with all TFIX stations.
The NMK password can be restored to its default "HomePlugAV0123" by performing a factory default procedure on the TFIX station.
IGMP settings
In Flowire clusters with multiple endpoints, IGMP settings may need to be set for correct operation.
Set CCo
For optimal availability it is recommended to configure CCo mode.

|
In mixed cluster with both FCDC3 and FCDC1/2, FCDC1/2 should be set as "Not CCo", and one FCDC3 must be set as "CCo". |


