Cisco Call Manager 6 configuration guide
From Zenitel Wiki
This article describes how to set up Cisco Call Manager 6 with IP phones and SIP trunk line to AlphaCom.
Components used in this example:
- Cisco Unified Call Manager version 6.1.2.1000-13
- Cisco IP phone 7960
- AlphaCom E exchange
- AlphaCom stations
- SIP Intercom
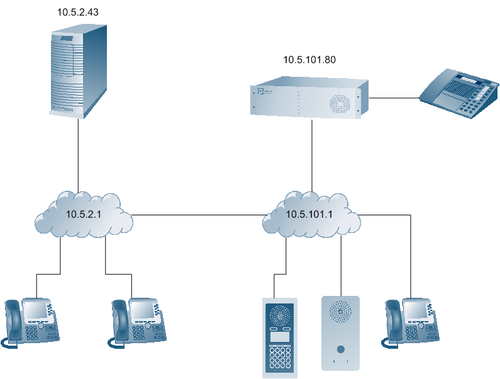
The network is used as an example throughout this article. The network should also preferably have a DHCP server configured. In our case, the DHCP server is configured with IP addresses 1-99=static, 100-255 DHCP automatic.
Contents
- 1 Cisco Unified Call Manager with Cisco IP Phones
- 1.1 Install Cisco Unified Call Manager server and operating system
- 1.2 Configure the Cisco Unified Call Manager
- 1.2.1 Configure a Date/Time Group
- 1.2.2 Configure a Region
- 1.2.3 Configure a SIP Trunk Security Profile
- 1.2.4 Configure a Route Partition
- 1.2.5 Configure a Calling Search Space
- 1.2.6 Configure a Media Resource Group
- 1.2.7 Configure a Media Resource Group List
- 1.2.8 Configure a Device Pool
- 1.2.9 Configure a Media Termination Point
- 1.2.10 Configure a SIP Trunk
- 1.2.11 Configure a Route Group
- 1.2.12 Configure a Route List
- 1.2.13 Configure a Route Pattern
- 1.2.14 Configure a Phone
- 1.3 Activate Cisco Services
- 1.4 Configure Cisco 7960 IP phone
- 2 AlphaCom Configuration
- 3 Verify the configuration
- 4 Related articles
- 5 Related documentation
Cisco Unified Call Manager with Cisco IP Phones
Install Cisco Unified Call Manager server and operating system
Your IT department or System Administrator installs the Cisco Unified Call Manager.
Configure the Cisco Unified Call Manager
- Open a browser window and type in the IP address of your Cisco Unified Call Manager (CUCM).
- Log on to Cisco Unified CM Administration with the proper Username and Password provided by your CUCM Administrator.
- Execute the following configuration: (Parameters not mentioned should be left untouched to their default setting)
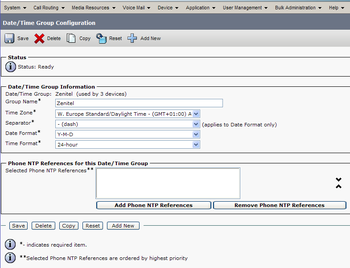
Configure a Date/Time Group
- System -> Date/Time Group -> Add New
- Group Name: Zenitel
- Time Zone: Choose your time zone
- Separator: -(dash)
- Date Format: Choose your date format
- Time Format. Choose your time format
- Press Save
- Press Reset/Restart
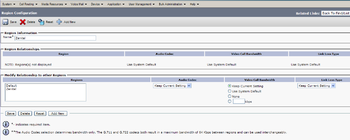
Configure a Region
- System -> Region -> Add New
- Name: Zenitel
- Press Save
- Press Reset/Restart
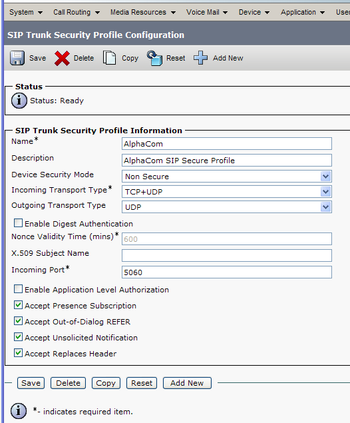
Configure a SIP Trunk Security Profile
- System -> Security Profile -> SIP Trunk Security Profile -> Add New
- Name: AlphaCom
- Description: AlphaCom SIP Secure Profile
- Device Security Mode: Non Secure
- Incoming Transport Type: TCP+UDP
- Outgoing Transport Type: UDP
- Enable:
- Accept Presence Subscription
- Accept Out-of-Dialog REFER
- Accept Unsolicited Notification
- Accept Replaces Header
- Press Save
- Press Reset/Restart
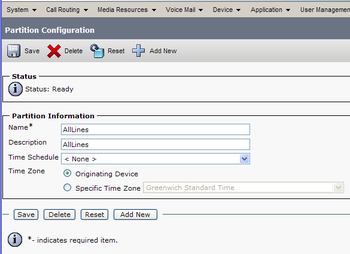
Configure a Route Partition
- Call Routing -> Class of Control -> Partition -> Add New
- Name: AllLines
- Press Save
- Press Reset/Restart
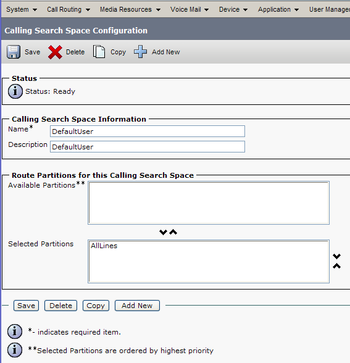
Configure a Calling Search Space
- Call Routing -> Class of Control -> Calling Search Space -> Add New
- Name: DefaultUser
- Description: DefaultUser
- Select AllLines in the ”Available Partitions” window and use the ”Move Down” arrow to move it to the ”Selected Partitions” window.
- Press Save
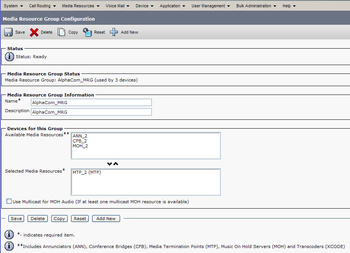
Configure a Media Resource Group
- Media Resources -> Media Resource Group -> Add New
- Name: AlphaCom_MRG
- Description: AlphaCom_MRG
- Select MTP_2 in the ”Available Media Resources” window and use the ”Move Down” arrow to move it to the ”Selected Media Resources” window.
- Press Save
- Press Reset/Restart
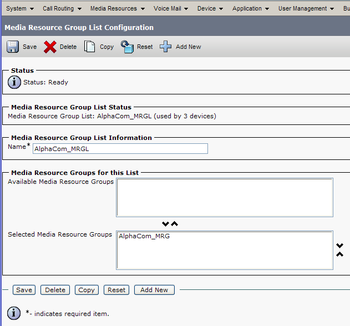
Configure a Media Resource Group List
- Media Resources -> Media Resource Group List -> Add New
- Name: AlphaCom_MRGL
- Select AlphaCom_MRG in the ”Available Media Resource Groups” window and use the ”Move Down” arrow to move it to the ”Selected Media Resource Groups” window.
- Press Save
- Press Reset/Restart
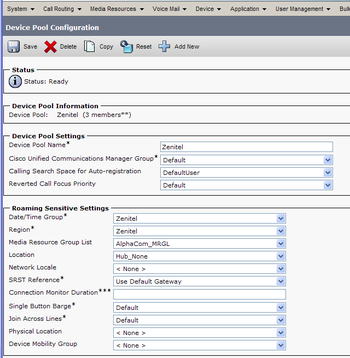
Configure a Device Pool
- System -> Device Pool -> Add New
- Name: Zenitel
- Cisco Unified Communications Manager Group: Default
- Calling Search Space for Auto-registration: DefaultUser
- Reverted Call Focus Priority: Default
- Date/Time Group: Zenitel
- Region: Zenitel
- Media Resource Group: AlphaCom_MRGL
- Location: Hub_None
- SRST Reference: Use Default Gateway
- Press Save
- Press Reset/Restart
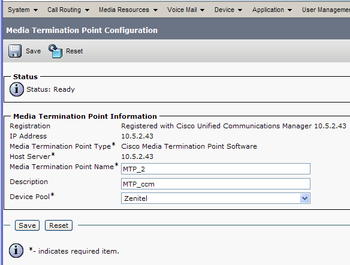
Configure a Media Termination Point
- Media Resources -> Media Termination Point -> Select: MTP_2
- Set Device Pool: Zenitel
- Press Save
- Press Reset/Restart
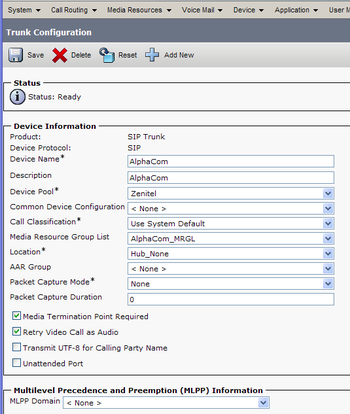
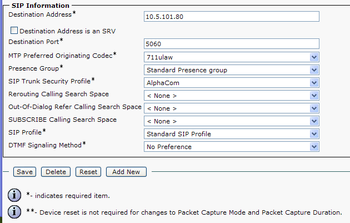
Configure a SIP Trunk
- Device -> Trunk -> Add New
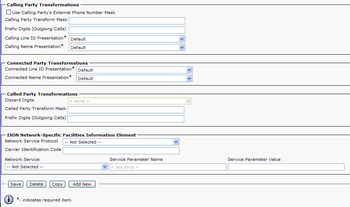
- Trunk Type: SIP Trunk
- Device Protocol: SIP
- Press Next
- Device Name: AlphaCom
- Description: AlphaCom
- Device Pool: Zenitel
- Media Resource Group List: AlphaCom_MRGL
- Enable: 'Media Termination Point Required'
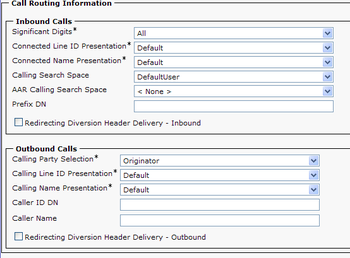
- Calling Search Space: DefaultUser
- Destination Adress: Your AlphaCom’s IP adress
- SIP Trunk Security Profile: AlphaCom
- SIP Profile: Standard SIP Profile
- Press Save
- Press Reset/Restart
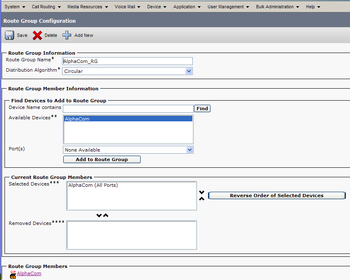
Configure a Route Group
- Call Routing -> Route/Hunt -> Route Group -> Add New
- Name: AlphaCom_RG
- Select AlphaCom from ”Available Devices” and press ”Add to Route Group”
- Press Save
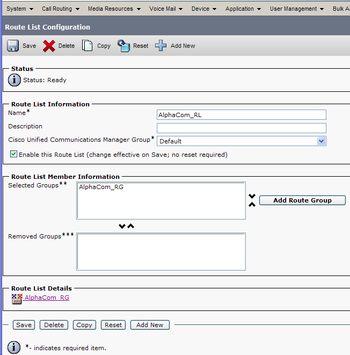
Configure a Route List
- Call Routing -> Route/Hunt -> Route List -> Add New
- Name: AlphaCom_RL
- Cisco Unified Communications Manager Group: Default
- Press Save
- Press Add Route Group
- Route Group: AlphaCom_RG [NON-QSIG]
- Press Save
- Press Save
- Press Reset/Restart
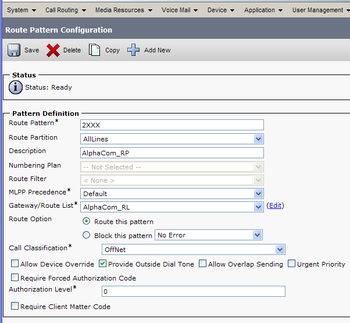
Configure a Route Pattern
- Call Routing -> Route/Hunt -> Route Pattern -> Add New
- Route Pattern: 2xxx (This allows calls to all numbers beginning with 2 in the AlphaCom)
- Route Partition: AllLines
- Description: AlphaCom_RP
- Gateway/Route List: AlphaCom_RL
- Press Save
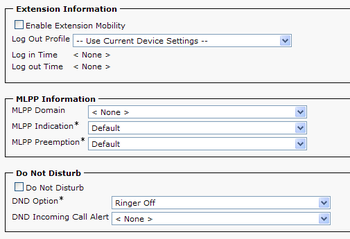
Configure a Phone
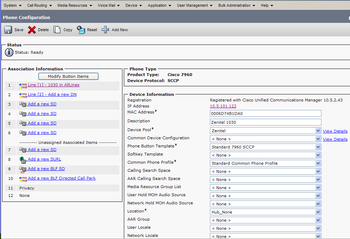
- Device -> Phone -> Add New
- Phone Type: Choose your IP phone type from the drop down list
- Press Next
- Select the device protocol: SCCP (This is the standard Cisco IP phone protocol).
- Press Next
- MAC Address: Enter your IP phones MAC address
- Description: Zenitel 1030
- Device Pool: Zenitel
- Phone button Template: Choose your IP phones specific template
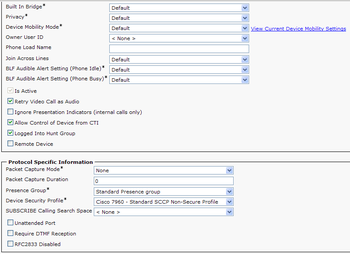
- Device security Profile: Choose your IP phone specific profile
- SIP Profile: Standard SIP Profile
- Press Save
- In the upper left corner press ”Line [1] – Add a new DN]
- Enter wanted directory number (here 1030)
- Route Partition: AllLines
- Calling Search Space: defaultUser
- ASCII Display (Internal Caller ID): CISCO 7960 (This is the wanted name for the phone. This name will be displayed in the AlphaCom stations, and should thus be configured the same as the Global Number in the AlphaCom)
- Press Save
- Press Reset/Restart
Activate Cisco Services
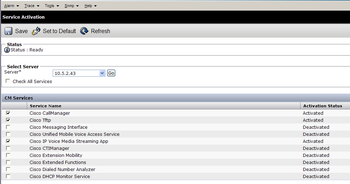
Navigation -> Cisco Unified Serviceability
- Tools -> Service Activation
- Activate the following services:
- Cisco CallManager
- Cisco Tftp
- Cisco IP Voice Media Streaming App
- Press Save (takes some time)
Configure Cisco 7960 IP phone
Connect a network cable to the phone. In this example we connect to a network with a DHCP server.
Power up the phone (48VDC, center positive).
Click "settings" button (rightmost, below the "i" button).
Select 3 Network Configuration. Notice that many fields (DHCP server, IP etc) is already set up automatically by the DHCP server.
Note: In the Network Configuration menu, settings are locked by default. To be able to change them, you must press this sequence: * * #.
33 Erase configuration: Change to Yes.
Save. The phone will reset. Return to the Network Configuration menu.
32 Alternate TFTP: Yes.
8 TFTP server 1: 10.5.2.43. (IP address for Cisco CM server).
Save. The phone will reset.
The phone will now register with Cisco CallManager, download configuration and be ready for use. (This takes about 1-2 minutes, or longer if an automatic firmware update is performed).
AlphaCom Configuration
AlphaWeb Configuration
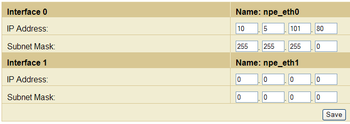
Assign IP address to the AlphaCom E Ethernet Port(s)
Log on to AlphaWeb and enter a valid IP address on the Ethernet port. In the example below, Ethernet port 1 is used. Consult your network administrator to obtain the IP address.
Assign IP routing to the AlphaCom E Ethernet Port(s)
Log on to AlphaWeb and create a default routing. This is essential if the CUCM and ACE are on two different networks.
Insert SIP Trunk licenses
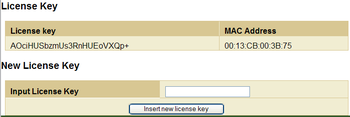
Log on to AlphaWeb and install the SIP Trunk License.
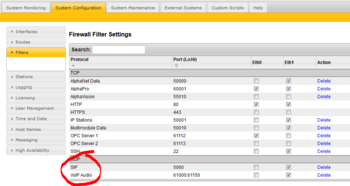
Firewall (filter) settings
- Enable the SIP protocol (UDP port 5060) on the desired Ethernet port. It is by default enabled for Ethernet port 1.
- Enable for VoIP audio (UDP port 61000 - 61150) on the desired Ethernet port. It is by default enabled for Ethernet port 1.
AlphaPro Configuration
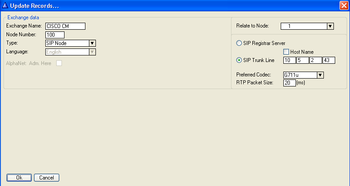
Create a SIP Trunk Node
From the AlphaPro main menu, use the ‘+’ button next to the ‘Select Exchange’ dropdown list to create a new exchange. The exchange type must be set to ‘SIP Node’.
Set the parameters as shown in the figure to the right.
The SIP Trunk IP address must be identical to the IP address of the Cisco Call Manager.
Note: If the AlphaCom is configured with a SIP Registar node in addition to the SIP Trunk node, the SIP Registar node must have a lower node number than the SIP Trunk node.
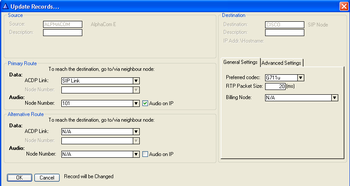
Define the AlphaCom / SIP routing
In Exchange & System > Net Routing use the Insert button to create a route between the AlphaCom and Cisco Call Manager.
Set Preferred codec to G711u and RTP Packet Size to 20 ms.
Create access numbers
The Cisco phones can be accessed in three different ways:
- Prefix number: Dial Prefix + Phone number. “Phone number” will be called
- Integrated Prefix number: Dial Prefix + Phone number. The prefix will be included as a part of the called telephone number.
- Global number: Dial the phone number without using prefix
Prefix number
The directory number must be programmed in the AlphaCom directory table with feature 81 and Node = SIP Trunk node number (100 in this example). In the field “Collect N more digits (SIP)” you must enter the maximum number of digits in a phone number.
When the prefix is dialed, the AlphaCom will wait for more digits. When the number of digits specified in the “Collect N more digits (SIP)” is collected, a call setup message is sent to the Cisco Call Manager. If fewer digits are entered, the AlphaCom will time out after 4 seconds, and the call setup message will be sent. You can also terminate the digit collection by pressing the M-key. The call setup message will then be sent immediately.
In the example to the right the directory number 0 is used as a prefix.
Dialing examples:
- 0 + 12345678: Telephone number 12345678 will be called
- 0 + 1234: After a 4 second timeout, telephone number 1234 will be called
- 0 + 1234 + M: Telephone number 1234 will be called
Integrated Prefix number
The directory number must be programmed in the AlphaCom directory table with feature 83 and Node = SIP Trunk node number (100 in this example). In the field “Collect N more digits (SIP)” you must enter the maximum number of digits in a phone number.
When the prefix is dialed, the AlphaCom will wait for further digits. When the number of digits specified in the “Collect N more digits (SIP)” is collected, a call setup message is sent to the Cisco Call Manager. If fewer digits are entered, the AlphaCom will time out after 4 seconds, and the call setup message will be sent. You can also terminate the digit collection by pressing the M-key. The call setup message will then be sent immediately.
In the example to the right the directory number 57 is used as a prefix.
Dialing examples:
- 57 + 12345678: Telephone number 5712345678 will be called
- 57 + 1234: After a 4 second timeout, telephone number 571234 will be called
- 57 + 1234 + M: Telephone number 571234 will be called
Global number
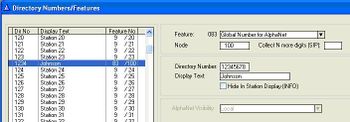
The directory number must be programmed in the AlphaCom directory table with feature 83 and Node = SIP Trunk node number (100 in this example). The field “Collect N more digits (SIP)” must be left blank.
When the global number is dialed, the AlphaCom will immediately send a call setup message to the Cisco Call Manager.
In the example to the right the directory number 12345678 is defined as a global number.
When dialing this number a call setup message is sent to the Cisco Call Manager, instructing it to call this phone number.
Update the exchange
Log on to the exchange and update the exchange by pressing the SendAll button. Reset the exchange when the transfer is finnished.
Verify the configuration
You should now be able to dial from an AlphaCom station to a Cisco IP station and from a Cisco IP station to an AlphaCom station.
Troubleshooting:
Related articles
Related documentation
- [1] CiscoWiki: http://supportwiki.cisco.com
- [2] For CUCM 6: http://www.cisco.com/univercd/cc/td/doc/product/voice/c_callmg/6_0/index.htm.
- [3] For 7960 phone: http://www.cisco.com/univercd/cc/td/doc/product/voice/c_ipphon/english/ipp7960/sipadmin/5_0/7960s.pdf

