Genetec Security Center - IC-EDGE/ICX-AlphaCom plugin
From Zenitel Wiki
Introduction
The interface between AlphaCom, ICX and IC-EDGE and Genetec Security Center is through an integration module which is available on the download page of Zenitel Wiki. This article assumes that the reader is
- familiar with setup and operation of Security Center
- that Security Center is operational, with all to the system connected cameras configured
Only points which are specific to this integration and to it connected intercom stations are described.
Compatibility
- Genetec Security Center: 5.7 SR4 and higher
- ICX:
- 1.0.3.1 - Full compatibility
- 1.0.3.0 - do not configure CRMV as part of a Ringing Group
- AlphaCom:
- 13.1.3.3 - Full compatibility
- 13.1.3.2 - do not configure CRMV as part of a Ringing Group
- All earlier version of AMC-IP: not compatible with ITSV-1
- IC-EDGE: 5.1.3.0
- With IC-EDGE 5.0.3.0 it is not possible to auto-discover station names, these need to be entered manually
Licensing
The integration is licensed.
Genetec license
An integration license for Security Center is available from Genetec:
- GSC-1SDK-Zenitel-VS
Each active client connection (Security Desk or Config Tool) requires 1x GSC-1SDK-Zenitel-VS
ICX
ICX requires the presence of the appropriate API/OPC license.
- 1002602306 - ILI-API64 - API License Supporting 64 Stations
- 1002602309 - ILI-API512 - API License Supporting 512 Stations
With ICX it is possible to purchase a single Product Key which covers all stations connected to all ICX's in a network. ICX licenses can be stacked, i.e. 1x 1002602306 + 2x 1002602309 gives 1088 API licenses which can be used on 2 or more ICXs.
IC-EDGE
IC-EDGE does not require a specific license for integration.
AlphaCom XE
AlphaCom requires the presence of the appropriate API/OPC license. Note that every AlphaCom in an AlphaNet requires such a license.
- 1009649901 - STENTOFON API License Supporting 40 Stations
- 1009649902 - STENTOFON API License Supporting 80 Stations
- 1009649903 - STENTOFON API License Supporting 160 Stations
- 1009649904 - STENTOFON API License Supporting 240 Stations
- 1009649905 - STENTOFON API License Supporting 320 Stations
- 1009649906 - STENTOFON API License Supporting 400 Stations
- 1009649907 - STENTOFON API License Supporting 552 Stations
Installation
This description assumes that Security Center has been installed and is running. It is also assumed that Security Center has been licensed appropriately.
Prerequisite
The interface module uses .NET 4.6.2. Please make certain that this version of the .NET framework is installed prior to installing the interface module itself.
Genetec Server
In case the plugin is installed on a PC where also the Genetec Server is running, the server must be stopped prior to plugin installation. This is not necessary on PC's which only have the Config Tool and/or Security Desk clients.
In Computer Management, stop the service Genetec Server prior to installing the plugin. Once the plugin has been installed, start the service again.
This same procedure must also be followed if the plugin needs to be uninstalled, or a newer version needs to be installed.
Plugin installation
The name of the installation file is VS.GSCPlugin.x.x.x.x.exe, where x.x.x.x is the version number.
VS.GSC = Vingtor-Stentofon.Genetec Security Center
Double click the exe-file to start the installation procedure. Click through the installation option screens, making the appropriate choices, and select Install to do the actual plugin installation.
Launch the plugin configuration either in the last screen of the installation wizard or via menu or desktop icons.
The plugin must be installed on every PC with a Config Tool and/or Security Desk client, where the operator also needs to have access to the ICX or IC-EDGE task.
Plugin setup
Company Name, Application Name and Application ID are shown for reference only. Security Center uses this information to check whether the correct Genetec license is present.
Select whether the plugin should be available in Config Tool, Security Desk or both. The plugin offers the same functionality for both Config Tool and Security Desk, but the functionality can be restricted for Security Desk later in this installation procedure.
Select the system type with which Security Center will be integrated:
- IC-EDGE
- ICX - select ICX also if the system to be integrated is AlphaCom XE (in the rest of this article only reference will be made to ICX, but the operation is the same for AlphaCom XE)
To configure the system, refer to ICX - Configuration or IC-EDGE - Configuration depending on the Vingtor-Stentofon system to integrate to.
ICX - Configuration
Configuration for a system with AlphaCom, ICX or a combination of the 2 is the same and described in this paragraph.
Call requests and Ringing group
Operator stations of type CRMV work with both call requests and calls to a Ringing Group.
Operator stations of type ITSV-1 work best when the ITSV-1 is a member of a Ringing Group, and calls to it are made as Ringing Group calls. Call requests and ringing group calls can be accepted from the GUI in the ICX-task.
If stations can make calls in 'Private mode' to the ITSV-1, the call will be shown in the Call Request list with the annotation P. Such calls can only be accepted from the ITSV-1 be either lifting the handset or touching the Answer-button. The Call request buttons in a button set for such a station shall be set with Visible as disabled.
Note that calls to Ringing Groups 6701-6710 have by default a priority of 155 or higher. Ringing groups shall in any case have a priority of 150 and higher to have the call annunciated with a ringing tone at the operator station. By default, call requests and ringing group calls with a priority of 140 and higher are indicated as high priority in Security Desk and Config Tool. It is possible to change this to be able to also have ringing group calls indicated as standard priority:
- Go to C:\Program Files (x86)\Vingtor Stentofon\VS-GSCPlugin
- Open the file VS.GSCPlugin.ConfigData.xml with a text editor
- Locate the line <HighPriorityLevel>140</HighPriorityLevel> and change the value 140 to a value appropriate for your application
- Save the file
- Restart Config Tool and/or Security Desk
The ITSV-1 is a Vingtor-Stentofon SIP telephone.To be able to use it as an operator intercom in an ICX-system, the following setting must be made:
- Log in into the ITSV-1 web page (default credentials: admin/alphaadmin)
- Navigate to Call Settings related to the account that is used to connect to the ICX.
- Make the setting as indicted in the picture below
Communication with ICX
Each Config Tool and Security Desk needs its own communication channel with ICX.
Communication via API ports 61112 and 61113
An ICX has 2 API ports available, 61112 and 61113. These 2 ports are independent of each other, and allow 2 entities to communicate with ICX. In an AlphaNet it is possible to use API-ports of multiple ICX's, up to a maximum of 10 ports.
Each port 61112 or 61113 allows one TCP/IP connection.
Communication via the AlphaNet Service Provider
The AlphaNet Service Provider connects to one port on an ICX (either 61112 or 61113) and provides a single port for entities to connect to. This port allows multiple connections. The AlphaNet Service Provider can therefore be seen as a port expander.
ICX-Task
Select Config Tool or Security Desk to configure the system. Which of the 2 to select depends on the choice which was made during plugin setup. In the rest of this article it is assumed that the plugin is available in at least Config tool.
- Start Config tool
- Under Tasks click the ICX-icon
The ICX-task will now be opened.
Options
There are 3 sections in the Options dialog.
Make the changes as required in the Options-dialog and click OK to save the changes.
AlphaNet setup
- Direct connect - Enable this if communication is directly with ICX, that is with either ICX API-port 61112 or 61113; When this setting is disabled, connection to the ICX will be through the AlphaNet Service Provider
- ICX (provider) address - This is the IP-address of either the ICX, or the PC on which the AlphaNet Service Provider is running
- ICX (provider) port - This is the port to connect to of either the ICX (61112 or 61113), or of the PC on which the AlphaNet Service Provider is running; in this latter case the port to be used is as configured in the AlphaNet Service Provider
Operator
Enter the node number and directory number of the station which will be used by the operator to answer call requests and make calls.
Configuration
Configuration file
All nodes and all stations can be auto-discovered. This information, together with settings related to operation and camera association is stored in an XML-file. By selecting an already existing file (in case the configuration has been done for a different operator already) it is not necessary to do the same task multiple times.
Simply do all configuration for one operator, and store the resulting file VS.GSCPlugin.ProjectData.xml in a location which can be reached by any operator workstation. Then simply point to this file every time a new workstation is configured for the ICX-task.
Disable config
Setting this will disable the possibility for users of the Security Desk application to make changes to the configuration. Configuration mode will not be available anymore. There are 2 possibilities to provide access again:
- On a workstation which also has Config Tool installed, open the Options-dialog in Config Tool and disable the setting
- Navigate to the file VS.GSCPlugin.ConfigData.xml, normally located at C:\Program Files (x86)\Vingtor Stentofon\VS-GSCPlugin and edit it; Find the line <DisableConfig>true</DisableConfig> and change true to false; Save the file
Explore
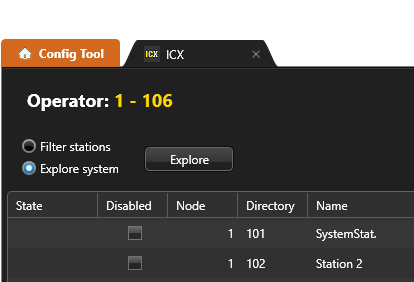
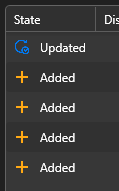
Select the radio-button Explore system and click Explore. All configured ICXs and stations will be discovered and listed with directory number and display text as defined in the ICX. Newly discovered stations are indicated with +Added, station of which the name has changed since last discovery are indicated with Updated.
Station configuration
Cameras
Up to 4 cameras can be assigned to each station. These cameras can be displayed on an incoming call request from that station or during a conversation.
To assign cameras, click on the TAB Cameras. Select a camera and drag/drop that camera onto a camera pane icon to the right of the station name with which the camera should be associated. A number will appear inside that camera pane icon, this number is the logical ID of that camera within Genetec Security Center.
To remove the camera association, right-click on the camera pane icon and select Remove camerax ..., where x is related to the camera pane number for that station.
Actions
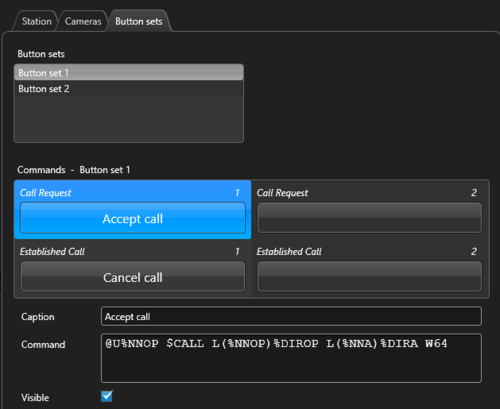
A button set is a set of 4 buttons, 2 for the call request state and 2 for the established connection state. Two button sets can be programmed and one button set can be assigned to each station. The appropriate buttons will become available when there is a call request or an established call related to that station. Each button has several properties, select the button to program those properties:
- Caption - Enter the text label which will be shown on the button
- Command - Enter the command that shall be executed; A command shall be entered in ICX Simple Link Layer format. The following parameters can be used:
- %NNOP - the node number of the Operator station
- %DIROP - the directory number of the Operator station
- %NNA - the node number of the selected station in the call request list or the established call pane
- %DIRA - the directory number of the selected station in the call request list or the established call pane
- Visible - when enabled the button will be visible; this is to be able to hide buttons which have no action programmed
Button set 1 is assigned by default to all discovered stations. To change, select a station in the list and right click. Select menu item Button set > and then select the required button set or remove the button set.
Button set 1 has the following properties for Call Request button 1:
- Caption - Accept call
- Visible - enabled
- Action - @U%NNOP $CALL L(%NNOP)%DIROP L(%NNA)%DIRA W64
Button set 1 has the following properties for Established Call button 1:
- Caption - Cancel call
- Visible - enabled
- Action - @U%NNOP $C L(%NNOP)%DIROP
Open Door button
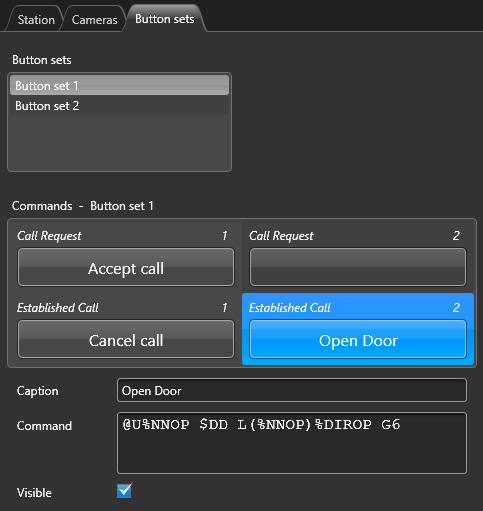
To be able to do door opening during conversation, a Open Door button must be added to the button set. We will use the Established Call button 2.
This button will have the following properties:
- Caption - Open Door
- Visible - enabled
- Action - @U%NNOP $DD L(%NNOP)%DIROP G6
Save and Load
When the configuration has been completed, click Save.
If during configuration it is necessary to go back to the current setup click Load; this will undo all configuration changes which have not been saved yet.
Switch between configuration mode and operational mode
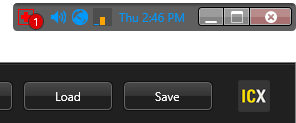
To change between operational mode and configuration mode, double click the ICX-icon in the top right corner of the ICX-task TAB.
IC-EDGE - Configuration
Select Config Tool or Security Desk to configure the system. Which of the 2 to select depends on the choice which was made during plugin setup. In the rest of this article it is assumed that the plugin is available in at least Config tool.
- Start Config tool
- Under Tasks click the IC-EDGE-icon
The IC-EDGE task will now be opened.
Options
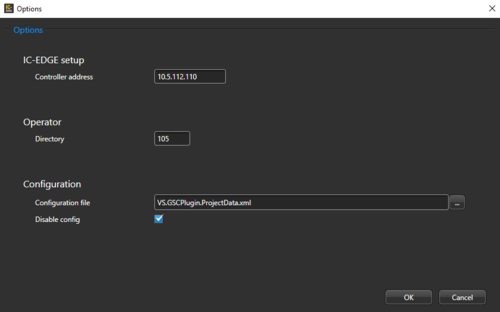
There are 3 sections in the Options dialog.
Make the changes as required in the Options-dialog and click OK to save the changes.
IC-EDGE setup
- Controller address - This is the IP-address of the Edge Controller
Operator
Enter the directory number of the station which will be used by the operator.
ITSV-1 as operator station in IC-EDGE
The ITSV-1 is a Vingtor-Stentofon SIP telephone.To be able to use it as an operator intercom in an IC-EDGE system, the following setting must be made:
- Log in into the ITSV-1 web page (default credentials: admin/alphaadmin)
- Navigate to SIP Settings related to the account that is used to connect to IC-EDGE.
- Make the setting as indicted in the picture below
Configuration
Configuration file
All nodes and all stations can be auto-discovered. This information, together with settings related to operation and camera association is stored in an XML-file. By selecting an already existing file (in case the configuration has been done for a different operator already) it is not necessary to do the same task multiple times.
Simply do all configuration for one operator, and store the resulting file VS.GSCPlugin.ProjectData.xml in a location which can be reached by any operator workstation. Then simply point to this file every time a new workstation is configured for the ICX-task.
Disable config
Setting this will disable the possibility for users of the Security Desk application to make changes to the configuration. Configuration mode will not be available anymore. There are 2 possibilities to provide access again:
- On a workstation which also has Config Tool installed, open the Options-dialog in Config Tool and disable the setting
- Navigate to the file VS.GSCPlugin.ConfigData.xml, normally located at C:\Program Files (x86)\Vingtor Stentofon\VS-GSCPlugin and edit it; Find the line <DisableConfig>true</DisableConfig> and change true to false; Save the file
Explore
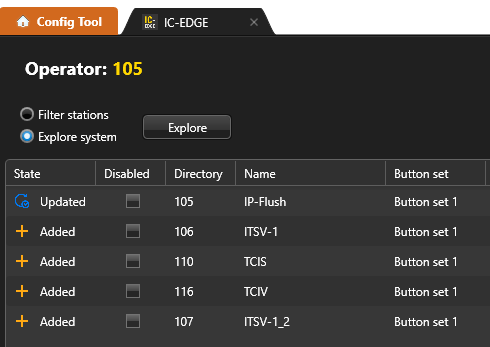
Select the radio-button Explore system and click Explore. All configured stations will be discovered and listed with directory number as defined in the Edge Controller. Discovered stations are indicated with +Added or Updated.
Station names can be entered or altered in the field Name.
Station configuration
Cameras
Up to 4 cameras can be assigned to each station. These cameras can be displayed on an incoming call from that station or during a conversation.
To assign cameras, click on the TAB Cameras. Select a camera and drag/drop that camera onto a camera pane icon to the right of the station name with which the camera should be associated. A number will appear inside that camera pane icon, this number is the logical ID of that camera within Genetec Security Center.
To remove the camera association, right-click on the camera pane icon and select Remove camerax ..., where x is related to the camera pane number for that station.
Actions
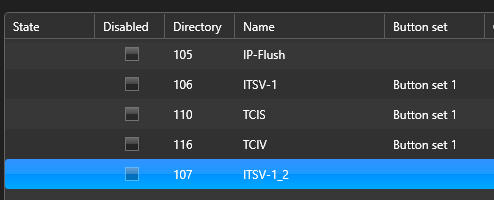
Each discovered station gets by default Button set 1 assigned to it. This button set consists of a single button which gives the possibility to cancel an ongoing conversation with the operator. If it is not required to cancel conversations from the GUI for specific stations, then the button set can be removed for those stations:
- Select the button set for the specific station and right click
- Select Button set >
- Select Remove
Save and Load
When the configuration has been completed, click Save.
If during configuration it is necessary to go back to the current setup click Load; this will undo all configuration changes which have not been saved yet.
Switch between configuration mode and operational mode
To change between operational mode and configuration mode, double click the IC-EDGE icon in the top right corner of the IC-EDGE task TAB.
ICX - Operation
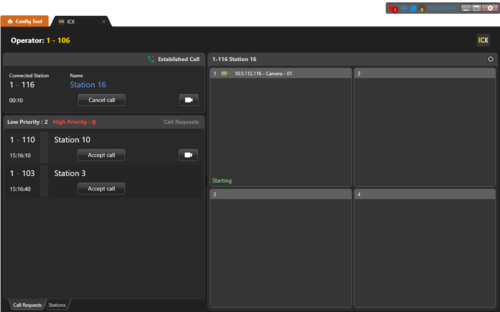
The main TAB in operational mode is the Call Requests-TAB. All call requests are listed in order of priority in the Call Requests-list; the time when the call request entered the list is shown below the station identification. If a station has 1 or more cameras associated with it, a camera-symbol will be shown; click on the symbol to display the camera(s) in the display pane(s). By double clicking on the title bar of a display pane it is possible to expand it; double click again to shrink to the original size.
An established call is shown in the top section of the TAB. A timer shows how long the conversation has been going on. The cameras are displayed immediately when the call is accepted. This display can be overrtiden by clicking on a camera-icon in the call request list; return to the cameras associated with the established call by clicking the icon in the established call pane; this icon is only available if there are cameras associated with the station in conversation.
The Stations-TAB allows selection of station for directly calling, or for selecting cameras associated with them. Note that in this screen the 'Play'-button is available even if there are no cameras associated with the station. Stations which are not available are shown in red.
IC-EDGE - Operation
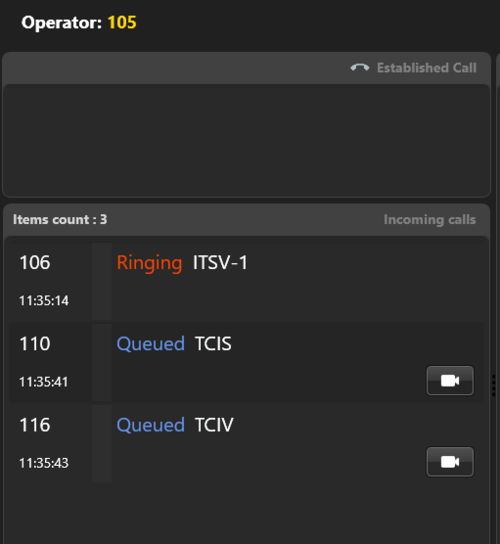
The main TAB in operational mode is the Incoming calls-TAB. When the operator station is in multi-line mode, multiple calls can be indicated with status Ringing. If the operator station does not have a line select possibility, only the first call will be indicated as Ringing, subsequent calls will be labelled as Queued.
All incoming calls are listed with the time when the call entered the list shown below the station identification. If a station has 1 or more cameras associated with it, a camera-symbol will be shown; click on the symbol to display the camera(s) in the display pane(s). By double clicking on the title bar of a display pane it is possible to expand it; double click again to shrink to the original size.
An established call is shown in the top section of the TAB. A timer shows how long the conversation (including the time before actual connection) has been going on. The cameras are displayed immediately when the call is accepted. This display can be overridden by clicking on a camera-icon in the incoming call list; return to the cameras associated with the established call by clicking the icon in the established call pane; this icon is only available if there are cameras associated with the station in conversation.
In case the remote station has a button set associated with it, a Cancel button will be available, allowing the call being disconnected from the GUI.
The Stations-TAB allows selection of station for directly calling, or for selecting cameras associated with them. Note that in this screen the 'Play'-button is available even if there are no cameras associated with the station. Stations which are not available are shown in red.


