Lenel Onguard - AlphaCom (old versions) integration
From Zenitel Wiki
This article describes how to integrate the LenelS2 OnGuard System with the AlphaCom system. The integration is using the MPC Data Protocol.

|
Note: This article relates to the integration between OnGuard and AlphaCom with software version older than 13.1.3.3. For a description of the integration with ICX-AlphaCom or AlphaCom with software version 13.1.3.3 or newer, please refer to the article LenelS2_OnGuard_-_ICX-AlphaCom_Integration |
For integration between LenelS2 OnGuard and the IC-Edge system, see here.
Contents
Introduction
The following information is relevant for all versions of OnGuard. Onguard 2012 introduces some new possibilities.
See also decription on Zenitel.com
AlphaCom Configuration
Configuration
The required settings in AlphaCom in order to communicate with LenelS2 OnGuard are:
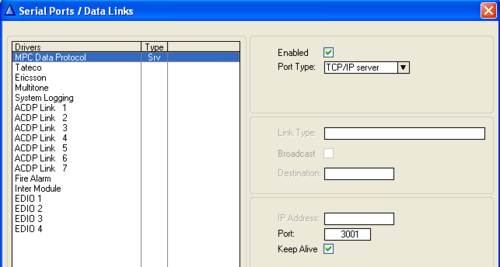
In AlphaPro, go to Exchange & System > Serial Ports, set the following parameters:
- MPC data protocol
- TCP/IP server
- Enter a Port number. In the screen shot port 3001 is used as an example
Note that after 'Send change' or 'Send all' the AlphaCom needs to be reset, use the 'Reset' button in AlphaPro.
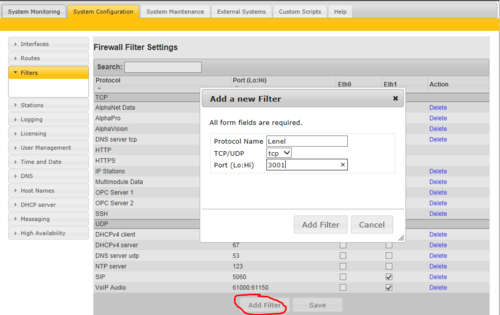
In the Web interface of the AlphaCom, go to System Configuration > Filters:
- Define the same TCP port in the firewall (filters), in this example this is port 3001
- Enable this TCP port on the relevant Ethernet port (Eth0 or Eth1)
LenelS2 OnGuard Configuration
The next steps are done in LenelS2 OnGuard System Administration. To enter the communications parameters in OnGuard, open System Administration
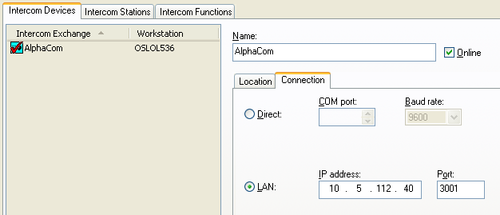
- Go to the menu item Additional Hardware > Intercom Devices ...
- Select the TAB Intercom Devices and click the Add-button
- Select the LAN-option, enter the IP-address of the AlphaCom, and the port number as used in the steps above, port 3001 in this example
- Click on OK
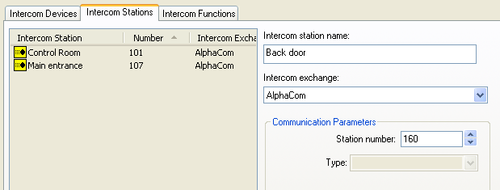
The following step is to enter the intercom stations into OnGuard
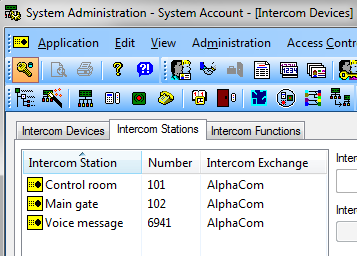
- Select the TAB Intercom Stations and click on Add
- Enter a name and a directory nr for each station which is in the system
- OnGuard uses integer values for the directory numbers and it is not possible to have directory numbers with a leading 0
- OnGuard restricts directory numbers to maximum 4 digits
Events in the AlphaCom are reported to OnGuard and are listed in Alarm Monitoring
- Call established between intercom stations
- Call cancelled
- But also calls to functions such as group calls, call requests, ...
In order to show the directory numbers of both stations in a conversation, make sure that the column Intercom Station Called is shown. To make this column visible, select the Main Alarm Monitor window and choose menu item Configure>Columns.... Select the columns which should be visible.
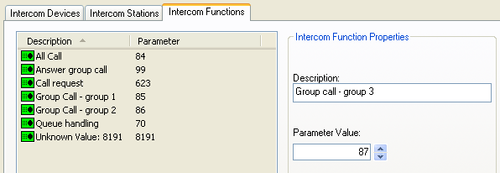
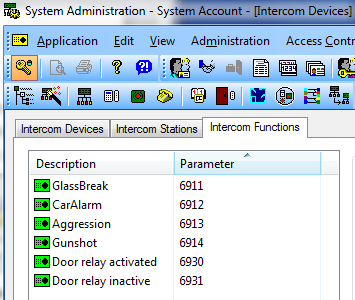
A call to a function which is not defined in System Administration is reported as a call to an unknown value. To define function directory numbers follow these steps
- Select the TAB Intercom Functions and click on Add
- Enter a name and a directory number for the function
Calls to in OnGuard undefined functions are automatically available in System Administration and can easily be edited at a later stage.
Intercom functions which are shown in Alarm Monitoring are reported from the AlphaCom server as a message with 0507 as a header. This opens the possibility to generate such messages from the event handler if these messages are not normally generated by the AlphaCom. A useful example are line error reports.
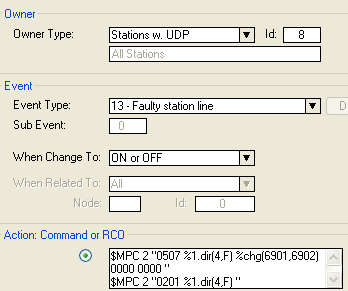
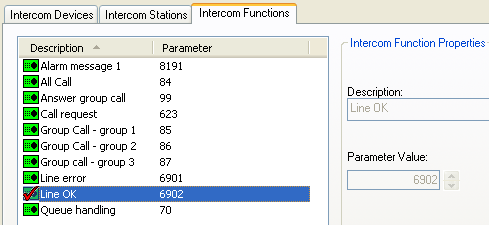
In AlphaPro define an event for Faulty station line. Use 2 dummy directory numbers which are used towards OnGuard as Intercom Function directory number, for instance 6901 and 6902 Use as action the following string:
$MPC 2 "0507 %1.dir(4,F) %chg(6901,6902) 0000 0000 "
$MPC 2 "0201 %1.dir(4,F) "
The line error directory numbers must also be defined in System Administration, using the same procedure as described above.
Linking events and actions between different sub-systems
Events in other sub-systems can result in calls being setup in AlphaCom, while AlphaCom events can trigger actions in other to OnGuard connected sub-systems. As programming of these trigger actions differs depending on the sub-systems involved, it is outside the scope of this guide to give a comprehensive description, below are just a few pointers.
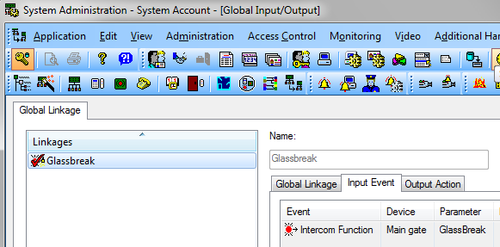
Linking of events in the AlphaCom with actions in other sub-systems can be done by selecting Access Control > Global I/O... in System Administration. AlphaCom related events can be:
- Call to a Busy Subscriber
- Call to a Private Subscriber
- Call to an Open Subscriber
- Call Disconnected
- Intercom Function
Intercom Function lists all parameters which are defined for the 0507 data message in the steps above, including custom defined functions generated through the AlphaCom event handler, and can all have specific actions linked to them.
Note that for the programmed event linkage to work the Linkage Server must be running.
NOTE:
In Onguard versions older than OnGuard 2012 it is possible to start functions such as voice messaging in the AlphaCom, but this requires the addition of the following lines in the file ACS.INI, which is located in the directory c:\Windows
[Stentofon]
AlphaNet=1
As from OnGuard 2012 this change to the file ACS.INI is no longer required.
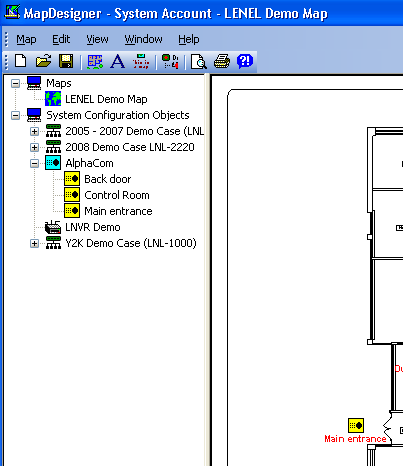
Intercom stations which are defined with System Administration can be imported into maps using the program MapDesigner. Intercom stations are listed on the left hand side and can easily be dragged to a location in a map.
LenelS2 OnGuard 2012
As from the release of OnGuard 2012, the interface module to the AlphaCom will not be installed automatically while OnGuard is installed. Instead the interface module is available from Zenitel and must be installed separately. The interface module is an msi-file which installs a dll in the OnGuard directory and registers the AlphaCom in the OnGuard database. Once the msi-file has been installed the operation is exactly how it used to be in previous versions of OnGuard.
'6.5.624_Zenitel_Accessory_Add-On.msi' provides an updated interface module and takes advantage of new messages and icons which have been included for STENTOFON intercom stations in OnGuard 2012.
'6.5.624_Zenitel_Accessory_Add-On.msi' can be downloaded from here.
Icons
OnGuard 2012 introduces some new icon appearances for states in which an intercom station can be. The following states can be indicated by icons in a map:
- Idle (icon labelled 'Normal' in OnGuard)
- Connected - Station is in a conversation with another station (icon labelled 'Call Connected' in OnGuard)
- InQueue - Station has initiated a call request and is in a call queue (icon labelled 'Queued' in OnGuard)
- AnalyticsEvent - An audio analytics event (glass break, car alarm, aggression, gunshot) has been detected (icon labelled 'Analytics Event' in OnGuard)
- LineError - A line error to the station has been detected (icon labelled 'Offline' in OnGuard)
- OffLine - The station is off line; The state is shown when there is no data communication at all between OnGuard and AlphaCom, all station icons will show the OffLine state (icon labelled 'Offline Device' in OnGuard)
OnGuard has some pre-defined icons for intercoms in the above states. It is possible to add custom icons to OnGuard. A suggested set of STENTOFON icons can be downloaded from here. In total OnGuard defines 10 intercom icon states, which are not all used by the AlphaCom-OnGuard integration, but the downloaded set does define an icon picture for all 10 states.
Alarm Monitoring messages
OnGuard has some predefined messages which are shown in Alarm Monitoring depending on the data which is received from the AlphaCom. In addition it is possible to add custom messages by defining 'Intercom Functions' together with a text and parameter. Alarm Monitoring displays the following messages:
- Call Queued - parameter: Queueing station
- Call Established - parameters: Originating station and called station
- Call Disconnected - parameters: Originating station and called station
- Call to a Private Subscriber - par: Originating station and called station
- Call to a Busy Subscriber - par: Originating station and called station
- Intercom Function; followed by the defined intercom function
Call from a guard
It is now possible for a guard to simply establish a call to a remote intercom station by clicking on the icon of that remote intercom. This function can also be invoked by a right click on the intercom icon and selecting 'Call Intercom' from the drop-down menu. For backward compatibility the previously available 'Place intercom call ...' is also still available.
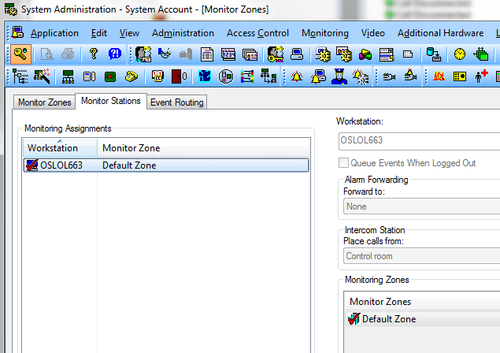
The guard intercom station must be programmed specifically as an OnGuard 'Monitor Station'.
AlphaCom programming
When programming the AlphaCom event handler with custom data messages to be sent to OnGuard, please take note of the format of the message as shown below. Every message has a <space> character in front of the closing ". If this format is not used exactly as shown, the OnGuard Communications Server will raise a 'Communications Lost' event and reset the link to the AlphaCom.
Line Error
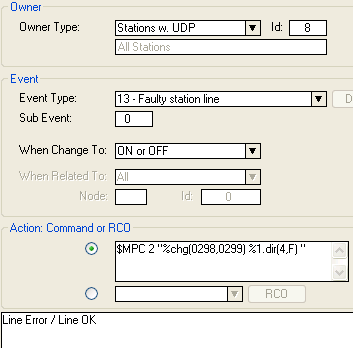
The reporting of line errors is not a standard feature on the protocol which is used between AlphaCom and OnGuard. To be able to use this new possibility in OnGuard an event needs to be programmed in the AlphaCom event handler. The codes which have been reserved for this in OnGuard are:
- 0298 - Line Error
- 0299 - Line OK
Program a an event as follows:
- Owner Type: Stations with UDP: 8
- Event Type: 13 - Faulty station line
- When Change To: ON or OFF
- Action command string:
$MPC 2 "%chg(0298,0299) %1.dir(4,F) "
Station in a call queue
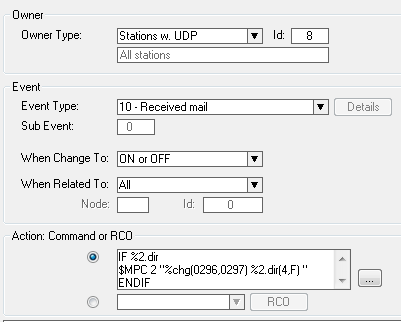
Stations which are placed in or removed from a call queue can be reported by the AlphaCom through the 'Received Mail'event. OnGuard displays stations in a queue with a specific icon appearance. Queue entries without any "Related To" information (e.g. Line Errors) are filtered away. Stations entering a queue or being removed are also indicated by messages in Alarm Monitoring. The codes which have been reserved for the event are:
- 0296 - Station queued
- 0297 - Station removed from queue
Program an event as follows:
- Owner Type: Stations with UDP: 8
- Event Type: 10 - Received mail
- When Change To: ON or OFF
- When Related To: All
- Action command string:
IF %2.dir
$MPC 2 "%chg(0296,0297) %2.dir(4,F) "
ENDIF
Door opening
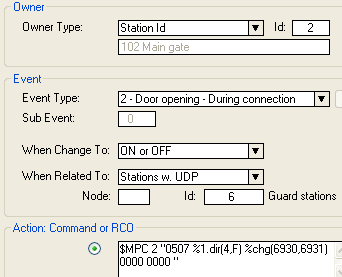
Stentofon intercom master stations have the possibility to open a door by pressing digit 6 during a conversation. Normally this operates a relay which is used to unlock the door. When using OnGuard, pressing digit 6 should be signalled to OnGuard after which OnGuard will give the command to unlock the door. The event owner must be station at the door, the related to station can either be a single station or a complete UDP group if several guard stations are allowed to open the specific door. The action command string is
$MPC 2 "0507 %1.dir(4,F) %chg(6930,6931) 0000 0000 "
Note that 6930 and 6931 are just taken as an example and just have to be numbers which are not used anywhere else in the intercom system, they do not need to be defined as a directory number, as they are not actually dialled.
These numbers do need to be defined in OnGuard, Intercom Functions. By using the OnGuard Linkage Server it is possible to trigger the door opening action in OnGuard. The programming as shown gives a command to unlock the door and a further command to lock the door again. If in the specific installation this second command is not required it is possible to only use the 'When Change To: ON' option. The action string can then simply be:
$MPC 2 "0507 %1.dir(4,F) 6930 0000 0000 "
Triggering actions in AlphaCom
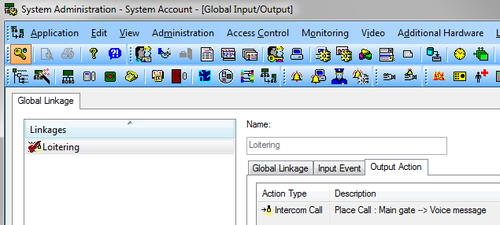
Many devices which are connected to OnGuard can raise an event. Through the Linkage Server it is then possible to trigger actions somewhere else in the system, including the AlphaCom. This makes it for instance possible that a video camera which raises a loitering event triggers a voice message to a nearby intercom station or to the AlphaCom connected PA/paging system. To trigger the action in AlphaCom, OnGuard will simulate dialling an AlphaCom event trigger directory nr. The AlphaCom event handler will cause the actual required action to be performed. The AlphaCom event trigger directory number needs to be defined as a station in OnGuard.
LenelS2 OnGuard 2013
In order to interface the AlphaCom exchange to OnGuard 2013 an addon is required. 6.6.287_Accessory_Add-On_for_Zenitel_Support_1.0.3.zip can be downloaded from here.
Blocking calls
In certain cicumstances it can be a requirement to block calls from specific sub-stations to the guard(s) for a limited period of time. With the following programming blocked stations can be indicated in the Alarm Monitoring screen. The example assumes that the substations make a call request to the guard(s). Further calls from a substation can be blocked during the time that the call is established between guard and substation.
- UDP: Put all guard stations in a UDP group, for instance group 1 and give the UDP group a meaningful name, 'Guards'
- UDP: Put all substation which may require blocking in a UDP group, for instance group 2 and give the UDP group a meaningful name, 'Blocking'
Define an event trigger directory number (Feature 52, ID 0)
- 6941 (example only, define a number which is most suitable)
Define a DAK on each guard station (UDP 1 group member stations), which dials the defined event trigger dirnr both from idle and during conversation:
- For instance DAK1: E6941
Define 3 events. Event 1 (this event stores in UDD the station with which the guard is in conversation):
- Owner: Stations with UDP 1 (Guards)
- Event Type: 8 - Conversation - Outgoing
- When change to: ON or OFF
- Related to: Stations with UDP 2 (Blocking)
- Action string:
WUDD %1.phy %chg(%2.phy,0)
Event 2 (this event will block a station when triggered during conversation and will unblock all stations when triggered in idle)
- Owner: Stations with UDP 1 (Guards)
- Event Type: 15 - Event trigger
- When change to: ON
- Related to: Directory nr: 6941
- Action string:
IF %udd(%1.phy)
WUDD %udd(%1.phy) 1
$ST N%udd(%1.phy) W300
OWN r %rdir(%udd(%1.phy))
$MPC 2 "0292 %2.dir(4,F) "
$MPC 2 "0507 %2.dir(4,F) 6943 0000 0000 "
STOP
ENDIF
WUDD 34 0
$MPC 2 "0293 F134 "
$MPC 2 "0507 F134 6944 0000 0000 "
Event 3 (this will unblock each station after the time out set in event 2)
- Owner: Stations with UDP 2 (Blocking)
- Event Type: 21 - Event Timeout
- When change to: ON
- Related to : All
- Action string:
IF %UDD(%1.phy)
WUDD %1.phy 0
$MPC 2 "0293 %1.dir(4,F) "
$MPC 2 "0507 %1.dir(4,F) 6944 0000 0000 "
ENDIF
STOP
Notes to events 2 and 3:
- When the DAK is pressed during idle, all blocked stations are unblocked. In event 2 this is accomplished by 3 commands
- WUDD 34
- $MPC 2 "0293 F134 "
- $MPC 2 "0507 F134 6944 0000 0000 "
These 3 commands are an example and related to 1 station which is blocked. The event needs to contain these same commands for every station which is in UDP group 2
- MPC data records 0292 and 0293 change the icon appearance in a map, but they do not log information in Alarm Monitoring. If this is required, it is possible to define for instance 6943 as 'Intercom Finction - Blocked' and 6944 as 'Intercom Finction - Unblocked' in OnGuard; The MPC data strings containing 6943 and 6944 will then log the blocking and unblocking
LenelS2 OnGuard 2014
In order to interface the AlphaCom exchange to OnGuard 2014 an addon is required. 7.0_Accessory_Add-On_for_Zenitel_Support_1.0.2.zip can be downloaded from here.
LenelS2 OnGuard in an AlphaNet
As from AMC-IP software version 11.2.3.5 and OnGuard 2012 it is possible to use OnGuard also in an AlphaNet where almost all functionality is available which is also available when connected to a single exchange. This does however require some additonal event handler programming in all AlphaCom exchanges which are not directly connected to OnGuard, the 'remote exchanges'. All event handler programming which is described in this article to enable special functionality needs to be repeated in all exchanges, this article only describes the extra programming required for AlphaNet use.
AlphaCom event handler programming
As stated in the introduction, this programming only needs to be done in the remote exchanges, not in the exchange with which OnGuard is communicating.
The examples below assume that OnGuard is connected to node nr 1. All MPC data strings are routed to that node (@1).
Note that each command string has a <space> in front of the closing " character.
IMPORTANT
The event 'Call disconnected' described below is also triggered after an exchange reset,
even for ASLT ports to which no station is connected. In this last case the string is
sent with an empty directory number field, which is handled by OnGuard by a reset of the
communication link. To make sure that the exchange does not send data strings without a
valid directory nr it is therefore advisable to define a specific UDP (for instance 7)
for stations which are actually present in the system.
Call connected
- Owner Type: Stations with UDP 7
- Event Type: 7 - Conversation - Incoming
- When Change To: ON
- When Related To: Stations with UDP, Node: 255, ID: 8
- Action: @1 $MPC 2 "0504 %2.dir(4,F) %1.dir(4,F) 0000 0000 "
Call disconnected
- Owner Type: Stations with UDP 7
- Event Type: 4 - Station in use
- When Change To: OFF
- When Related To: Stations with UDP, Node: 255, ID: 8
- Action: @1 $MPC 2 "0201 %1.dir(4,F) "
Call to a subscriber in private
- Owner Type: Stations with UDP 7
- Event Type: 9 - Private ringing mode
- When Change To: ON
- When Related To: Stations with UDP, Node: 255, ID: 8
- Action: @1 $MPC 2 "0503 %2.dir(4,F) %1.dir(4,F) 0000 0000 "
OnGuard
OnGuard is only connected to one of the exchanges in the AlphaNet and sees the complete network also just as a single exchange. Therefore in OnGuard only 1 exchange needs to be defined and all intercom stations must be configured as being connected to this single exchange.
Restrictions
AlphaCom normally sends a data string starting with 0502 when a call is made to a busy subscriber. As there is no appropriate event available in the AlphaCom event handler this is not possible from the remote exchanges and the message 'Call to a busy subscriber' will not be shown in Alarm Monitoring when the busy subscriber is in the remote exchange.
LenelS2 OnGuard and CP-CAM
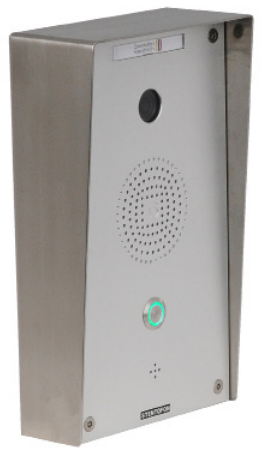
The camera CP-CAM is used in the IP Video Door Station, type number 1401110100. The CP-CAM camera has been certified with the following LenelS2 products:
- LNVR, versions 7.0 and 7.1
- OnGuard versions 6.5, 6.6 and 7.0 (OnGuard 2012, OnGuard 2013 and OnGuard 2014)
- Prism version 1.1
Integration is through an xml-file, STENTOFON.xml, which describes the camera capabilities. The xml-file is part of an Add-On which is available from LenelS2. It is also available from the AlphaWiki Download section.
Camera Integration Setup
LNVR
LNVR, LenelS2 NVR, is the Network Video Recorder from LenelS2 which is closely integrated with OnGuard. LNVR can run on dedicated hardware available from LenelS2, or can be installed as a software product on 3rd party PC hardware. For CP-CAM video to be able to be viewed via and recorded on LNVR, the STENTOFON.xml file must be installed on the LNVR-hardware.
- Stop the LNVR services - Start - LenelS2 Network Video Suite - Stop LNVR Services (Run as administrator)
- Copy the STENTOFON.xml file included with the add-on to the LNVR system in the \Caps\Camera\ sub-folder under the root of the LNVR software folder typically located at:
- For Windows XP: C:\Documents and Settings\All Users\ApplicationData\LenelS2\LNVSuite\
- For Windows Vista or Windows 7: C:\ProgramData\LenelS2\LNVSuite\
- Start the LNVR services - Start - LenelS2 Network Video Suite - Start LNVR Services (Run as administrator)
- Click [Update Capabilities] on the Digital Video > Video Recorders form in System Administration to update the capabilities of the LNVR.
OnGuard
OnGuard offers an optional feature that video from cameras can be viewed directly. This feature can be used in case the LNVR is not available (not purchased or failed). Note that in that case there would be no recording facility.
To activate the Direct Connect feature in OnGuard:
- Copy the STENTOFON.xml file included with the add-on to the \Caps\Camera\ sub-folder typically located at:
- For Windows XP: C:\Documents and Settings\All Users\Application Data\LenelS2\LNVSuite\
- For Windows Vista or Windows 7: C:\ProgramData\LenelS2\LNVSuite\
Camera setup for use with OnGuard
- The default IP-address of the camera is 169.254.1.101.
- The default administrator user name/password is admin/1234.
- After connecting with a web-browser, the IP-address and other network settings can be changed on the page ‘System Settings/Network’. On this page it is also possible to set Authentication to Yes or No.
- Set the ‘Authentication required for Picture/Video’ to ‘No’ for the camera.
- On the page ‘System Settings/Camera’ different video parameters can be set. It is not possible to change these parameters from OnGuard.
Limitations
- Frame rate and resolution can only be set directly on the camera. The following camera resolutions supports the following frame rates:
- 640X480 supports frame rate of 15.
- 320X240 supports frame rate of 15, 20, and 25.
- 160X120 supports frame rate of 15, 20, and 25.
- Camera user and password were not supported with version 1.0.1 of the add-on, but as from 1.0.2 authentication is supported.

