VS-IMT VS-SDK for Pulse System Setup
From Zenitel Wiki
Overview
The VS-SDK for Pulse-enabled project lets you set up an intercom system project using our special Zenitel Application Protocol (ZAP). This type of project supports the easy setup of a Pulse system:
- Upload license to Pulse server
- Make client/server relations between stations
- Set up VS-Client as a Pulse client
- Perform basic configuration of stations
It also supports a configuration specific to VS-SDK for Pulse intercom applications.
Preparation work
First, create a new VS-SDK Project. To enable such a project:
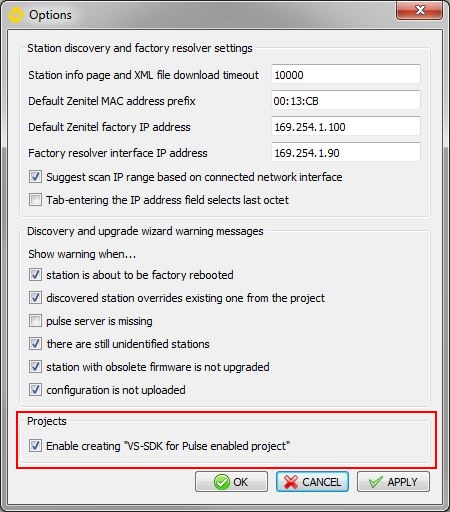
- Select Tools > Options
- Check the Enable creating “VS-SDK for Pulse enabled project” box
Once projects are enabled:
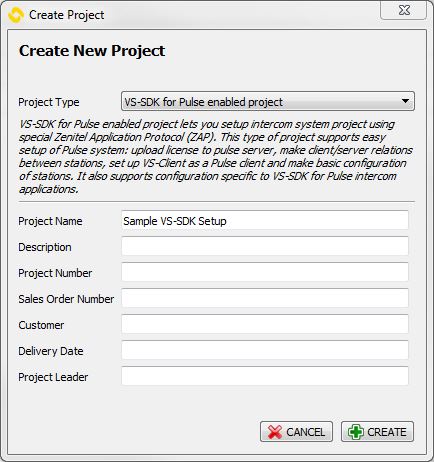
- Select Project > Create Project
- Under the Project Type dropdown list, select VS-SDK for Pulse enabled project
- Set project parameters and click the CREATE button
An empty VS-SDK project will be created.
Discovery and basic configuration
The next step in the configuration is discovering all intercom devices on the network.
- Select File > Launch Station Wizard or press Ctrl+W
The Wizard start screen is displayed.
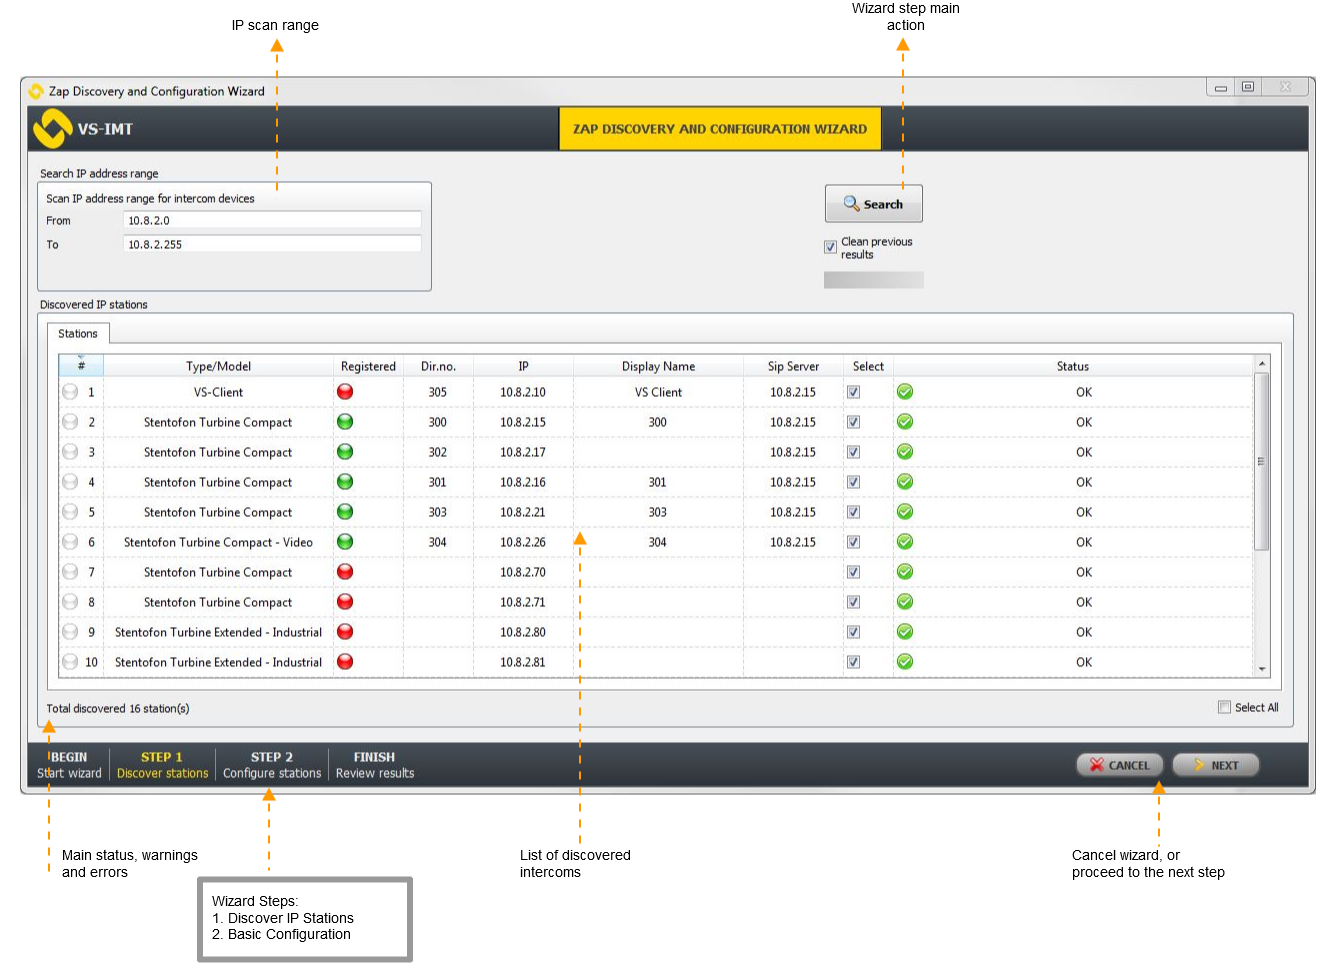
- Click NEXT to get to the auto-discovery window.
This feature of VS-IMT automatically scans through a specified range of IP addresses and finds all relevant intercom devices. The functionality is similar to the Discover stations step in the Standard project.
In the list of discovered devices:
- Select the devices you want to configure and click NEXT
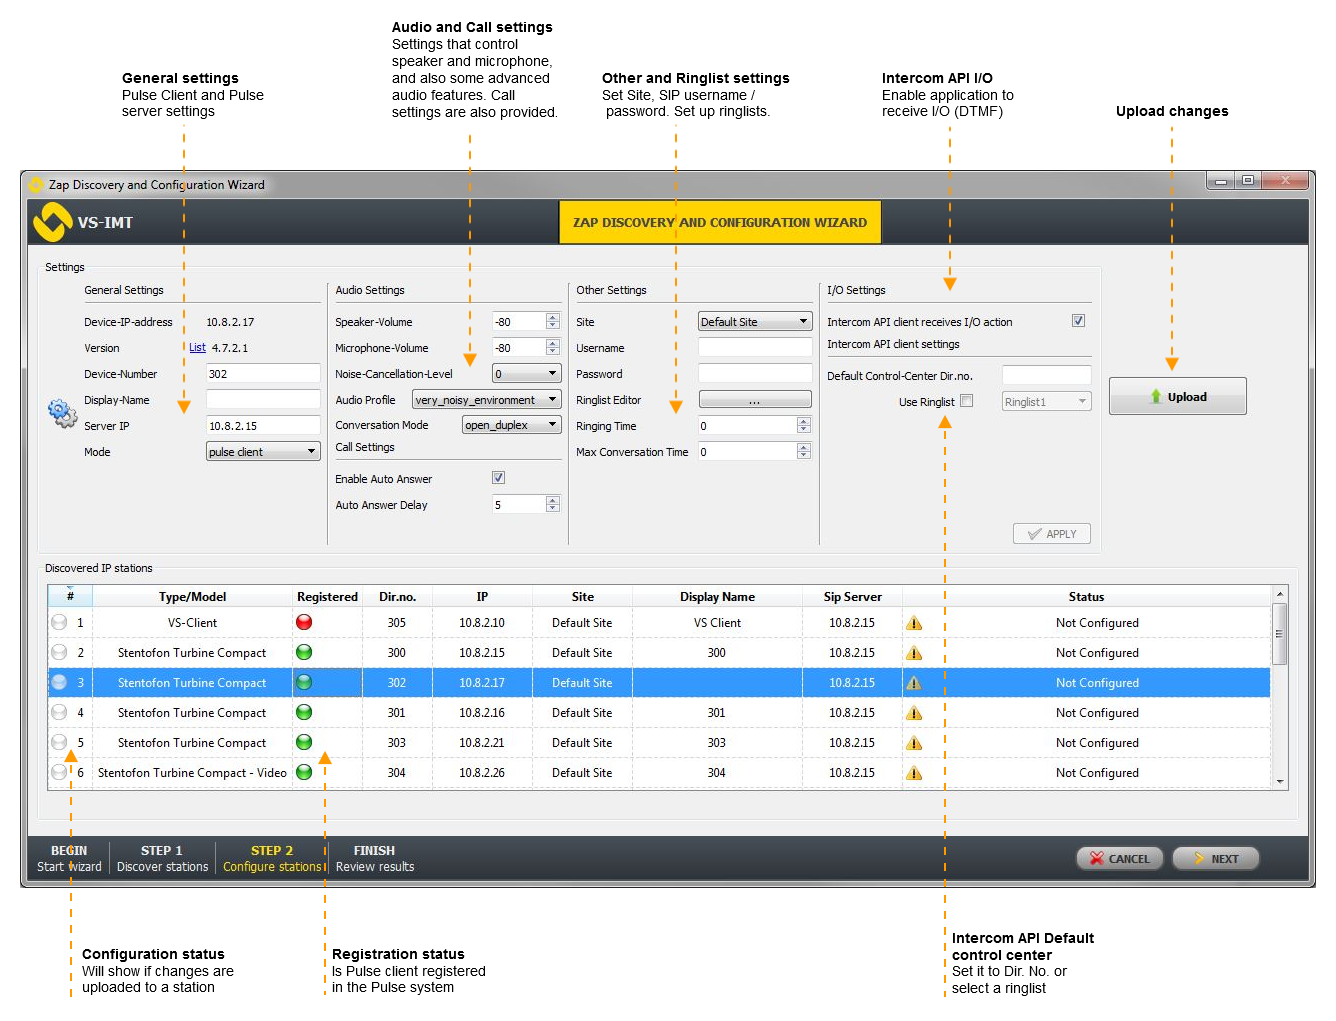
In the second step of the wizard, select each device to view and change settings. When settings have been changed, for each device:
- Click the Apply button (green check mark)
When all devices have been configured:
- Click the Configure button to push the configuration to the devices.
As there are many options in the Configuration step, we will only describe the ones specific for VS-SDK for Pulse system. For detailed explanations of Client, Audio, Call and Ringlist settings, please consult A100K11194 Turbine IP Intercoms Technical Manual.
Server Configuration
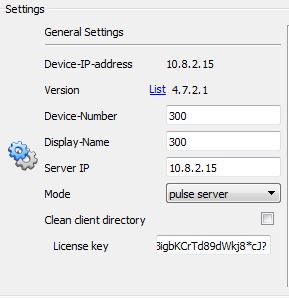
If a selected device is a server, select the pulse server option from the Mode dropdown menu in the General Settings field. The main settings for a server device to connect to the Pulse network are listed under General Settings.
IMPORTANT : The Pulse server must have a static IP address. This can be done in the DHCP server by fixing the IP address to the MAC address of the Pulse server.
- Clean client directory: This will erase all clients that were previously configured on that server; otherwise new devices will be added to the existing list.
- License key: Copy and paste the license key from the license file and upload it to the server to enable the system and its functions.
For client/server configuration it is required to configure server and clients together because configuration data needs to be sent to both the server and clients. However if you just want to add one (or more) client to the server, you need to discover both the server and client, and then set server address in client settings and leave the Clean client directory box unchecked.
Once FINISH is clicked on the Review results page, all the selected stations will be added to the project.
Additional Configuration
The configuration of all devices can also be changed after adding them to the main VS-IMT screen. Selecting each device will display all device settings on the right side of the main window. Different settings group can be selected from drop down menu, they are:
- Server-Client Configuration (Pulse server only)
- Basic ZAP Configuration
- Event Rule Configuration (Turbine stations only)
Note that array of configurable settings is much smaller than in Standard VS-IMT project.
Server-Client Configuration
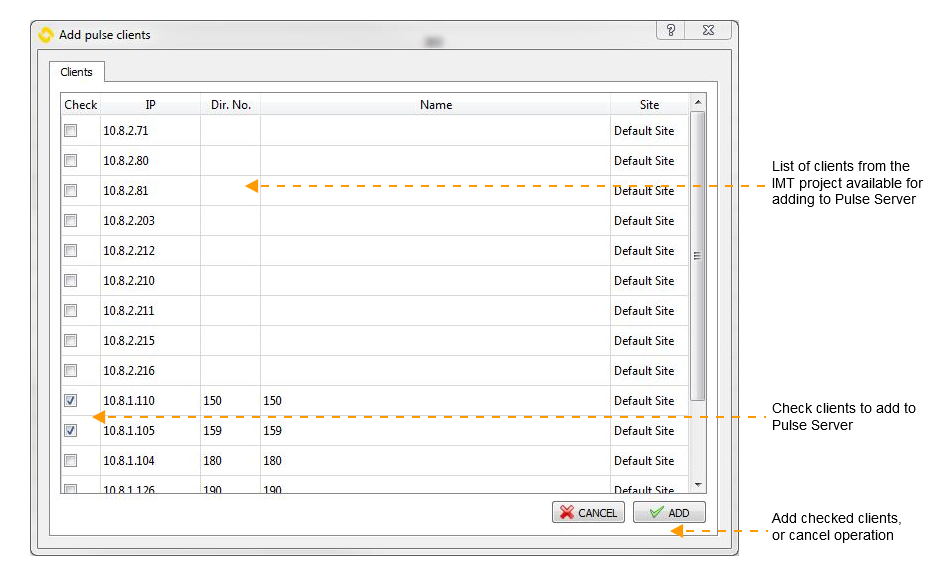
When selecting any Pulse Server in the project, you will get an option to open the Server-Client Configuration settings group which offers the possibility of reconfiguring the existing Pulse system. Aside from adding Pulse clients to the Pulse server there is additional option of adding 3rd-party SIP terminals and GSM/SIP gateways to the server.
To add third party SIP clients to the Pulse Server, follow these steps:
- Click the ADD button located below the Third-party SIP Terminals list.
- A new entry will appear. Edit this entry so that Dir. No. is the same as the username which is set on the SIP client SIP settings. The Display Name does not affect the configuration and can be set to any value.
- Click Upload to push settings to the Pulse Server.
- Note that a specific license for 3rd party SIP terminals has to be installed to be able to register.
To add GSM/SIP gateways to the Pulse Server, follow these steps:
- Click the ADD button located below the GSM/SIP Gateways list.
- A new entry will appear. Edit this entry so that Dir. No. is the same as the username which is set on the Gateway SIP settings. The Display Name does not affect the configuration and can be set to any value.
- Click Upload to push settings to the Pulse Server.
- Note that a specific license for Gateways has to be installed to be able to register.
To add new Pulse trunk link to Pulse Server, follow these steps:
- Click the ADD button located below the Pulse Trunk list.
- A new entry will appear. Edit this entry so that Host entry matches the IP address of remote Pulse server, and that Dir.Start and Dir.End match the Local Site Range configured on remote Pulse server. Name does not affect the configuration and can be set to any value.
- Click Upload to push settings to the Pulse Server.
- NOTE: if using Pulse Trunks, it's necessary to configure Local Site Range setting on the Pulse server. If Pulse Trunks are not used, it's not necessary to configure it.
The new configuration is immediately applied after clicking the UPLOAD button.
Note that clients can be added to the Server directory either by selecting an existing client in the project (Add > Client from project), or by manually entering an External client.
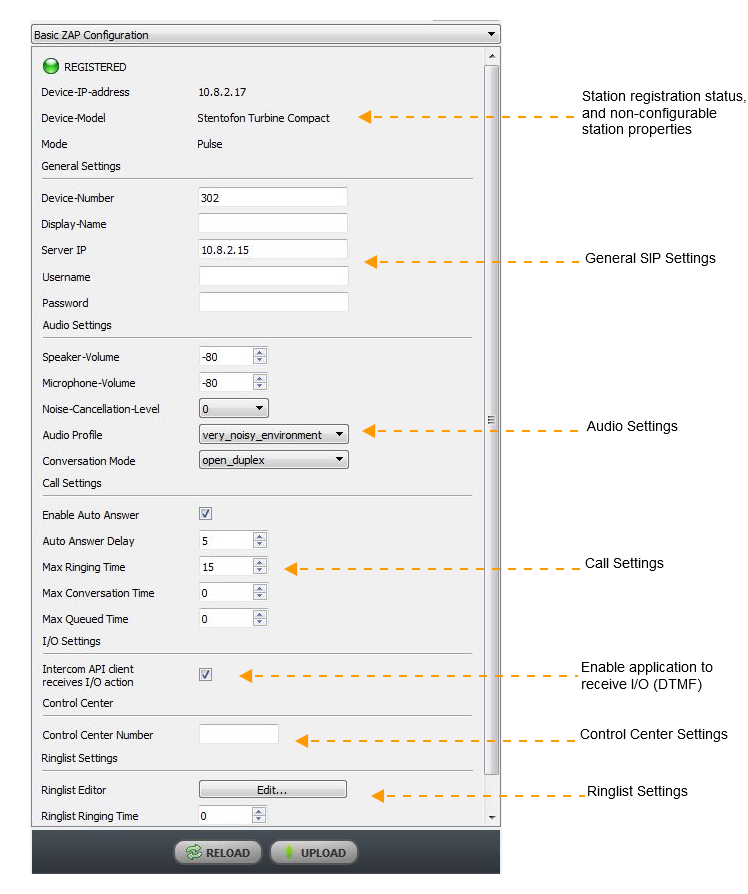
Basic ZAP Configuration
All the settings in the Basic ZAP Configuration group are “live” - they are collected at the moment the user selects the Basic ZAP Configuration group and applied immediately to the device by clicking the UPLOAD button.
Event Rule Configuration
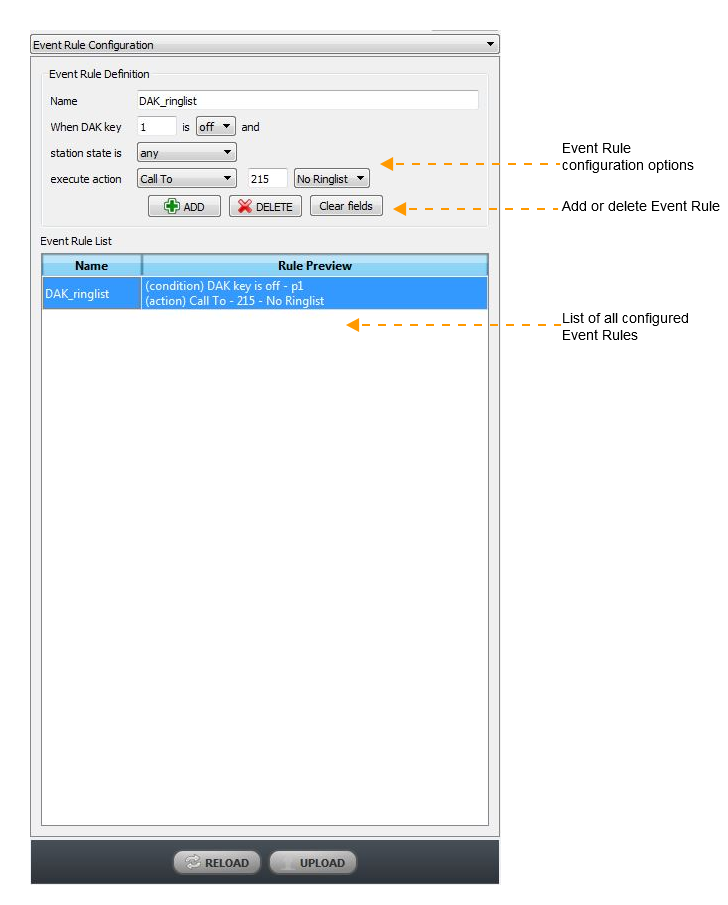
Event Rule Configuration is used for configuring Direct Access Key (DAK) behavior on stations. It's only available on Turbine stations.
Event Rule is an action which will be executed on station when user interacts with DAK. If the configured station state is not satisfied when the user interacts with DAK, event rule will not be executed.
- Name: descriptive name of event rule, each event rule must have it's unique name.
- When DAK key <N> is <on/off>: define which DAK will be affected by this rule, and on which DAK state will it be executed . DAKs are identified by an ID, starting from 1 to number of DAKs on specific station.
Possible states are:
- on - event rule is executed when DAK is pressed
- off - event rule is executed when DAK is released
- station state is: specify in which state must the station be to execute event rule.
Possible states are:- any
- idle
- in call
- not registered
- execute action: define which action will be executed with this event rule:
Possible actions are:- Call To - insert Directory Number, or select ringlist, which will be dialed when event rule is triggered.
- End Call - end currently active call.
- Send DTMF - insert which DTMF will be sent.
Licensing
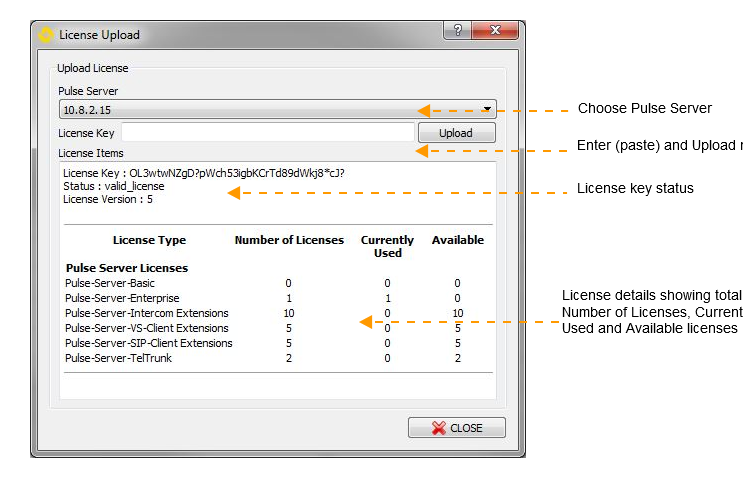
VS-IMT is used to load the License file and send the license key to the License manager (Domain controller / Pulse server). The license can be loaded to the Pulse server in three ways:
- In the station wizard, inside of Configure step
- In the main project window, by clicking on the Pulse Server station and then on Server licenses…
- In Project > Project Settings menu, under the License tab, and by selecting Pulse server from the Domain Controller dropdown list.
In the License Upload dialog-box, it is enough to copy and paste the license key from the license file and clicking on the Upload button. The license will be uploaded to the server and the license status will be displayed immediately in VS-IMT.
Note: The license can be uploaded from the station web interface by selecting Station Administration > Licensing. The License Key can be inserted in the New License field.


