Mobotix Hub - IC-EDGE Integration
From Zenitel Wiki
Introduction
The interface between IC-EDGE and MOBOTIX HUB is through an integration module which is available on the Downloads page of Zenitel Wiki.
Licensing
MOBOTIX HUB
The integration interface does not require a specific license from MOBOTIX.
However, note that Zenitel stations are typically registered as ONVIF devices in MOBOTIX HUB, to e.g. stream and record audio/video from stations. This requires separate station licenses from MOBOTIX.
For an overview of the ONVIF features supported in Zenitel devices, please read our article ONVIF_Settings
IC-EDGE
The integration does not require a license from Zenitel.
Installation
- Download the zip file containing the plugin from the Zenitel website.
- Extract the contents of the zip file to a location of your choice.
- Run the setup file (the MSI or the EXE, depending on your system).
- When prompted for the installation location, select the Mobotix/MIP installation folder (e.g. C:\Program Files\Mobotix\MIP).
- Click "Finish" to complete the installation.
Configuration
Basic plugin configuration
- Open the XProtect Smart Client.
- Open the "Configuration" window by clicking the "Configuration" icon in the toolbar.
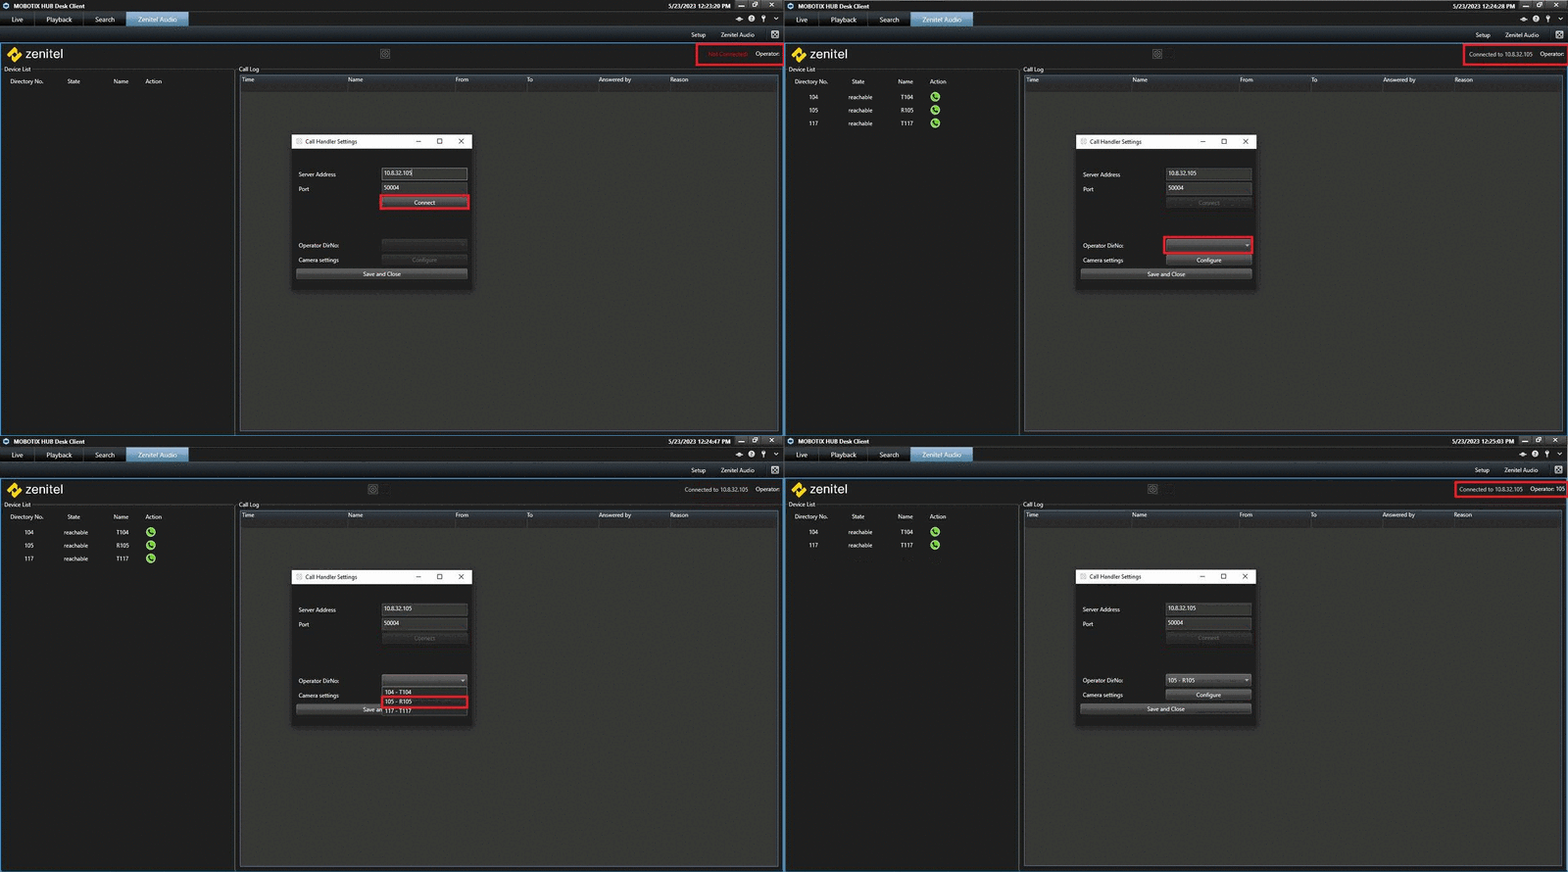
- In the "Configuration" window enter the IP address and port number of your Zenitel intercom system acting as the IC-Edge controller in the "IP Address" and "Port" fields, respectively.
- Click the "Connect" button and wait for the system to retrieve the list of available devices.
- Select the operator's device by choosing its directory number from the drop-down list.
Associating cameras with devices
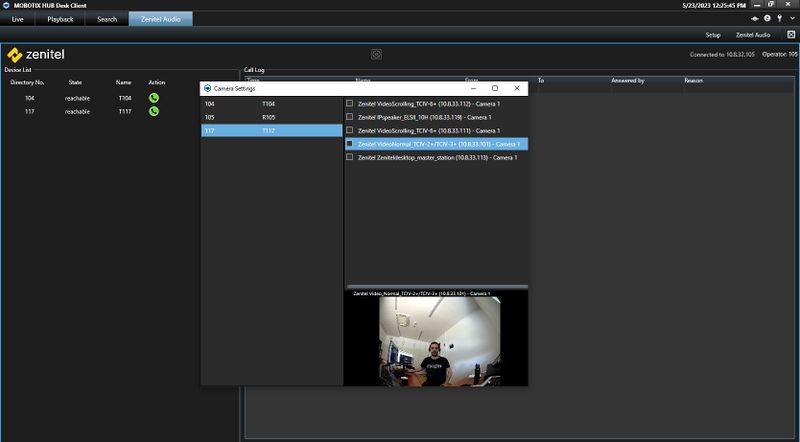
- Open the camera settings window.
- On the left side, there will be a list of devices registered with the IC-Edge controller. On the right side, there will be a list of cameras registered within the XProtect system.
- Click on a device in the left list to select it.
- Click on an item in the right list to preview the video feed from that camera.
- To associate a camera with a selected device, click the checkbox next to the camera's name.
- Repeat steps 3-5 to associate additional cameras with the selected device.
- Once satisfied with the configuration, close the camera settings window.
- Click "Save and Close" on the configuration window to save the changes.
Using the Call Handler
The Zenitel Call Handler (IC-Edge) plugin can be used for two scenarios: initiating calls and reacting to inbound calls.
Initiating Calls
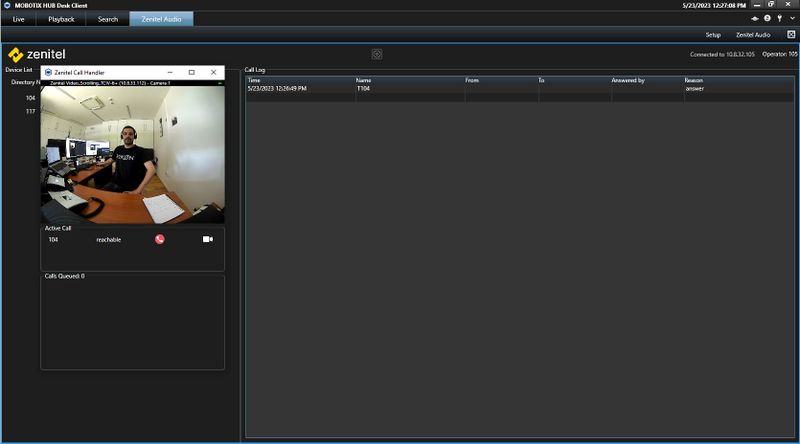
In XProtect Smart Client on the Zenitel Audio tab select a device you wish to call and click on the green "Call" button.
A popup window will be displayed showing the active call, along with a video preview from an associated camera.
Answering queued Calls
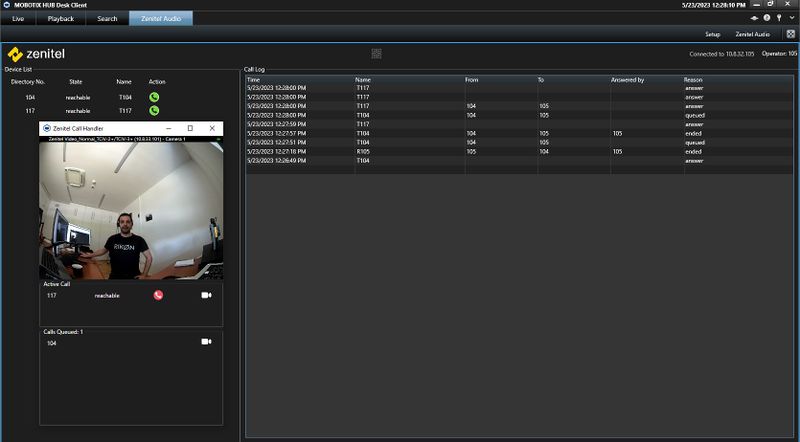
- When an inbound call is received, a popup window will be displayed showing the queued call, along with a video preview from an associated camera.
- To answer the call, the operator has to answer it using a physical device selected as the operator directory number.
- If there is an active call, the Call Handler will automatically hang up the active call and answer the inbound call.
- If there are multiple queued calls, they will be displayed in order of priority.
Using the Popup Window
- The popup window displays the active call (if it was initiated by the operator) or a list of queued calls, along with a video preview from an associated camera.
- The popup window will display the camera feed from the first associated camera of the active call (if present) or if there are no active calls, the first queued device-associated camera will be displayed.
- To manually switch the camera video feed to any active or queued device, select the desired device from the dropdown list in the popup window.
- To hang up the active call, click the red "Hang-Up" button.
- To answer a queued call, the operator has to answer it using a physical device selected as the operator directory number.
- If there are multiple queued calls, they will be displayed in order of priority. To answer a specific queued call, select it from the dropdown list in the popup window.
Previous versions
For configuration of previous versions of the plugin go to:


