IPv6 (SIP)
From Zenitel Wiki
Contents
- 1 Requirements
- 2 Setting IPv6 address
- 3 IPv6 Address Assignment
- 4 Address verification and StationWeb access
- 5 PBX Registration
- 6 Time Server on IPv6 address
- 7 Turbine upgrade over TFTP server listening on IPv6 address
- 8 Syslog and SNMP listening on IPv6
- 9 SIP Updates over IPv6 – currently not supported
Requirements
IPv6 protocol is currently supported on all Turbine stations in SIP mode running image 5.1 3.x and above. IPv6 protocol is not supported on first generation video stations (TCIV) and INCA platforms.
Setting IPv6 address
A station in SIP mode will show assigned IPv6 address on Main Information page. If private or global unicast IPv6 address is not assigned to Turbine interface, IPv6 address shown in this page will be station's link-local address.
IPv6 Address Assignment
IPv6 Address can be assigned to Turbine interface statically (manual assignment) or dynamically (with the assistance of external addressing service), and essentially this has not been changed when compared to IPV4 address assignment.
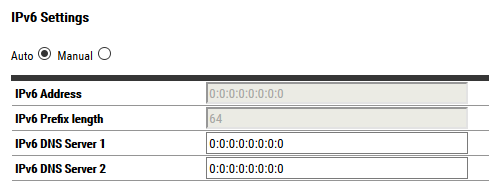
Select Main > Main Settings to access the page for configuring Mode of operation and Network Settings, then scroll down to section IPv6 Settings. By default, Turbine will be configured to receive IPv6 address dynamically (Auto), but in case of need, we might set static IPv6 address as well (Manual).
IPv6 static address assignment
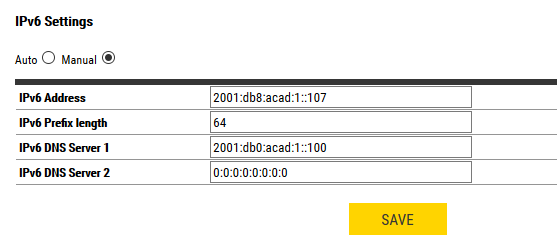
Select Main > Main Settings to access the page for configuring Mode of operation and Network Settings and scroll down to section IPv6 Settings. Under this section, click the radio button next to Manual. After choosing Manual IPv6 address assignment method, all fields under this section will be unlocked. Mandatory fields that should contain IPv6 address information are IPv6 Address and IPv6 Prefix Length. In case of existing DNS service on the network, this information can be written in the appropriate field. Once IPv6 addressing information are entered, click Save and Apply. The station will be rebooted and will appear online after few minutes with desired IPv6 address.
IPv6 dynamic address assignment
Dynamic IPV4 host address assignment is possible in only one way - through any by presence of DHCP V4 (Dynamic Host Configuration Protocol) Server in the local network segment.
IPv6 protocol offers several methods in this regard – stateless, stateful or combination of these two. IPv6 dynamic address configuration and method chosen on the networking level should not impact dynamic IPv6 address assignment on Turbine.
Select Main > Main Settings to access the page for configuring Mode of operation and Network Settings and scroll down to section „IPv6 Settings“. Under this section, click the radio button next to „Auto“, click Save and Apply. The station will be rebooted and will appear online after few minutes with dynamic IPv6 address.
Address verification and StationWeb access
IPV4 host can be configured to have only one IP address. IPv6 protocol, one host might be configured with two or more IP addresses, where IPv6 link-local address is always active on the interface, but that could be several global addresses assigned dynamically or manually. One of these IPv6 addresses will be shown on the Main Information page on StationWeb.
PBX Registration
We might register Turbine station with PBX either by specifying PBX's IPv6 address or by its mnemonic, DNS name.
Registration by IPv6 PBX address
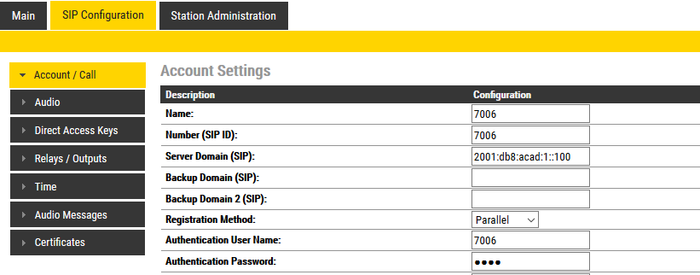
Select SIP Configuration > Account/Call. In the Account Settings section, enter all necessary information needed to register the Turbine station on PBX, including IPV6 address on which PBX is listening for SIP registrations. Once all information is entered in appropriate fields, click Save and then Reboot. The station, if everything is configured well on PBX, will be registered on PBX soon after boot.
Station registration status will be shown on StationWeb's Main Information page, in the section Status.
Registration by IPv6 PBX DNS name
To register the Turbine station against PBX DNS name, Turbine station must be configured to use DNS server that will be able to resolve the name to IPv6 address.
Preferred protocol – IPv6
Even if DNS server information is correctly configured, resolving PBX DNS name to IPv6 address is successful and Account information is correctly configured – why are we not able to register our Turbine station to PBX listening on IPv6 address?
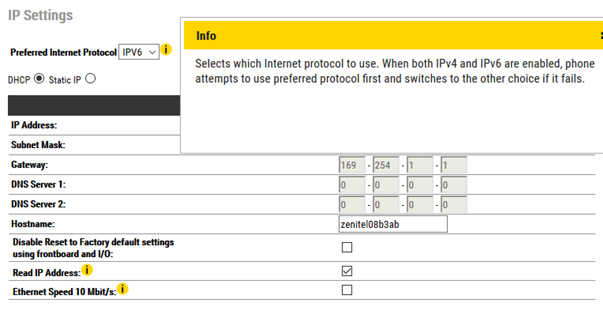
The answer lies in the option Preferred protocol, which should be set to use IPv6. To configure this option go to Main > Main Settings and go to the IP Settings section. Under this section, find the option Preferred Protocol and from the dropdown menu choose IPv6. Click Save and Apply.
If everything was configured well, Turbine station will be registered against PBX listening on IPv6, immediately upon reboot.
Time Server on IPv6 address
Turbine station in SIP mode will be able to synchronize Time with NTP server listening on IPv6 address. To configure Time Server on Turbine, select SIP Configuration > Time and configure DNS name or IPv6 address of desired NTP server.
Turbine upgrade over TFTP server listening on IPv6 address
Turbine software upgrades over TFTP Server listening on IPv6 address is supported only if temporary IPv6 addresses are disabled.
Go to Station Administration > Manual Upgrade. In the text box next to „TFTP Server“ label, add TFTP IPv6 address or TFTP DNS name.

|
To do the upgrade over TFTP server, we recommend to use tftpd64. In tftpd64, you must Enable IPv6 in Settings > Global |
Syslog and SNMP listening on IPv6
To be able to configure SNMP and Syslog settings we will need to open Advanced Configuration mode. Select Main > Recovery. On this page, under section Preferences type „1851“ in text box next to Advanced Configuration mode label, then check the box, click Save and after that Reload.
Advanced Configuration mode will now be enabled for configuration.
Syslog on IPv6
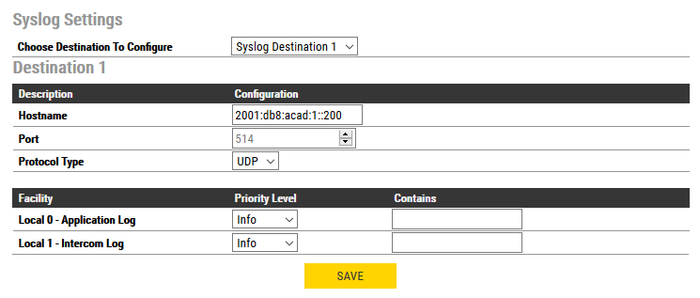
Select Station Administration > Logging. Under section Syslog Settings configure IPv6 address or DNS name of Syslog server, configured already for accepting system logs on specified IPv6 address, transport protocol and port. Save changes, a reboot is not required.
SNMP on IPv6
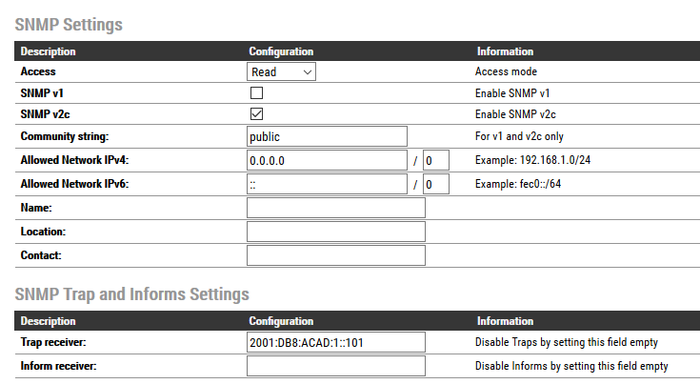
Select Advanced Network > SNMP. Under the section SNMP Settings enable SNMP protocol.
- Access – should be set to „Read“ to enable SNMP
- SNMP v1 or SNMP v2c, or enable both – choose which version you would like to use
- Community string – a string that will be used by external SNMP browser to access Turbine SNMP data
- Allowed Network IPv6 – with this option we can control from which IPv6 network address we will allow access to Turbine's SNMP data. In this example, we will allow anyone if we specify ::/0
- SNMP Trap and Inform Settings - receivers listening on IPv6 will be able to receive SNMP Traps from Turbine if we specify its IPv6 address
SIP Updates over IPv6 – currently not supported
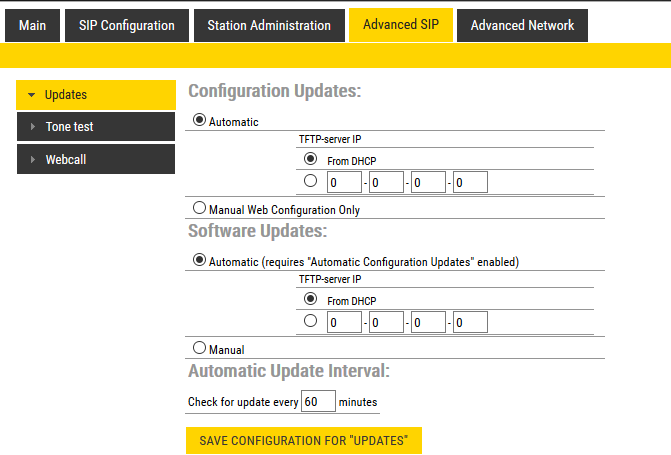
Select Advanced SIP > Updates. There we can see that there will be no option to execute any kind of SIP updates over IPv6. Since Dual Stack on Networking Level is supported, every Turbine station will be able to receive updates on its IPV4 address.


