MPS Button Configuration (VIPA Configuration Tool)
From Zenitel Wiki
The button type is defined by the type property of the button. This is set from the drop-down list in the "Type" field of the Required Settings category of the button's Add Button edit window. The following button types can be configured:
Page Button
This button selects PA zone(s) for an announcement. A single zone or a list of zones is defined in the zones property, where each zone equates to an audio output on a VIPA device (local or remote). After the button is pressed, a green zone selection LED will flash to indicate the zone(s) is selected. The main PTT button is then pressed to make a live announcement to the selected zones.
- Right-click on the Microphone in the Navigation window and select Add > Button
Required Settings Tab
- Choose which button Number you want to assign to the button. This will correspond with any physical buttons on the MPS if present, or selectable zones via the front panel menu if you are configuring an MPS01.
- Set the button Type to Page
 |
| MPS Page Button Required Settings |
Optional Settings Tab
- Select the zone(s) you want the live announcement to route to (in the example below all zones have been selected)
- Press Apply
| File:VAIA MPSButton Opt.png |
| MPS Page Button Optional Settings |
DVA Button
This button will trigger and pre-recorded DVA stored in the VAIA's /dva/msgs/dist directory. The the path and filename of the DVA has to be entered into the "Filename box" e.g. /dva/msgs/dist/PleaseStandBack.wav
- Right-click on the Microphone in the Navigation window and select Add > Button
Required Settings Tab
- Choose which button Number you want to assign to the button. This will correspond with any physical buttons on the MPS if present, or selectable zones via the front panel menu if you are configuring an MPS01.
- Set the button Type to DVA
- Enter the the path and filename of the DVA into the Filename box e.g. /dva/msgs/dist/PleaseStandBack.wav
- Select the DVA Button Mode. The two possible options and their functionality are as follows:
- Trigger - Button press will only trigger the DVA. A separate DVA Reset button is required to terminate the DVA playing
- Toggle - 1st button press will trigger the DVA 2nd button press will cancel the DVA after its current play.
 |
| MPS DVA Button Required Settings |
Optional Settings Tab
- Select the zone(s) you want the DVA to route to (in the example below all zones have been selected)
- The Keylock option allows you to select whether the button can be activated with or without Keylock protection:
- Unprotected - DVA Button will trigger the DVA without MPS Keylock on
- Protected - Keylock has to be activated for DVA button to be active
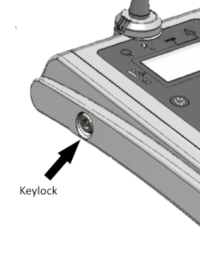
MPS Keylock location

- Leave the Priority as the default Use microphone priority option. (Advanced Setting)
- Leave the Permissions box checked so that the microphone permissions are used. (Advanced Setting)
- Set the DVA Play Count. This is the number of time the DVA will play.
- Set the Gap in seconds between DVA plays if configured to play more than once.
- Press Apply
 |
| MPS DVA Button Optional Settings |
DVA Reset
This button will terminate a DVA triggered by a button configured in DVA Trigger mode. It can be configured to terminate a single or multiple DVA trigger buttons
- Right-click on the Microphone in the Navigation window and select Add > Button
Required Settings Tab
- Choose which button Number you want to assign to the button. This will correspond with any physical buttons on the MPS if present, or selectable zones via the front panel menu if you are configuring an MPS01.
- Select Type > DVA Reset
- Select which DVA trigger button this button will reset
- Select Apply
 |
| MPS DVA Reset Button Required Settings |
Mute Button
Pressing this button mutes the audio to the zone or group of zones defined in the zones property.
- Right-click on the Microphone in the Navigation window and select Add > Button
- In the Required Settings choose which button Number you want to assign to the button. This will correspond with any physical buttons on the MPS if present, or selectable zones via the front panel menu if you are configuring an MPS01.
- In the Required Settings set the button Type to Mute
 |
| MPS Mute Button Required Settings |
- In the Optional Settings select the zone(s) you want to mute. In the example below zone: ticket_hall will be muted.
- Press Apply
 |
| MPS Mute Button Optional Settings |
Listen-In Button
After a Page button has been pressed, this button will Listen-in to any PMC Output that has been assigned to the listenin Audio Group on any VIPA device capable of streaming output audio over the IP network to a host system.
BGM
This button routes preconfigured background music to the zone or group of zones defined in the zones property.
Fault Status
This button has no effect, but the red LED indicator monitors faults on a VIPA device.
Fault Clear
This button clears faults on a VIPA device. The button can be configured to clear faults only on the local VIPA device to which it is attached if the "target" property in "Optional Settings" of the button is left blank or on a remote VIPA device if the "target" property of the button identifies the remote VIPA device is added.
Fault Accept
This button will Accept any faults on a VIPA device to inhibit any audible alarms. The latched fault will remain until a Fault Clear is issued.
VAIA Configuration