Getting Started (IC-Edge)
From Zenitel Wiki
This article describes step by step how to configure an IC-EDGE System.
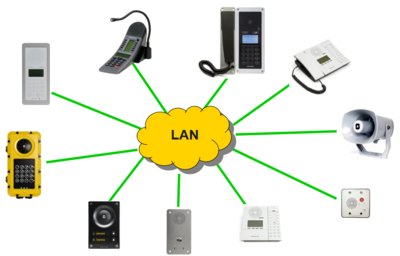
The IC-EDGE system is a SIP intercom system intended for small to mid-size installations for up to 64 IP stations. Up to 32 stations can be used without the need of a license. The IC-EDGE System is easy to install and configure. It is configured using a standard web browser (like Firefox or Chrome). Multiple IC-EDGE systems can be linked together.
One of the intercom stations must be set as the "Edge Controller". The Edge Controller is acting as a server for the other intercom stations in the system. Any Turbine device can serve as an Edge Controller.
Watch this video on how to get started with the IC-Edge system:
Contents
Prerequisites
Software requirements
- Turbine devices: Minimum version 5.0.3.0
- INCA devices: Minimum version 2.10.3.0
Hardware requirements
- The Edge Controller must be a Turbine device.
- Turbine video station TCIV should only be used in very small installation; 4-5 stations
- INCA Station cannot be used as an Edge Controller
License requirements
Some devices used in the IC-EDGE System require that a software license is installed. See Licensing in IC-EDGE for details.
Planning the IC-EDGE System
Before starting the configuration, it is recommeded to carefully plan the system. Configuration data, such as IP addresses, Names and Numbers should be documented. From the IC-EDGE System Planning page one can download a IC-EDGE System Planner template, which will assist you in collecting all neccerassy data before starting with the configuration.
Set Edge Controller
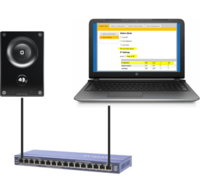
- Decide which station to use as an Edge Controller, and connect that station to a PoE Ethernet switch. Do not connect any other stations at this point.
- Connect your laptop computer to the network switch
- Start a web browser (e.g. Firefox or Chrome), and log on to the station.
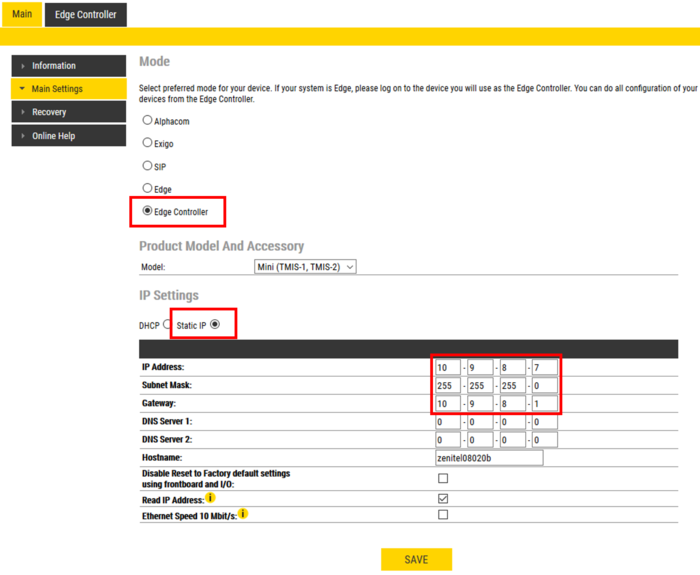
- In Main Settings, set "Mode" = Edge Controller. Enable Static IP, and enter the IP Address, Subnet Mask and the Gateway of the Edge Controller
- Press Save

|
|
Set Directory
Note that all configuration is done at the Edge Controller, which will push configuration to the Edge devices. There is no need to log on to each individual device.
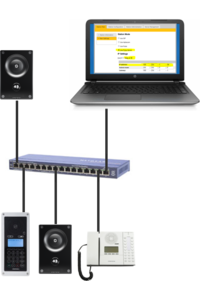
- Connect the rest of the intercom stations to the network.
- Wait for the stations to boot up (approximately 60 seconds) before proceeding to the next step.
- Log on to the Edge Controller using its new IP address.
- Select Edge Controller > System Configuration > Directory. You should now see a list of all stations on the network.
- To identify the individual stations, click Play Tone. You will now hear a tone in the loudspeaker of the station you selected.
- Enter Number, Name and IP address for all the stations. You can choose to enter a Static IP address, or check DHCP to obtain IP address from a DHCP server. When using Static IP addresses, make sure to enter an unique IP Address for each station.
- Optionally one can add a SIP Password. If a password is entered, it will automatically be applied to the devices. The password is used for the registration proccess.
- Optionally one can change the Profile. Device Profiles are used if restrictions should be applied to Relay Activation (Door Opening), Group Call activation etc.
- If the Read IP Address is checked, the station will play its own IP address in the loudspeaker when the station is off-line, and a Call Button is pressed.
- Click Save. This will immediately push the settings to all stations.
To verify that the devices are successfully registered to the Edge Controller, select Edge Controller > System Overview. The devices should now have the status Registered.

|
|
The Edge system supports up to 32 intercom stations without the need of any license. The number of intercoms can be expanded to 64 by adding Intercom extension licenses. See Licensing in IC-EDGE for details.
Set Direct Access Keys
The Call Buttons (aka Direct Access Keys - DAK) are configured via the Edge Controller.
- Log on to the Edge Controller, and select Edge Controller > System Configuration > Direct Access Keys
- Select Show/Hide Settings for the station you want to configure
- Enter the number you want the call button to dial, then Save:
- Continue with the next station until the call button of all stations are configured.
Set System Time
By setting the System Time, the Edge Controller may obtain the date and time from the NTP server, and upgrade all connected devices with correct time settings.
- NTP Server: Defines the URL or IP address of the NTP server.
- Region: Select which region in the world
- Zone: Select local zone
When region/zone is selected, Daylight Savings time will automatically be adjusted according to the seleceted zone.
Set Credentials
The default credentials are User = admin, Password = alphaadmin. For security reasons it is recommended to change the default password.
- From Edge Controller > System Configuration > Credentials, you can change the password on all connected devices in one operation
- Enter the Old Password, the New Password, then confirm the new password
- Upon Save, the new password will be pushed to all devices
Verify System Setup
Select Edge Controller > System Overview. All stations that have been configured should be displayed in the table. Stations that are up and running will have the status Registered.
Verify that the system works as expected:
- Make Calls to and from intercom stations
- Check that Call Buttons are placing the call to the correct destination
- Verify that Relay operation is according to configured behavior
- If required, adjust Audio Settings
Manually Added Devices
Some devices are not automatically discovered by the Edge Controller, and must be manually added. See Manually Added Devices for further details.
Audio Settings
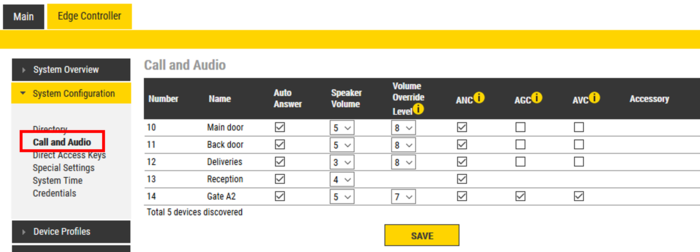
The Call and Audio Settings menu include the following parameters:
- Autoanswer: When un-checked incoming calls will be ringing (Private mode), and has to be accepted by the user. When checked the call will connect straight through (Open mode). On stations with full keypad the user can also toggle Autoanswer on/off by pressing the C-button for 2 seconds.
- Speaker Volume: Sets the loudspeaker volume for the station.
- Volume Override Level: Sets the loudspeaker volume during volume override. Volume Override is used by Group calls with Emergency priority.
- ANC: Active Noise Cancellation. When enabled most of the background noise will be filtered away from the microphone signal.
- AGC: Automatic Gain Control. When enabled the microphone signal will automatically be amplified when speaking with a low voice or if you are far away from the station.
- AVC: Automatic Volume Control. When enabled the loudspeaker volume is adjusted according to the ambient noise level. The AVC will perform better if the "Speaker Volume" is set to a fairly low level, as this will give the AVC a more dynamic range for adjustments. Note that the AVC adjustment is disabled while the speaker is playing audio. Adjustments are made in silent periods (min. 100 ms silence required).
- Accessory: If the station model supports accessories (headset, handset etc.), you can choose the type of accessory here

|
For Turbine TCIV+ registered to Edge Controller running firmware ver. 5.x:
|

