Difference between revisions of "IMT - Additional intercom system configuration"
From Zenitel Wiki
(Created page with "{{AEIPS}} = About Station Settings = Once a station is included in a project, it is placed on the list of stations in the main project window. When a station is selected, basi...") |
(→802.1X configuration) |
||
| (8 intermediate revisions by the same user not shown) | |||
| Line 2: | Line 2: | ||
= About Station Settings = | = About Station Settings = | ||
Once a station is included in a project, it is placed on the list of stations in the main project window. When a station is selected, basic station information will be displayed in the '''Station info''' panel. | Once a station is included in a project, it is placed on the list of stations in the main project window. When a station is selected, basic station information will be displayed in the '''Station info''' panel. | ||
| − | [[ | + | <table style="max-width:80%; border-style: double; border-color: #c7c7c7;"> |
| + | <tr style="rowspan:2;"> | ||
| + | <td style="display: block; vertical-align: bottom;">[[Image:IMT-Main.png|none|thumb|1426x1426px]]</td> | ||
| + | </tr> | ||
| + | </table> | ||
| + | |||
The '''Station info''' panel information is read-only, but the following actions are available on it: | The '''Station info''' panel information is read-only, but the following actions are available on it: | ||
| − | * '''Sync''': collect station configuration directly from the station.[[ | + | * '''Sync''': collect station configuration directly from the station. |
| − | * '''Change Model''': Frontboard model can be changed (only for Turbine stations). On Turbine Industrial station, it's also possible to change Accessory.[[ | + | <table style="max-width:80%; border-style: double; border-color: #c7c7c7;"> |
| + | <tr style="rowspan:2;"> | ||
| + | <td style="display: block; vertical-align: bottom;">[[Image:IMTStationSync.JPG|none|thumb|538x538px]]</td> | ||
| + | </tr> | ||
| + | </table> | ||
| + | * '''Change Model''': Frontboard model can be changed (only for Turbine stations). On Turbine Industrial station, it's also possible to change Accessory. | ||
| + | <table style="max-width:80%; border-style: double; border-color: #c7c7c7;"> | ||
| + | <tr style="rowspan:2;"> | ||
| + | <td style="display: block; vertical-align: bottom;">[[Image:IMTChangeFrontboard.JPG|none|thumb|446x446px]]</td> | ||
| + | </tr> | ||
| + | </table> | ||
| + | <table style="max-width:80%; border-style: double; border-color: #c7c7c7;"> | ||
| + | <tr style="rowspan:2;"> | ||
| + | <td style="display: block; vertical-align: bottom;">[[Image:IMTChangeFrontboardAccessory.JPG|none|thumb|446x446px]]</td> | ||
| + | </tr> | ||
| + | </table> | ||
* '''Open StationWeb''': open station interface in a web browser. | * '''Open StationWeb''': open station interface in a web browser. | ||
| − | * '''Site''': this setting is not applied on the station itself; it can be used to organize stations into sites from | + | * '''Site''': this setting is not applied on the station itself; it can be used to organize stations into sites from IMT. |
| − | * '''Description''': this setting is not applied on the station itself; it can be used for a user-defined description in | + | * '''Description''': this setting is not applied on the station itself; it can be used for a user-defined description in IMT.<br> |
| − | Station info is not synchronized in real-time with the station, so there is an option to synchronize all information directly from the station by clicking the '''Sync…''' button. This option is very useful for checking whether the station has been changed since the last usage of | + | Station info is not synchronized in real-time with the station, so there is an option to synchronize all information directly from the station by clicking the '''Sync…''' button. This option is very useful for checking whether the station has been changed since the last usage of IMT, without the need to go on the station web interface to see whether there are differences. |
| + | |||
| + | It's also possible to update station registration information for all stations in the project. To do that, click on the '''Check''' link an the left pane in the main IMT window. This will launch the check registration process.0 | ||
| + | </table> | ||
| + | <table style="max-width:80%; border-style: double; border-color: #c7c7c7;"> | ||
| + | <tr style="rowspan:2;"> | ||
| + | <td style="display: block; vertical-align: bottom;">[[Image:IMTStationRegistration.JPG|none|thumb|456x456px]]</td> | ||
| + | </tr> | ||
| + | </table> | ||
| − | |||
| − | |||
Once the process is done, close the window by clicking on the '''CLOSE''' button. Note that this will update information shown on '''Station info''' panel for all stations in the project. | Once the process is done, close the window by clicking on the '''CLOSE''' button. Note that this will update information shown on '''Station info''' panel for all stations in the project. | ||
= Station settings = | = Station settings = | ||
| − | In the '''Station settings''' | + | In the '''Station settings''' panel, a list of setting groups available for the selected station is displayed. |
| − | panel, a list of setting groups available for the selected station is | + | {{Note|The list is unique for every station type and mode.}} |
| − | displayed. Note | + | Related settings are grouped together inside settings group. Settings groups can be collapsed or expanded by clicking on the +/- icon next to their name. To change a settings, simply input a new value a click on '''SAVE''' button. |
| − | Related settings are grouped together inside settings group. Settings | + | |
| − | groups can be collapsed or expanded by clicking on the +/- icon next to | + | Settings which are changed will be highlighted with ''orange'' background. If settings group has some settings changed, it will also be highlighted in ''orange''. |
| − | their name. To change a settings, simply input a new value a click on '''SAVE''' button. Settings which are changed will be highlighted with ''orange'' background. If settings group has some settings changed, it will also be highlighted in ''orange''. | + | <table style="max-width:80%; border-style: double; border-color: #c7c7c7;"> |
| − | [[ | + | <tr style="rowspan:2;"> |
| − | Clicking on the '''DISCARD''' button will revert all local changes made in | + | <td style="display: block; vertical-align: bottom;">[[Image:IMTChangedSettings.JPG|none|thumb|898x898px]]</td> |
| + | </tr> | ||
| + | </table> | ||
| + | |||
| + | Clicking on the '''DISCARD''' button will revert all local changes made in IMT on the selected station. | ||
== Multiple-select and Configure == | == Multiple-select and Configure == | ||
| − | It's | + | It's also possible to change configuration on multiple stations at once. To do this, select multiple stations in the station list, either via Shift click or Ctrl click. |
| − | also possible to change configuration on multiple stations at once. To | ||
| − | do this, select multiple stations in the station list, either via Shift | ||
| − | click or Ctrl click. | ||
| − | After that you will need to | + | After that you will need to explicitly select which setting will be changed by checking the checkbox next to each setting you wish to change. Until this is done, control for changing the configuration value will be disabled. |
| − | explicitly select which setting will be changed by checking the checkbox | + | |
| − | next to each setting you wish to change. Until this is done, control | + | {{Note|Only settings which are available for all selected station types will be shown, for example if both Turbine and INCA stations are selected, Turbine specific and INCA specific settings will not be shown.}} |
| − | for changing the configuration value will be disabled. | + | <table style="max-width:80%; border-style: double; border-color: #c7c7c7;"> |
| + | <tr style="rowspan:2;"> | ||
| + | <td style="display: block; vertical-align: bottom;">[[Image:ImtMultipleSelect.png|none|thumb|1000px]]</td> | ||
| + | </tr> | ||
| + | </table> | ||
| − | |||
| − | |||
| − | |||
| − | |||
| − | |||
The configuration '''Status''' panel will update the number of changed stations and these will be indicated by the color ''yellow'' in the list. | The configuration '''Status''' panel will update the number of changed stations and these will be indicated by the color ''yellow'' in the list. | ||
Settings can be changed on a larger number of stations and then applied by clicking the '''UPLOAD''' button on all stations at once. | Settings can be changed on a larger number of stations and then applied by clicking the '''UPLOAD''' button on all stations at once. | ||
| − | + | <table style="max-width:80%; border-style: double; border-color: #c7c7c7;"> | |
| − | + | <tr style="rowspan:2;"> | |
| − | + | <td style="display: block; vertical-align: bottom;">[[Image:IMTConfigurationStart.JPG|none|thumb|900px]]</td> | |
| − | + | </tr> | |
| − | + | </table> | |
| − | [[ | ||
| − | |||
| − | + | After clicking the '''UPLOAD''' button, you will be presented with list of stations whose configuration will be changed. After reviewing the list, you can apply new configuration by clicking on the '''PUSH CONFIG''' button. | |
| − | + | <table style="max-width:80%; border-style: double; border-color: #c7c7c7;"> | |
| − | + | <tr style="rowspan:2;"> | |
| − | + | <td style="display: block; vertical-align: bottom;">[[Image:IMTConfigurationDone.JPG|none|thumb||900px]]</td> | |
| − | + | </tr> | |
| − | + | </table> | |
| − | |||
| − | |||
| − | |||
| − | |||
| − | |||
| − | |||
| − | |||
| − | |||
| − | |||
| − | |||
| − | |||
| − | |||
| − | |||
| − | |||
| − | |||
| − | |||
| − | |||
| − | |||
| − | |||
| − | |||
| − | |||
| − | |||
| − | |||
| − | |||
| − | |||
| − | |||
| − | |||
| − | |||
| − | |||
| − | |||
| − | |||
| − | |||
| − | |||
| − | |||
| − | |||
| − | |||
| − | |||
| − | |||
| − | |||
| − | |||
| − | |||
| − | |||
| − | |||
| − | |||
| − | |||
| − | |||
| − | |||
| − | |||
| − | |||
| − | |||
| − | |||
| − | |||
| − | |||
| − | |||
| − | |||
| − | |||
| − | |||
| − | |||
| − | |||
| − | |||
| − | |||
| − | |||
| − | |||
| − | |||
| − | |||
| − | |||
| − | |||
| − | |||
| − | |||
| − | |||
| − | |||
| − | |||
| − | |||
| − | |||
| − | |||
| − | |||
| − | |||
| − | |||
| − | |||
| − | |||
| − | |||
| − | |||
| − | |||
| − | |||
| − | |||
| − | |||
| − | |||
| − | |||
| − | |||
| − | |||
| − | |||
| − | |||
| − | |||
| − | |||
| − | |||
| − | |||
| − | |||
| − | |||
| − | |||
| − | |||
| − | |||
| − | |||
| − | |||
| − | |||
| − | |||
| − | |||
| − | |||
| − | |||
| − | |||
| − | |||
| − | |||
| − | |||
| − | |||
| − | |||
| − | |||
| − | |||
| − | |||
| − | |||
| − | |||
| − | |||
| − | |||
| − | |||
| − | |||
| − | |||
| − | |||
| − | |||
| − | |||
| − | |||
| − | |||
| − | |||
| − | |||
| − | |||
| − | |||
| − | |||
| − | |||
| − | |||
| − | |||
| − | |||
| − | |||
| − | |||
| − | |||
| − | |||
| − | |||
| − | |||
| − | |||
| − | |||
| − | |||
| − | |||
| − | |||
| − | |||
| − | |||
| − | |||
| − | |||
| − | |||
| − | |||
| − | |||
| − | |||
| − | |||
| − | | | ||
| − | | | ||
| − | | | ||
| − | | | ||
| − | |||
| − | |||
| − | |||
| − | |||
| − | |||
| − | |||
| − | |||
| − | |||
| − | |||
| − | |||
| − | |||
| − | |||
| − | < | ||
| − | + | After configuration is completed, you will be presented with status for each station. Click on the '''CLOSE''' button to return back to main IMT window. | |
| − | |||
| − | |||
| − | |||
| − | |||
| − | |||
| − | |||
= Profile Manager = | = Profile Manager = | ||
| − | Profiles in | + | Profiles in IMT provide the possibility to define array of settings with their values that are commonly used. Defined array of settings can be applied to one or many stations at once with a single click. |
Profiles are managed using Profile manager utility that can be accessed from '''Tools''' > '''Profile Manager''' | Profiles are managed using Profile manager utility that can be accessed from '''Tools''' > '''Profile Manager''' | ||
| − | [[ | + | <table style="max-width:80%; border-style: double; border-color: #c7c7c7;"> |
| + | <tr style="rowspan:2;"> | ||
| + | <td style="display: block; vertical-align: bottom;">[[Image:IMT-Profiles-Setup.png|none|thumb|900px]]</td> | ||
| + | </tr> | ||
| + | </table> | ||
| + | |||
| − | Created profile can be applied to any station in the project. User can apply it on one or many stations at once by selecting profile from drop-down list and clicking on '''Use Profile Values'''.Profile values are updated on selected stations and user can continue modifying station settings as when settings are changed one-by-one (without using profiles). Note: applied settings are locally stored in | + | Created profile can be applied to any station in the project. User can apply it on one or many stations at once by selecting profile from drop-down list and clicking on '''Use Profile Values'''. Profile values are updated on selected stations and user can continue modifying station settings as when settings are changed one-by-one (without using profiles). Note: applied settings are locally stored in |
| − | + | IMT database - for uploading configuration to stations user needs to use '''Upload''' function. | |
| − | [[ | + | <table style="max-width:80%; border-style: double; border-color: #c7c7c7;"> |
| + | <tr style="rowspan:2;"> | ||
| + | <td style="display: block; vertical-align: bottom;">[[Image:IMT-Profiles-Apply.JPG|none|thumb|900px]]</td> | ||
| + | </tr> | ||
| + | </table> | ||
= VLAN configuration = | = VLAN configuration = | ||
| Line 259: | Line 111: | ||
User can select one or more stations at once and set desired configuration and add/remove VLANs from VLAN table. Configuration is pushed immediately to all selected stations at once with '''Save''' button. VLAN is fully applied/activated with '''Apply''' button. Note: '''Apply''' does not store configuration, only activates existing setup. | User can select one or more stations at once and set desired configuration and add/remove VLANs from VLAN table. Configuration is pushed immediately to all selected stations at once with '''Save''' button. VLAN is fully applied/activated with '''Apply''' button. Note: '''Apply''' does not store configuration, only activates existing setup. | ||
| − | [[ | + | <table style="max-width:80%; border-style: double; border-color: #c7c7c7;"> |
| + | <tr style="rowspan:2;"> | ||
| + | <td style="display: block; vertical-align: bottom;">[[Image:IMT-Settings-VLAN.png|none|thumb|900px]]</td> | ||
| + | </tr> | ||
| + | </table> | ||
= 802.1X configuration = | = 802.1X configuration = | ||
| Line 268: | Line 124: | ||
User can select one or more stations at once and set desired authentication method, enable 802.1X, set credentials and configuration, paste certificate and push new configuration to stations. Configuration is pushed immediately to all selected stations at once with '''Save''' button. Reboot will also push configuration on stations, but it will additionally restart stations in order settings are immediately activated. | User can select one or more stations at once and set desired authentication method, enable 802.1X, set credentials and configuration, paste certificate and push new configuration to stations. Configuration is pushed immediately to all selected stations at once with '''Save''' button. Reboot will also push configuration on stations, but it will additionally restart stations in order settings are immediately activated. | ||
| − | [[ | + | <table style="max-width:80%; border-style: double; border-color: #c7c7c7;"> |
| + | <tr style="rowspan:2;"> | ||
| + | <td style="display: block; vertical-align: bottom;">[[Image:IMT-Settings-802.1X.png|none|thumb|900px]]</td> | ||
| + | </tr> | ||
| + | </table> | ||
= Upgrade Stations = | = Upgrade Stations = | ||
| − | + | IMT also offers an option to perform software upgrade on stations which are included in project. | |
See [[IMT - Discover & Upgrade#Upgrade Stations already included in the project|IMT Upgrade Stations]] for details | See [[IMT - Discover & Upgrade#Upgrade Stations already included in the project|IMT Upgrade Stations]] for details | ||
[[Category:IMT]] | [[Category:IMT]] | ||
Latest revision as of 15:22, 16 August 2022
Contents
About Station Settings
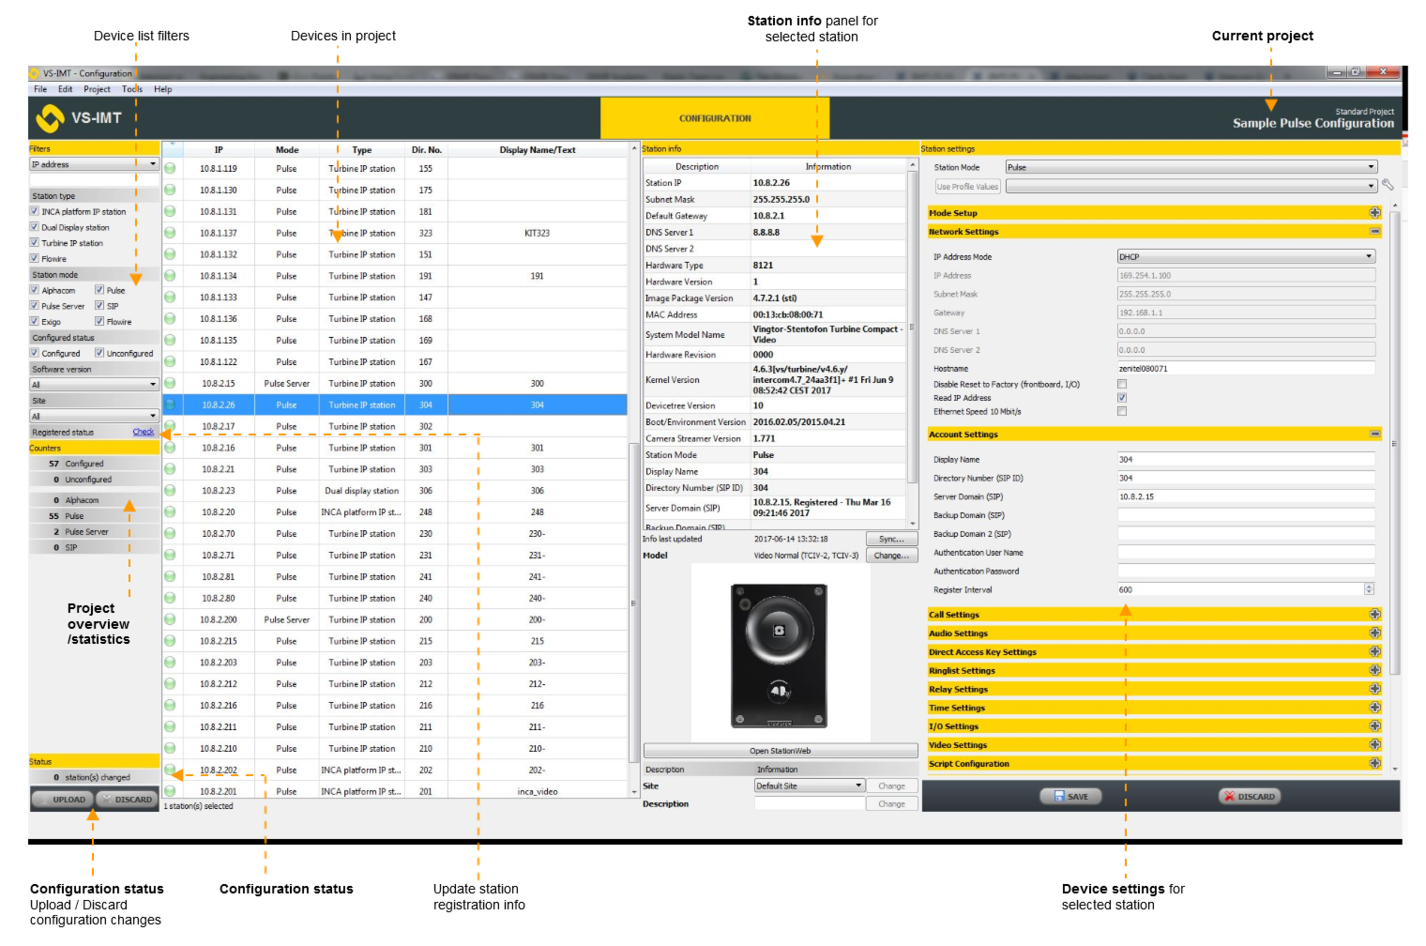
Once a station is included in a project, it is placed on the list of stations in the main project window. When a station is selected, basic station information will be displayed in the Station info panel.
The Station info panel information is read-only, but the following actions are available on it:
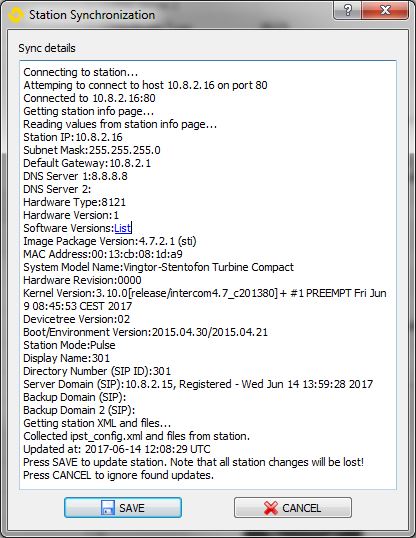
- Sync: collect station configuration directly from the station.
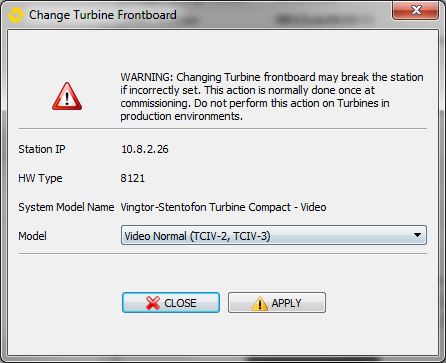
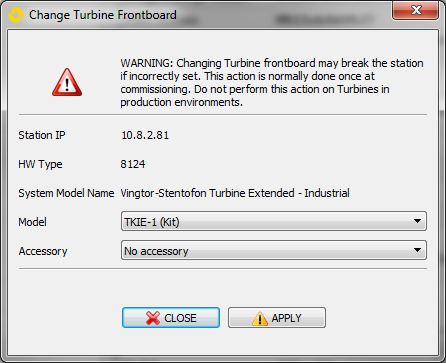
- Change Model: Frontboard model can be changed (only for Turbine stations). On Turbine Industrial station, it's also possible to change Accessory.
- Open StationWeb: open station interface in a web browser.
- Site: this setting is not applied on the station itself; it can be used to organize stations into sites from IMT.
- Description: this setting is not applied on the station itself; it can be used for a user-defined description in IMT.
Station info is not synchronized in real-time with the station, so there is an option to synchronize all information directly from the station by clicking the Sync… button. This option is very useful for checking whether the station has been changed since the last usage of IMT, without the need to go on the station web interface to see whether there are differences.
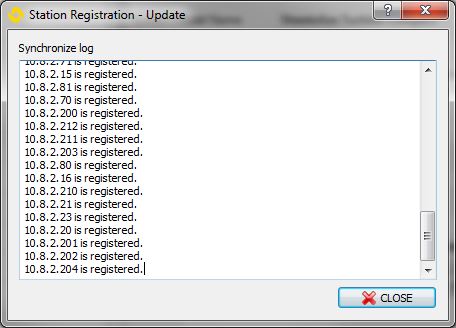
It's also possible to update station registration information for all stations in the project. To do that, click on the Check link an the left pane in the main IMT window. This will launch the check registration process.0
Once the process is done, close the window by clicking on the CLOSE button. Note that this will update information shown on Station info panel for all stations in the project.
Station settings
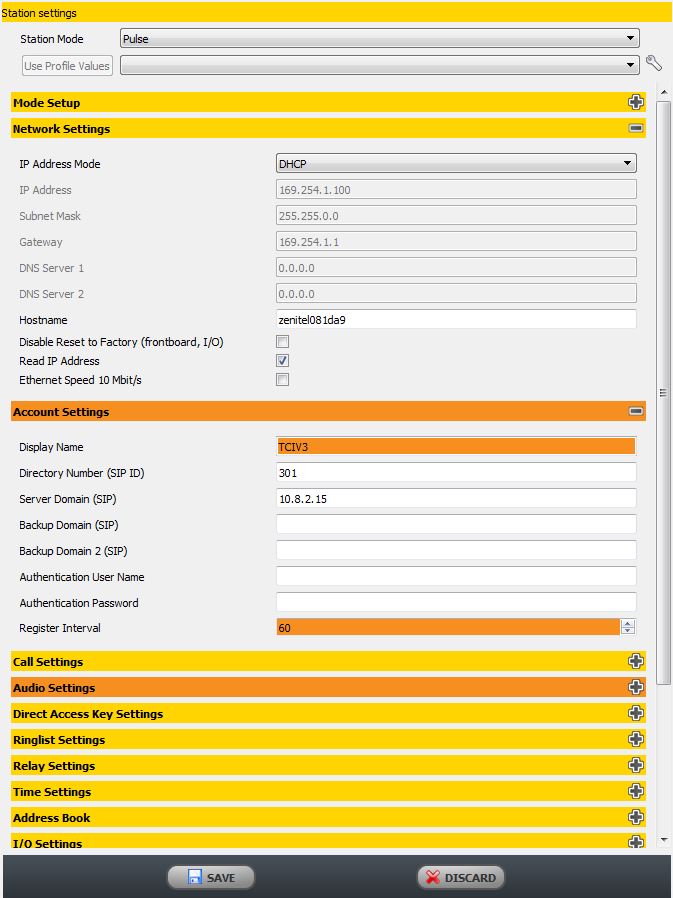
In the Station settings panel, a list of setting groups available for the selected station is displayed.
Related settings are grouped together inside settings group. Settings groups can be collapsed or expanded by clicking on the +/- icon next to their name. To change a settings, simply input a new value a click on SAVE button.
Settings which are changed will be highlighted with orange background. If settings group has some settings changed, it will also be highlighted in orange.
Clicking on the DISCARD button will revert all local changes made in IMT on the selected station.
Multiple-select and Configure
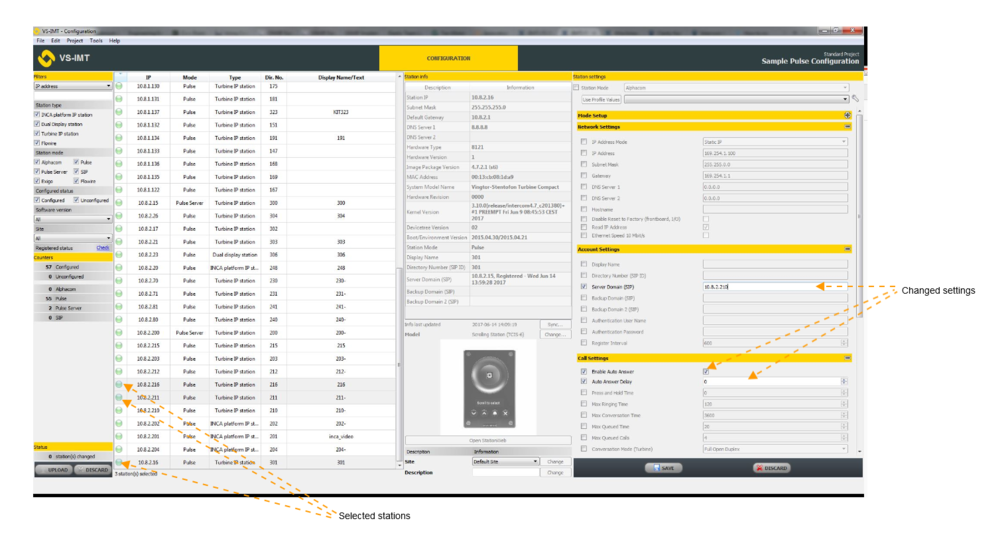
It's also possible to change configuration on multiple stations at once. To do this, select multiple stations in the station list, either via Shift click or Ctrl click.
After that you will need to explicitly select which setting will be changed by checking the checkbox next to each setting you wish to change. Until this is done, control for changing the configuration value will be disabled.
The configuration Status panel will update the number of changed stations and these will be indicated by the color yellow in the list.
Settings can be changed on a larger number of stations and then applied by clicking the UPLOAD button on all stations at once.
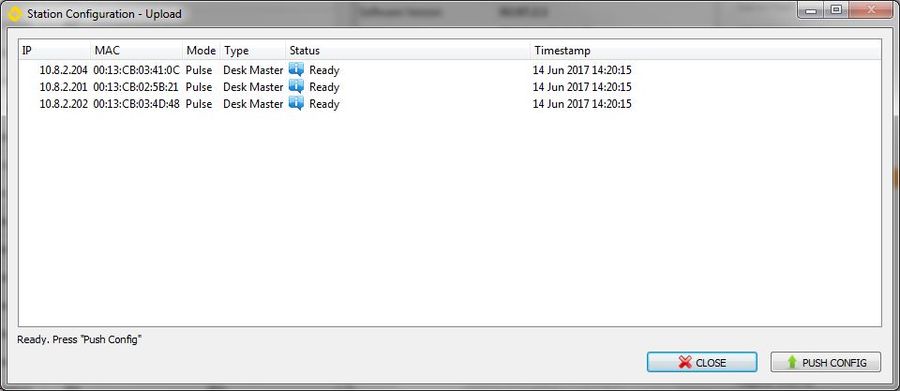
After clicking the UPLOAD button, you will be presented with list of stations whose configuration will be changed. After reviewing the list, you can apply new configuration by clicking on the PUSH CONFIG button.
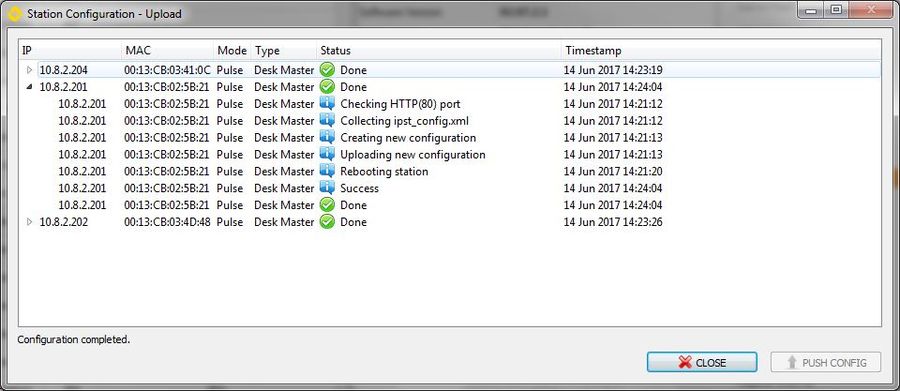
After configuration is completed, you will be presented with status for each station. Click on the CLOSE button to return back to main IMT window.
Profile Manager
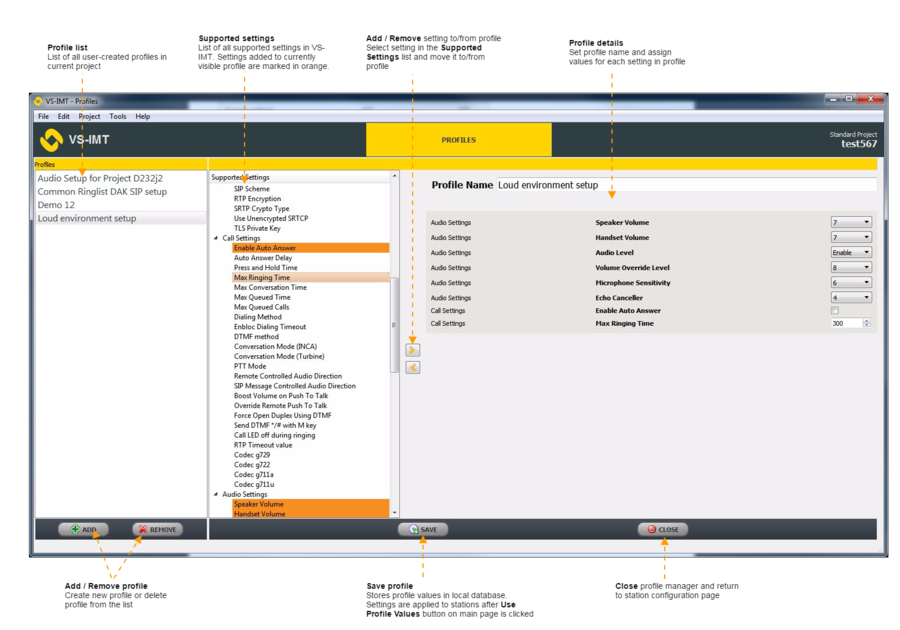
Profiles in IMT provide the possibility to define array of settings with their values that are commonly used. Defined array of settings can be applied to one or many stations at once with a single click.
Profiles are managed using Profile manager utility that can be accessed from Tools > Profile Manager
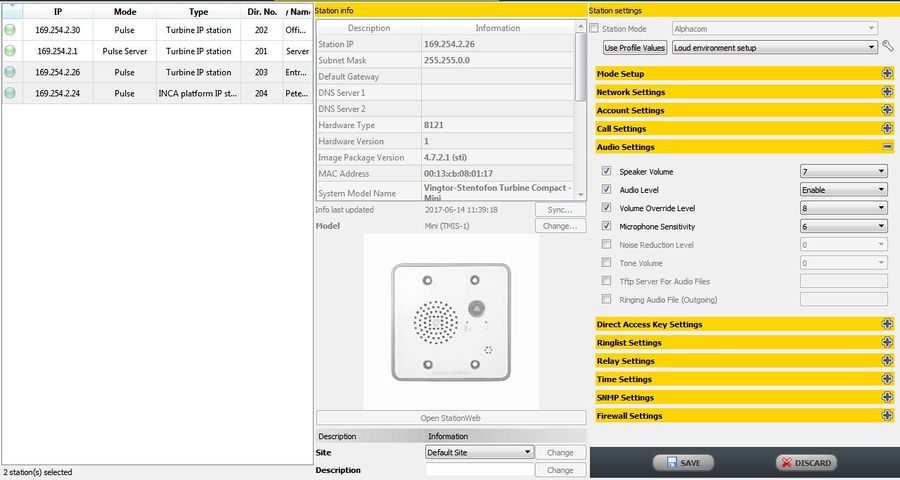
Created profile can be applied to any station in the project. User can apply it on one or many stations at once by selecting profile from drop-down list and clicking on Use Profile Values. Profile values are updated on selected stations and user can continue modifying station settings as when settings are changed one-by-one (without using profiles). Note: applied settings are locally stored in
IMT database - for uploading configuration to stations user needs to use Upload function.
VLAN configuration
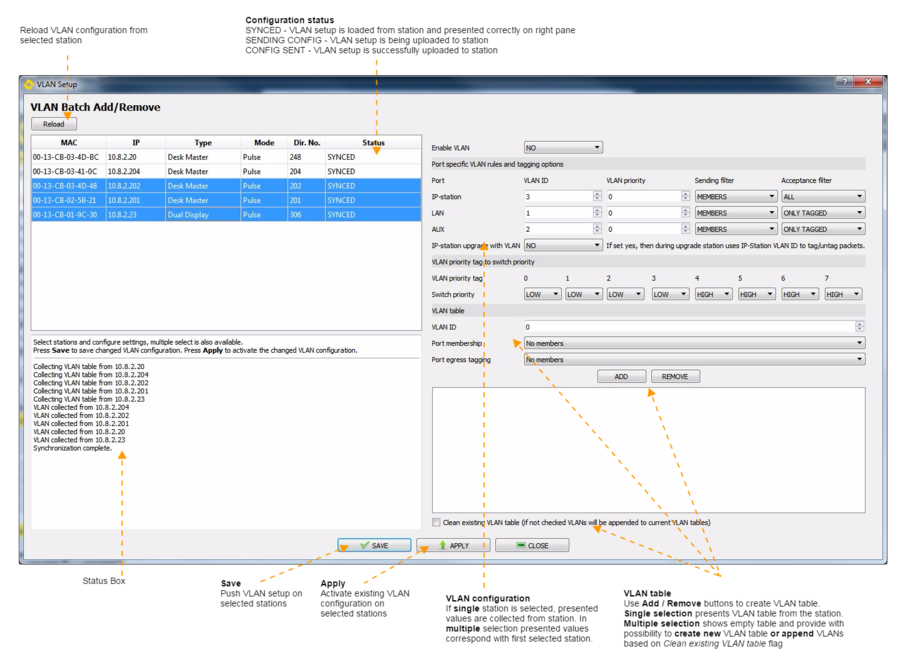
VLAN configuration is supported outside main settings list and it can be accessed from Tools > VLAN Setup... menu.
This configuration utility provides with possibility to fully setup VLAN on one or many stations at once. In the moment utility is opened whole VLAN configuration from all stations is collected and presented. Station list consist of only stations with supported VLAN.
User can select one or more stations at once and set desired configuration and add/remove VLANs from VLAN table. Configuration is pushed immediately to all selected stations at once with Save button. VLAN is fully applied/activated with Apply button. Note: Apply does not store configuration, only activates existing setup.
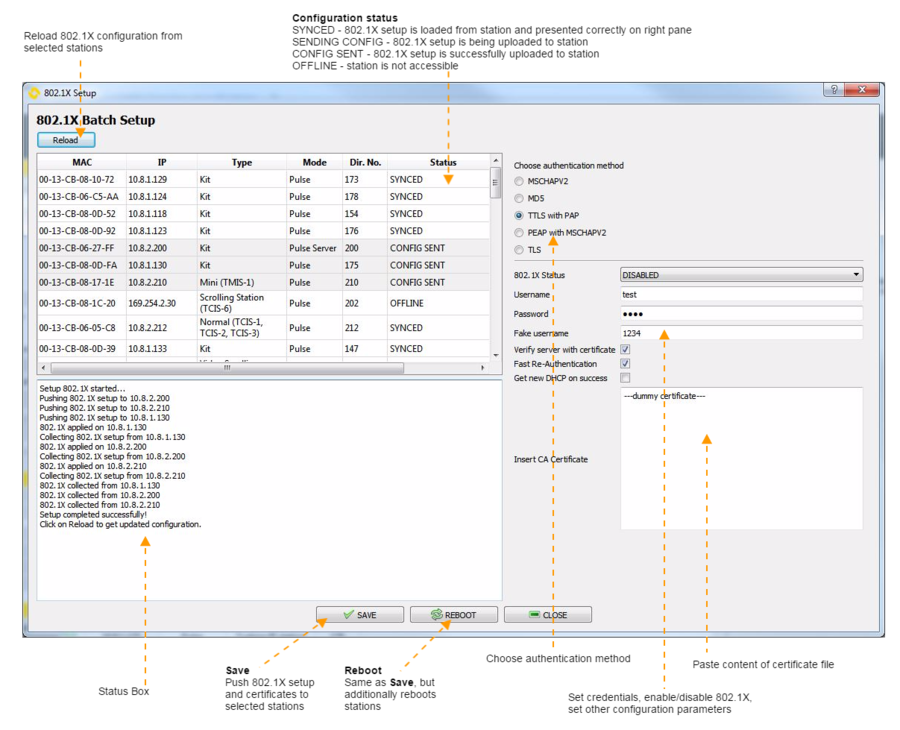
802.1X configuration
802.1X configuration is supported outside main settings list and it can be accessed from Tools > 802.1X Setup... menu.
This configuration utility provides with possibility to fully setup 802.1X on one or many stations at once. In the moment utility is opened whole 802.1X configuration from all stations is collected and presented. Certificates are not collected from stations.
User can select one or more stations at once and set desired authentication method, enable 802.1X, set credentials and configuration, paste certificate and push new configuration to stations. Configuration is pushed immediately to all selected stations at once with Save button. Reboot will also push configuration on stations, but it will additionally restart stations in order settings are immediately activated.
Upgrade Stations
IMT also offers an option to perform software upgrade on stations which are included in project.
See IMT Upgrade Stations for details


