INCA Station Software upgrade
From Zenitel Wiki
This article describes how to upgrade the software in the INCA family of IP Stations. Note that there is a separate Upgrade procedure for Turbine stations.
There are two recommended ways of upgrading the software on the IP Station:
It is also a possiblity to upgrade via the web interface of the AlphaCom Server (AlphaCom mode) or to define Automatic Updates (SIP mode).
Contents
Upgrade using the VS-IMT tool
Procedure:
- Download and install the VS-IMT tool
- Download the software package A100G80200.02_05_3_4.zip. Don't unzip the file.
- Start the VS-IMT tool
- Select Create project or open an existing project, and start the wizard that takes you through the discovery and upgrade process, by selecting File > Launch Station Wizard
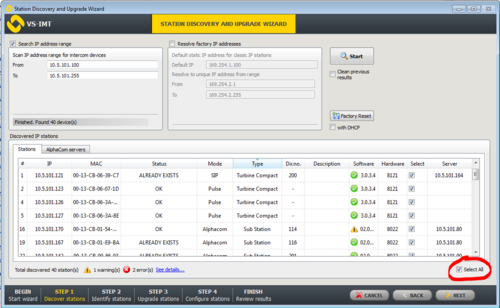
- Press Next to go to Station Discovery. Enter the range of IP addresses (From - To) to search for, and press Search
- When the discovery process is finished, select all stations in the list by checking the Select All flag
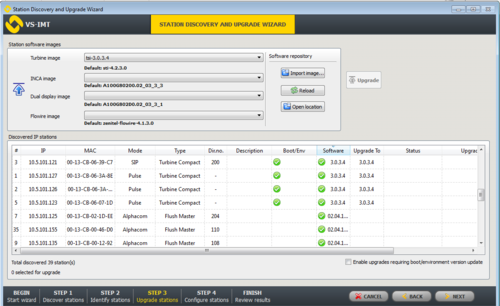
- Press Next two times. You've now come to the "Upgrade Stations" window:
- Import the software package into the VS-IMT tool, and start the upgrade:
- Select Import image..., and browse to the A100G80200.02_05_3_4.zip file, and select Open
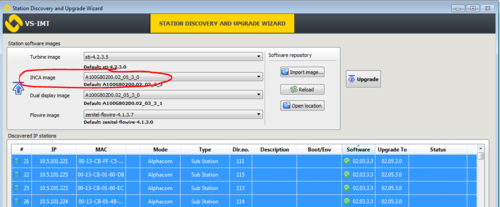
- Select the "INCA Image" = A100G80200.02_05_3_4
- In the list box, select the stations to upgrade. Use Ctrl + click to select multiple stations.
- Press the Upgrade button to start the upgrade process. The status is shown on the screen. The Status will become Success when the station is up and running after the upgrade.
Upgrade via the web interface of the station
To upgrade the software from the web page of the IP Station:
- Download the software package A100G80200.02_05_3_4.zip, unzip the file and store the files on a folder on your PC
- Start the TFTP server and browse to the folder were the software files are located
- Log on to the IP Station Web Server
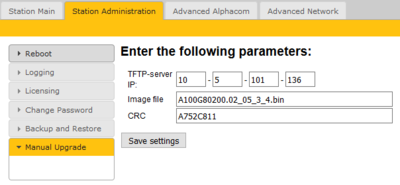
- Select Station Administration > Manual upgrade
- Enter the IP address of the TFTP server (normally your PC)
- Enter the name of the software Image file (include bin file extension)
- Enter the CRC checksum (found in the text file from the downloaded software package)
- Click Save settings to store this information.
The station will now try to contact the TFTP server. If the connection cannot be established or the file tftp_test.txt is missing from the folder, the message TFTP_CONN_ERROR is displayed. If the response is TFTP_CONN_OK the settings are saved, and the Upgrade button will appear.
- Click on the Upgrade button to upgrade the software of the IP Station. The procedure takes about 3 minutes.
- The transfer process can be monitored by selecting the Log viewer tab in the TFTP server program.
Upgrade via the web interface of the AlphaCom server
Note: This option is only available when the station is used in AlphaCom mode.
Start the TFTP server and browse to the folder were the software file is located.
Log on to the AlphaCom XE Web Server AlphaWeb:
- Select System Upgrade -> IP Stations Upgrade
- Enter the IP address of the TFTP server, the filename of the software Image file and its CRC checksum. Click Save.
- Select which IP Stations to upgrade (or all) and click Update Station List.
- Click Start Upgrade Process.
The AlphaCom XE will tell each IP Station to contact the TFTP server, download the software image file and carry out the upgrade.
A short status description of the process will be displayed in the Upgrade status column. The message IPST:ERROR indicates that there is no connection to the TFTP server, or that the tftp_test.txt file is missing from the folder. The transfer process can be monitored by selecting the Log viewer tab in the TFTP server program.
Automatic Software Upgrade
Note: Automatic Software Upgrade is only available when the station is used in SIP mode.
A SIP station may be set up to automatically poll software upgrade configuration from a TFTP server. The IP address of this TFTP server can be obtained using DHCP procedures or be manually configured.
A configuration file should first be created. The relevant parameters in the configuration file are described in Configuration File Parameters for SIP Provisioning.
An example of the parameters for software upgrade in the configuration file is as follows:
auto_update_interval=10
auto_update_image_type=A100G80200.01_10_1_2.bin
auto_update_image_crc=C1466499
To carry out automatic software upgrade from the station web server:
- Start the TFTP server program and set the server path by browsing to the directory where the software file is located.
- Log on to the SIP Station web server.
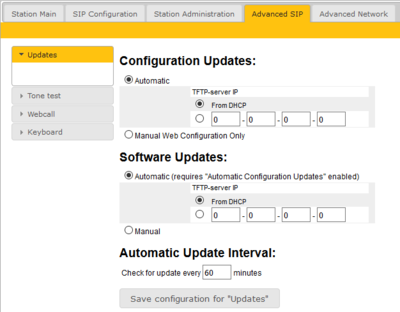
- Select Advanced SIP > Updates
- Under Configuration Updates select the radio button for Automatic. (Automatic Configuration Updates has to be enabled)
- Either select the radio button for From DHCP or enter the IP address of the TFTP server
- Under Software Updates select the radio button for Automatic
- Either select the radio button for From DHCP or enter the IP address of the TFTP server
- Under Automatic Update Interval enter the interval in minutes for checking updates. The value must be between 1 and 999 and the default setting is 60.
- Click Save configuration for “Updates”
The station will now contact the TFTP server, download the software image and carry out the upgrade.
- Note 1: During an upgrade, the station switch will not be VLAN aware. Make sure the IP station can reach the TFTP server from the native VLAN.
- Note 2: During an upgrade of the station, 802.1X will not be running. Thus if 802.1X reauthentication is enabled and is performed during the upgrade, the station may lose contact with the TFTP server (depending on the configuration when 802.1X authentication fails). If the station loses contact with the TFTP server, it will not be upgraded.
Additional Information
Downloading and unzipping the software
Download the IP Station software file from the download page
Unzip the files to a folder on your PC, e.g. C:\software\IP station\
The zip file contains three files, one bin file and two txt files. Example files:
- A100G80200.02_05_3_4.bin: The actual software image file
- A100G80200.02_05_3_4.txt: You must open this file and make a note of (or copy to the clipboard) the CRC-checksum
- tftp_test.txt: Used by the upgrade process to check the communication between the IP Station and the TFTP server
About the file name of the software package
- Windows Explorer might be set to hide known file extensions, so the file might appear as A100G80200.02_05_3_4 in Windows Explorer, although the full file name is A100G80200.02_05_3_4.bin
- The name of the software image file has to be entered with the extension .bin.
Upgrade in VLAN environment
During an upgrade, the IP station switch will not be VLAN aware. Make sure the IP station can reach the TFTP server from the native VLAN.
Upgrade in 802.1x environment
During an upgrade of the IP station, 802.1X will not be running. Thus if 802.1X reauthentication is enabled and is performed during the upgrade, the IP station will lose contact with the TFTP server (depending on the configuration when 802.1X authentication fails). If the IP station loses contact with the TFTP server, it will not be upgraded.
Installing a TFTP server on your PC
- Download the TFTP Server program tftpd32 standard edition (installer) from http://tftpd32.jounin.net/tftpd32_download.html.
- For 64 bit computers download tftpd64 standard edition (installer)
- Unzip the tftpdxx.yyy.zip file. (e.g. to C: \tftpdxx\)
- Run the tftpdxx.exe file. The program is run by selecting the extracted .exe file, no installation is needed.
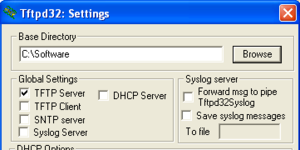
- Select the base directory (e.g. C:\Software) by selecting the Settings button, then Browse
- Turn off every thing except "TFTP Server" under Global Settings. Escpecially important to turn off "DHCP Server", as this server part of the tftpxx application may interfere with other DHCP servers in the network
- The TFTP Server program must be running during the software upgrade process
Troubleshooting
In the case the upgrade is not successful it may be due to a windows setting.
- For Windows XP: http://www.sysprobs.com/enable-ping-in-xp
- For Windows7: http://www.sysprobs.com/enable-ping-reply-windows-7


