Difference between revisions of "ITSV-2 & ITSV-3 Restore Factory Defaults"
From Zenitel Wiki
(→Restore to Factory Default via the Web GUI) |
(→Restore to Factory Default via the Web GUI) |
||
| Line 14: | Line 14: | ||
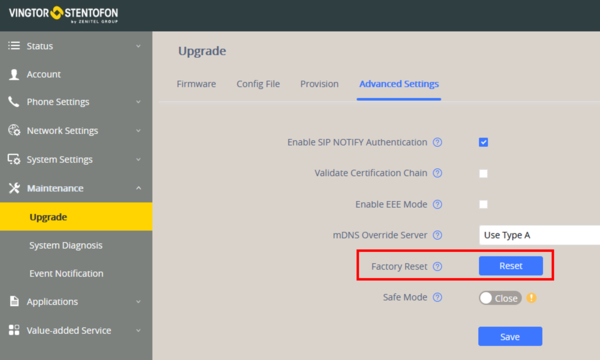
[[File:ITSV-3 FR Web.png|600px|thumb|left|Factory Reset]] | [[File:ITSV-3 FR Web.png|600px|thumb|left|Factory Reset]] | ||
<br style="clear:both;" /> | <br style="clear:both;" /> | ||
| − | |||
| − | |||
| − | |||
| − | |||
</ol> | </ol> | ||
Revision as of 09:28, 20 October 2020
This article describes how to restore factory defaults of the ITSV-3 station.
Restore to Factory Default
Restore to Factory Default via LCD Menu
- Select the Settings icon on the screen, and scroll down to the Advanced section. Select System Security > Factory Default
Restore to Factory Default via the Web GUI
- Login to ITSV-3 Web GUI and go to Maintenance > Upgrade page
- Under the Advanced Settings tab, select Factory Default.
Restore to Factory Default via Hard Keys
If users could not access web GUI for factory reset, or when the ITSV-1 cannot boot up, follow the steps below to reset the ITSV-1 via hard keys.
- Turn off the ITSV-1
- Press and hold both 1 and 9 keys at the same time until it enters the factory reset mode
- The ITSV-1 will boot up with factory default settings
Factory default values
- Station IP address: DHCP
- Username: admin
- Password: alphaadmin
The very first time you log in you are prompted to change the password.


