Difference between revisions of "LenelS2 OnGuard - ICX-AlphaCom Integration"
From Zenitel Wiki
| Line 135: | Line 135: | ||
===Define System=== | ===Define System=== | ||
| − | * Select menu item Additional Hardware > Intercom Devices | + | * Select menu item '''Additional Hardware''' > '''Intercom Devices''' |
| − | ** Select the tab Intercom Devices and click the Add button | + | ** Select the tab '''Intercom Devices''' and click the '''Add''' button |
| − | ** Select the LAN option | + | ** Select the '''LAN''' option |
** Enter the IP address of the ICX and the port number as used in the steps above (port 3001 in this example) | ** Enter the IP address of the ICX and the port number as used in the steps above (port 3001 in this example) | ||
| − | ** Click OK | + | ** Click '''OK''' |
| + | |||
| + | [[File:lenel_intercomdev.png|thumb|left|700px|Add ICX as a device]] | ||
| + | <br clear=all/> | ||
| + | |||
| + | ===Devices=== | ||
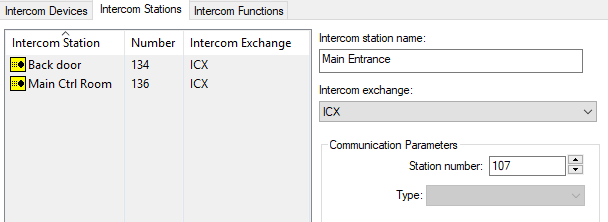
| + | * Select the tab '''Intercom Stations''' and click '''Add''' | ||
| + | * Enter a name and a directory number for each station which is in the system | ||
| + | ** OnGuard uses integer values for the directory numbers, and it is not possible to have directory numbers with a leading 0 | ||
| + | ** Only use directory numbers with a maximum of 4 digits | ||
| + | |||
| + | [[File:lenel_intercomsta.png|thumb|left|700px|Add stations]] | ||
| + | <br clear=all/> | ||
| + | |||
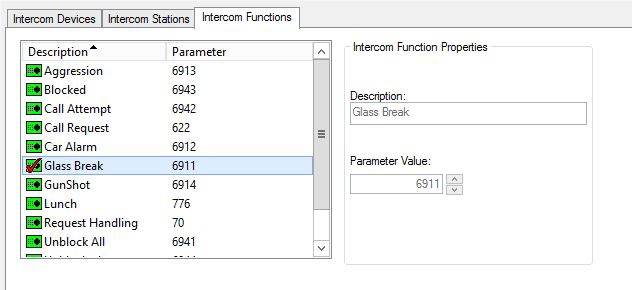
| + | ===Add Intercom Functions=== | ||
| + | * In OnGuard System Administration, navigate to '''Additional Hardware''' > '''Intercom Devices''' > '''Intercom Functions''' | ||
| + | |||
| + | [[File:lenel_intercomfunc.png|thumb|left|700px|Add stations]] | ||
| + | <br clear=all/> | ||
| + | |||
| + | Add all intercom functions that are expected to be used, with the appropriate directory number. | ||
| + | {{note|OnGuard will automatically add intercom functions if they are used in the system but have not been defined. Such a function will be shown as '''Unknown Value: xxx''', where xxx is the directory number of the OnGuard unknown function.}} | ||
Revision as of 12:26, 23 December 2019
Introduction
Article Scope
This article describes the interface of Vingtor-Stentofon ICX and AlphaCom XE platforms with OnGuard. OnGuard users will be able to configure ICX and AlphaCom XE as a communication platform from within OnGuard System Administration.
ICX and AlphaCom XE offer advanced communication and control capabilities. They provide the voice of security. This article includes descriptions of setup and configuration, operation, and any limitations and/or notes surrounding the solution. Setup and operation of ICX and AlphaCom XE are very similar, as ICX is built on the AlphaCom XE application software. Where this does not cause any confusion, only reference will be made to the ICX.
This article assumes that the reader is familiar with the setup of OnGuard and ICX.
Prerequisites
Pre-Installation Checklist
- Use AlphaPro, the standard ICX programming tool to enter the parameters to enable communication between ICX and OnGuard.
- ICX software has been upgraded to version 1.0.3.1 or higher
- AlphaCom software has been upgraded to version 13.1.3.3 or higher
- OnGuard software is an actively supported version
- Zenitel intercom stations have been configured and point to the ICX
- Programming of the exchange (if necessary)
- OnGuard server configured on a compatible Operating System
Licensing
- Maximum Number of Intercom Exchanges (SWG-1340) – Contact VAR or Lenel
- ICX: 1002602400 - ILI-IF
Installation and Configuration
Install Accessory Add-On
- Install x.x Zenitel ICX Accessory Add-On.msi, where x.x refers to the OnGuard software version
Note that when upgrading to a newer version of OnGuard, the Accessory Add-On installation needs to be performed again. All database information will still be present.
ICX System Configuration
Use AlphaPro, the standard ICX programming tool to enter the parameters to enable communication between ICX and OnGuard.
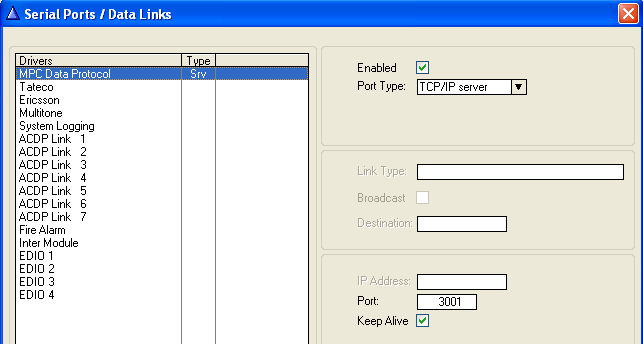
- Go to Exchange & System > Serial Ports and set the following parameters:
- MPC Data Protocol
- TCP/IP server
- Enter a Port number
- In the screenshot, port 3001 is used as an example, and is also the default port configured in OnGuard
Use a web browser to log into the ICX webserver, (default username/password = admin/alphaadmin)
- Select System Configuration > Filters
If the port is not in the list yet, use Add Filter to define it. In the above screenshot, it has been defined with the name 3001 but any meaningful name can be given. Enable this TCP port on the relevant Ethernet port (Eth0 or Eth1).
Ringing Group
In order to have the full benefit of the integration between ICX and OnGuard, operator stations should be placed in a ringing group. This should be done even if there is only a single operator station.
There are 10 predefined ringing groups, with group numbers 51-60 and default directory numbers 6701-6710. If required, more ringing groups can be added as ICX handles up to 250 groups.
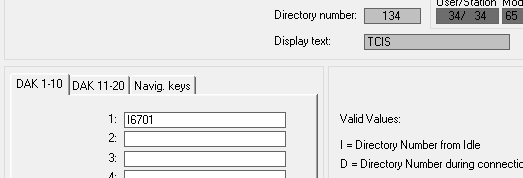
Remote stations calling these operators must call 6701. Substations with only a single call button (Direct Access Key – DAK) must have DAK-1 programmed as I6701.
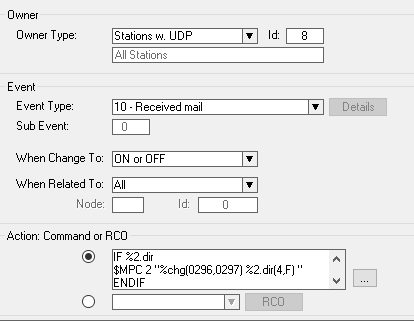
Call Request Information
ICX must sent call request information to OnGuard. This is done by programming the ICX event handler:
The action string for the above event is:
IF %2.dir
|
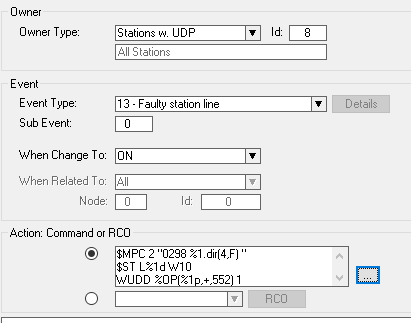
Faulty Line
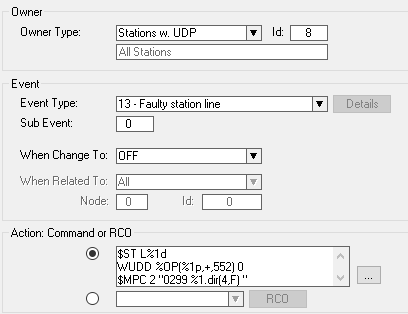
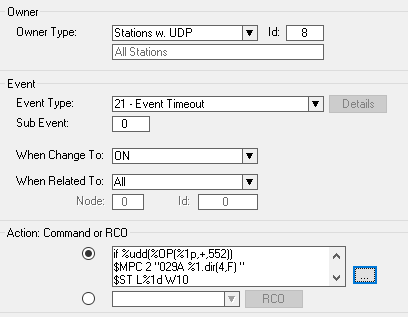
ICX must sent faulty line information to OnGuard. This is done by programming the ICX event handler with 3 events:
The action string for the above event is:
$MPC 2 "0298 %1.dir(4,F) "
|
The action string for the above event is:
$ST L%1d
|
The action string for the above event is:
if %udd(%OP(%1p,+,552))
|
Door Opening from an Operator Station
Very often, an operator will want to open a door by simply pressing a digit on the station keypad during a conversation with a person near that door. For ICX, this can be done by pressing digit 6. Normally this will operate a relay directly but, in this case, OnGuard needs to be notified, afterwhich OnGuard can take the action to open the door.
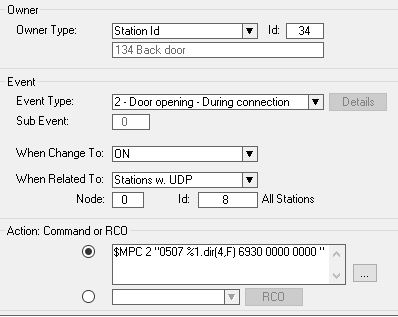
The event below is an example of how this can be done.
The door intercom has directory number 34 and there is a conversation with an operator. When digit 6 is pressed, the event sends the directory number and code 6930 to OnGuard. Within OnGuard, 6930 must be defined as an Intercom function. Using Global I/O it is then possible to define the door that needs to be opened when this code is received.
$MPC 2 "0507 %1.dir(4,F) 6930 0000 0000 "
|
Other Events and Actions
Using the ICX event handler and the Global I/O + Linkage Server functionality of OnGuard, it is possible to solve many customer requirements.
ITSV-1 as an Operator Station
The ITSV-1 is a Vingtor-Stentofon SIP telephone. To be able to use it as an operator intercom, the following setting must be made:
- Log in into the ITSV-1 web page (default credentials: admin/alphaadmin)
- Navigate to Call Settings related to the account that is used to connect to the ICX.
OnGuard Configuration
The following steps are done in OnGuard System Administration.
Define System
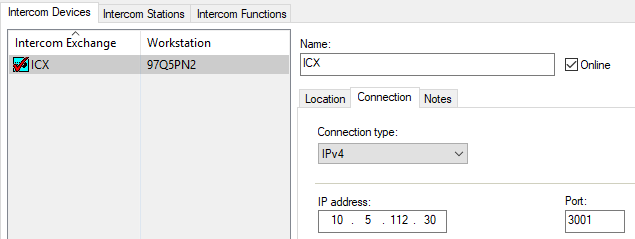
- Select menu item Additional Hardware > Intercom Devices
- Select the tab Intercom Devices and click the Add button
- Select the LAN option
- Enter the IP address of the ICX and the port number as used in the steps above (port 3001 in this example)
- Click OK
Devices
- Select the tab Intercom Stations and click Add
- Enter a name and a directory number for each station which is in the system
- OnGuard uses integer values for the directory numbers, and it is not possible to have directory numbers with a leading 0
- Only use directory numbers with a maximum of 4 digits
Add Intercom Functions
- In OnGuard System Administration, navigate to Additional Hardware > Intercom Devices > Intercom Functions
Add all intercom functions that are expected to be used, with the appropriate directory number.


