Milestone XProtect - IC-Edge Integration
From Zenitel Wiki
Revision as of 14:13, 3 July 2023 by Thalvorsen (talk | contribs)
Contents
Introduction
The Zenitel Call Handler (IC-Edge) is a plugin that allows users to integrate Milestone XProtect with Zenitel intercom systems.
This integration requires an Zenitel desktop station or intercom client to be associated with the Milestone Xprotect Client, as SIP audio is routed through IC-Edge.
Installation
- Download the zip file containing the plugin from the Zenitel website.
- Extract the contents of the zip file to a location of your choice.
- Run the setup file (the MSI or the EXE, depending on your system).
- When prompted for the installation location, select the Milestone/MIP installation folder (e.g. C:\Program Files\Milestone\MIP).
- Click "Finish" to complete the installation.
Configuration
Basic plugin configuration
- Open the XProtect Smart Client.
- Open the "Configuration" window by clicking the "Configuration" icon in the toolbar.
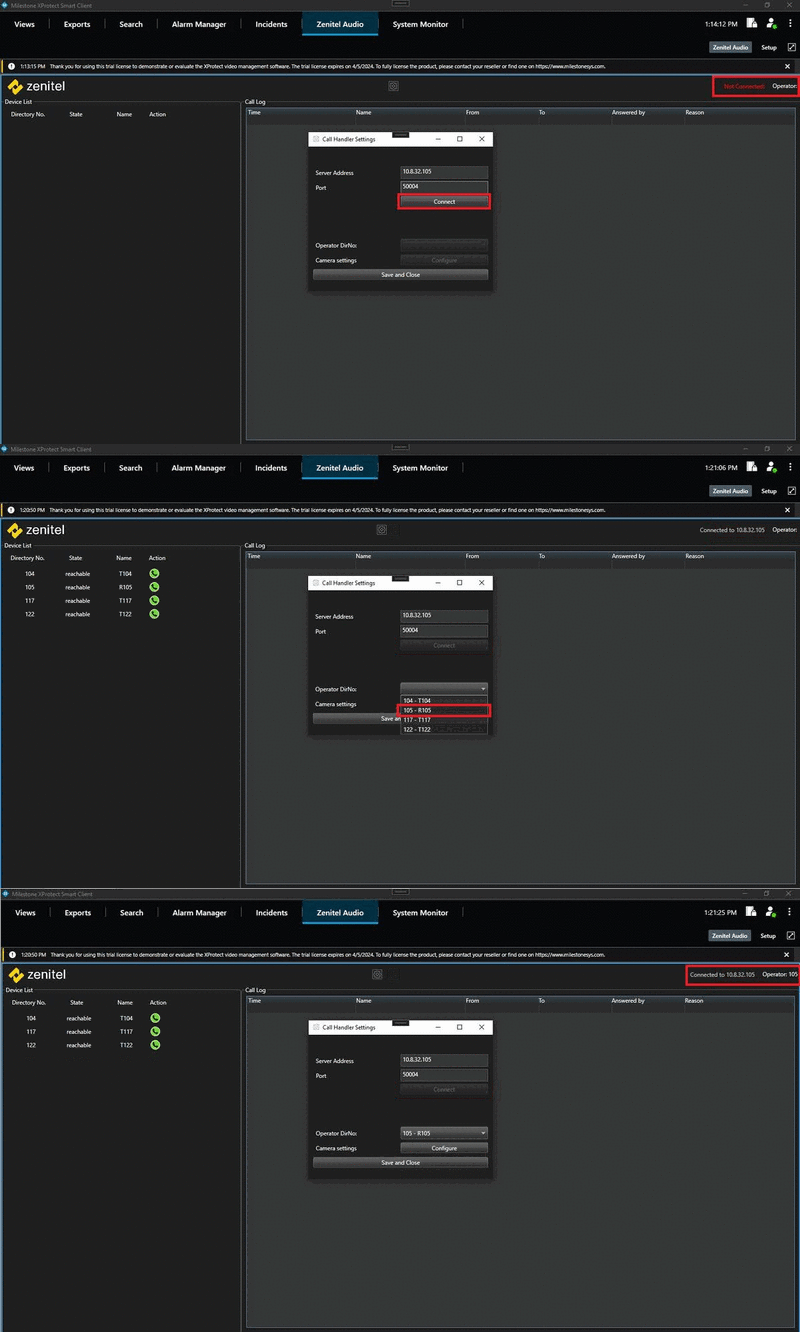
- In the "Configuration" window enter the IP address and port number of your Zenitel intercom system acting as the IC-Edge controller in the "IP Address" and "Port" fields, respectively.
- Click the "Connect" button and wait for the system to retrieve the list of available devices.
- Select the operator's device by choosing its directory number from the drop-down list.
 |
| Zenitel plugin configuration steps |
Associating cameras with devices
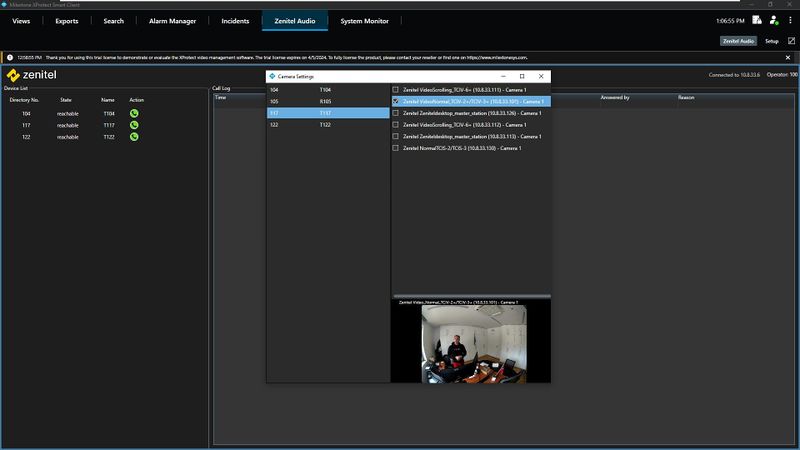
- Open the camera settings window.
- On the left side, there will be a list of devices registered with the IC-Edge controller. On the right side, there will be a list of cameras registered within the XProtect system.
- Click on a device in the left list to select it.
- Click on an item in the right list to preview the video feed from that camera.
- To associate a camera with a selected device, click the checkbox next to the camera's name.
- Repeat steps 3-5 to associate additional cameras with the selected device.
- Once satisfied with the configuration, close the camera settings window.
- Click "Save and Close" on the configuration window to save the changes.
 |
| Assign camera to a station |
Using the Call Handler
The Zenitel Call Handler (IC-Edge) plugin can be used for two scenarios: initiating calls and handling incoming calls.
Initiating Calls
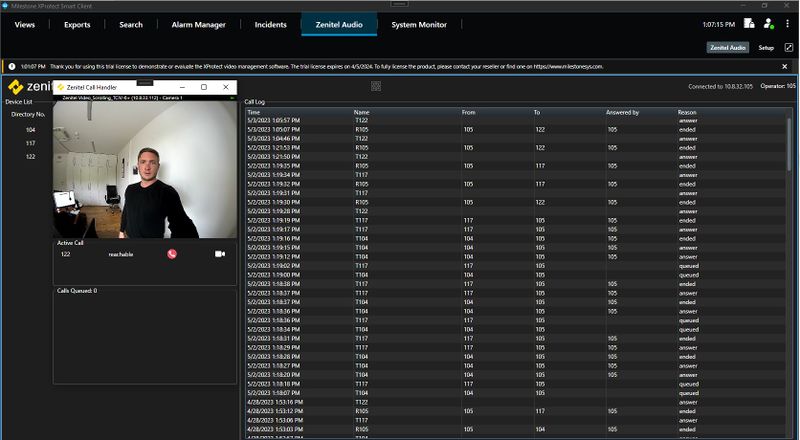
In XProtect Smart Client on the Zenitel Audio tab select a device you wish to call and click on the green "Call" button.
A popup window will be displayed showing the active call, along with a video preview from an associated camera.
 |
| Popup window displaying the active call and associated camera |
Answering Calls
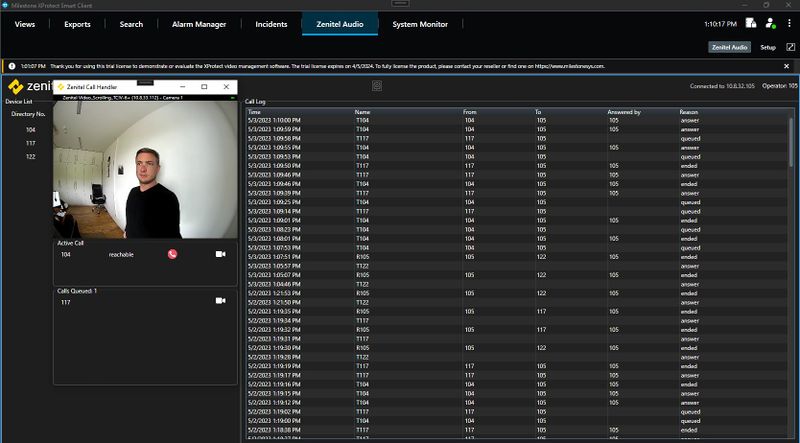
- When a call is received, a popup window will be displayed showing the incoming call, along with a video preview from an associated camera.
- To answer the call, the operator has to answer it using a physical device selected as the operator directory number.
- If there are multiple incoming calls, they will be displayed in call list.
 |
| Popup window displaying the active call and his associated camera with two queued calls |
Using the Popup Window
- The popup window displays the active call (if it was initiated by the operator) or a list of incoming calls, along with a video preview from an associated camera.
- The popup window will display the camera feed from the first associated camera of the active call (if present) or if there are no active calls, the first queued device-associated camera will be displayed.
- To manually switch the camera video feed to any active or queued device, select the desired device from the dropdown list in the popup window.
- To hang up the active call, click the red "Hang-Up" button.
- To answer a queued call, the operator has to answer it using a physical device selected as the operator directory number.
Previous versions
For configuration of previous versions of the plugin go to:
- Milestone Xprotect - IC-Edge Integration (Zenitel Call Handler) or
- Milestone Xprotect - IC-Edge Integration (VS-Milestone Plugin)
