Milestone XProtect - ICX-AlphaCom Integration
From Zenitel Wiki

Contents
- 1 Introduction
- 2 ONVIF Integration
- 3 Zenitel Call Handler plugin installation
- 4 ICX - Configuration
- 5 Operation
- 6 Additional Information
Introduction
This article assumes that the reader is
- familiar with setup and operation of the Milestone XProtect VMS
- that the Milestone XProtect VMS is operational, with all the system connected cameras configured
Only points that are specific to this integration and to its connected intercom stations are described.
Overview
Zenitel devices can be integrated into the Milestone XProtect system using their ONVIF capabilities and supplemented with the Zenitel Call Handler plugin.
ONVIF benefits:
- Auto discover devices in the Milestone XProtect VMS, ensuring easy integration.
- Display Zenitel device video feed in the Milestone XProtect VMS on various events like a call request, outgoing call, or pressed DAK button.
- Display Camera on a call connection, allowing the operator to see who he is talking to.
- Record audio and video during a conversation.
- Write a log entry for the audit trail on various events like starting a conversation, opening a door, motion detection, etc.
Benefits of Zenitel Call Handler:
- Pops up above all opened windows and displays all incoming (queued) and outgoing calls.
- Allows the operator to accept queued calls and close opened call connections without opening the plugin inside the Milestone XProtect VMS.
Compatibility
- Milestone XProtect Smart Client 2019 R3 and higher
- ICX: 1.0.3.1 and higher
- AlphaCom: 13.1.3.3 and higher
Licensing
Zenitel devices can be used using their ONVIF capabilities without a specific integration license from Zenitel.
The use of the call handler plugin is licensed as detailed below.
ICX-AlphaCom
ICX requires the presence of the appropriate API/OPC license.
- 1002602306 - ILI-API64 - API License Supporting 64 Stations
- 1002602309 - ILI-API512 - API License Supporting 512 Stations
With ICX it is possible to purchase a single Product Key that covers all stations connected to all ICXs in a network. ICX licenses can be stacked, i.e. 1x 1002602306 + 2x 1002602309 gives 1088 API licenses which can be used on 2 or more ICXs.
AlphaCom XE
AlphaCom requires the presence of the appropriate API/OPC license. Note that every AlphaCom in an AlphaNet requires such a license.
- 1009649901 - STENTOFON API License Supporting 40 Stations
- 1009649902 - STENTOFON API License Supporting 80 Stations
- 1009649903 - STENTOFON API License Supporting 160 Stations
- 1009649904 - STENTOFON API License Supporting 240 Stations
- 1009649905 - STENTOFON API License Supporting 320 Stations
- 1009649906 - STENTOFON API License Supporting 400 Stations
- 1009649907 - STENTOFON API License Supporting 552 Stations
Milestone license
Using the integration plug-in module does not require a specific license from Milestone.
For connection of devices to Milestone XProtect, please contact Milestone directly.
ONVIF Integration
Zenitel devices are recognized in the Milestone XProtect system as ONVIF compatible devices and are added to the system in the same way.
Note: audio-only devices are also recognized as ONVIF devices.
Supported Devices
Video Intercoms
- Turbine Video intercom and kit: TCIV+
- Turbine Video kit: TKIV+
- Turbine Video intercom TCIV (previous generation of Zenitel video intercom devices)
Non-Video Intercoms
- Turbine Compact series TCIS
- Turbine Industrial series TFIE
- Turbine kits TKIE and TKIS
- EX intercoms series TFIX
- V2 Master Stations
- IP Speakers
Pre-requisites
- VS-IS 6.4.3.0 or later must be installed in the Zenitel Device
- The latest XProtect Device Pack must be installed.
ONVIF configuration
Some ONVIF settings are available from the station web interface where the user needs to enable reporting DAKs and digital inputs in ONVIF.
The user can configure digital inputs to trigger various behaviors in XProtect, most notably:
- Set the Matrix to view the device video
- Start recording video/audio
- Write an entry in the audit trail log
- Trigger a pre-recorded audio message
- Trigger an alarm
More information on this topic can be found in the ONVIF article.
Using the Matrix
1. The user has to create a matrix in the Milestone Management Client.

2. After configuring the matrix the user has to add it to a view in the XProtect Smart Client

3. After the matrix has been set up the user has to configure the rule system in the XProtect Management System to push the device video to the matrix.

More information on the matrix can be found in the official Milestone documentation
Milestone Matrix (usage)
Milestone Matrix (configuration)
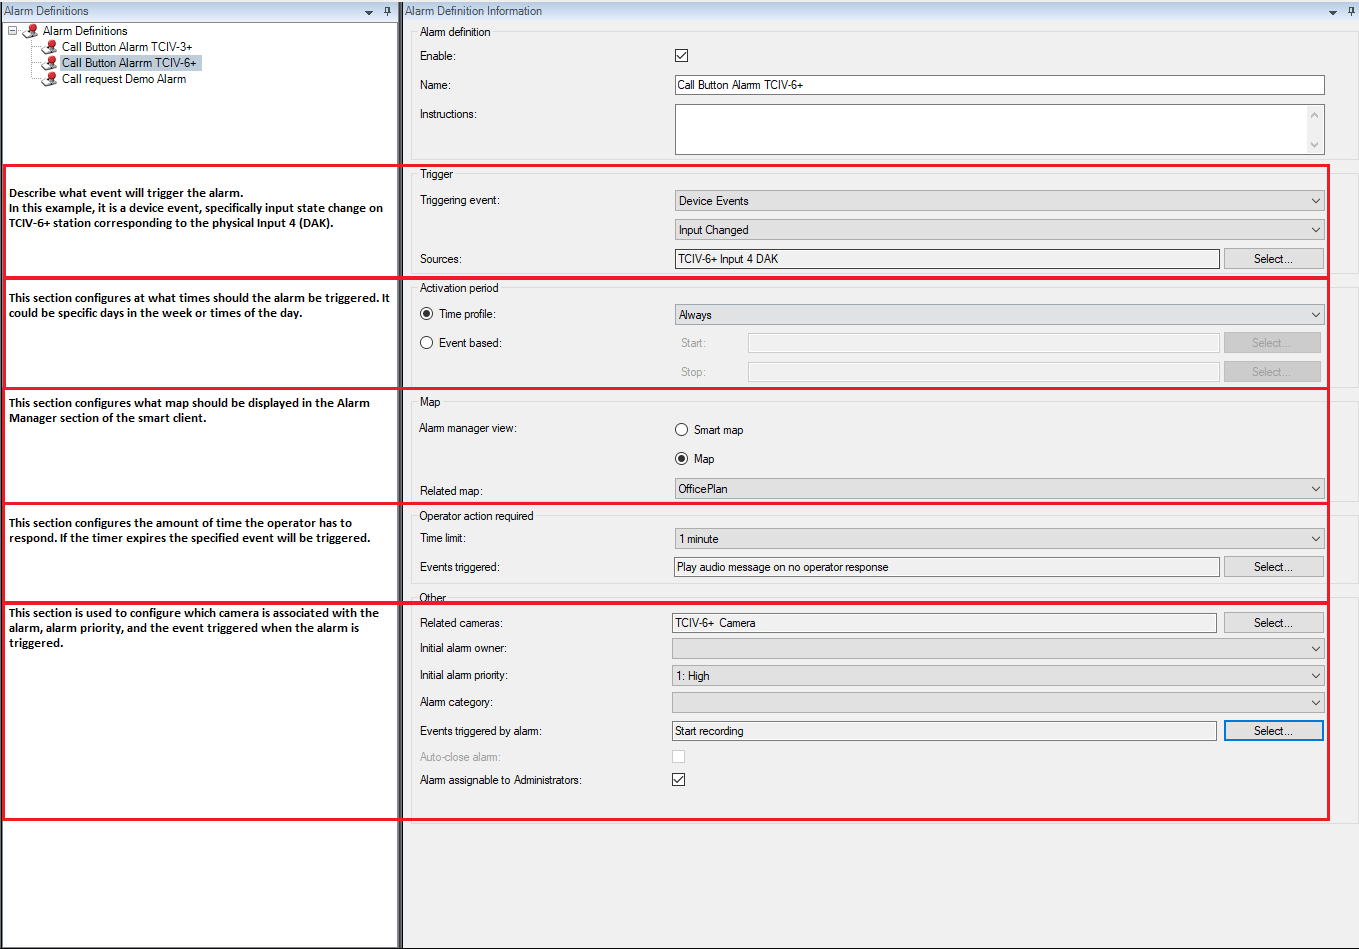
Alarm configuration
On the Milestone XProtect VMS server, virtually any kind of incident or technical problem - events - can be set up to trigger an alarm. Alarms and events can all be viewed on the Alarm Manager tab, which provides a central overview of your Milestone XProtect VMS incidents, status, and possible technical problems.
The following images show a detailed overview of the XProtect alarm system:


Full size images can be found here:
More information on the alarm system can be found in the official Milestone documentation
Milestone Alarms and events (usage)
Zenitel Call Handler plugin installation
This section describes how to install the integration plugin.
It is assumed that the Milestone XProtect VMS has been installed and is running.
Prerequisite
The integration plugin uses .NET 4.8. Please make certain that this version of the .NET framework is installed prior to installing the interface module itself.
Milestone Management Client / Smart Client
When installing (or uninstalling) the plugin, all Milestone Clients (Management Client and Smart Client) must be closed.
Plugin Installation
The name of the installation file is Zenitel-CallHandler.x.x.x.x.exe, where x.x.x.x is the version number. Double click the exe-file to start the installation procedure. Click through the installation option screens, make the appropriate choices, and select Install to do the actual plugin installation.
The plugin will be installed in the directory C:\Windows\Program Files(x86)\Zenitel\Zenitel Call Handler

Plugin Setup
The installation in Milestone XProtect VMS is carried out by starting the program Zenitel.CallHandler.Plugin.Config.exe:

Select the type of system (ICX/IC-EDGE). Press “Apply” to execute the update. The program can also be used for changing the system type in which case you press “Load” – make the system change – and press “Apply”.
- ICX - Select ICX also if the system to be integrated is AlphaCom XE (in the rest of this article only reference will be made to ICX, but the operation is the same for AlphaCom XE)
- IC-EDGE - Selects IC-EDGE system
Milestone XProtect Smart Client
The Milestone XProtect Smart Client is started in the following way:
- Ensure the three servers - management, event, and recording - are up and running. This can be checked by viewing the taskbar. All icons should be shown with a green indicator.

- Click on icon
 and wait until the following picture will be shown:

Press “Connect” and wait until the Milestone XProtect Client is started.

Ensure that the “Setup” button in the upper right corner is turned on with an orange background as shown. The Milestone Xprotect VMS is now in setup mode. It is now possible to define different views with different partitioning (split). For the test, it would be appropriate to create a (1 x 1) view (see picture above).
Select the (1*1) view and and drag and drop the “Zenitel Call Handler” plugin onto the view.

Press the orange "Setup" button.
You may push “<” in the panel ![]() to hide the left side panel.
to hide the left side panel.

You can easily switch between views by activating the “v” in the panel.
![]() and select the desired view from the list:
and select the desired view from the list:

The ICXICE-Client is now in setup mode. Switching between “Setup” and “Operation” is done by a single left click on the icon ![]()
ICX - Configuration
Configuration for a system with ICX is described in this paragraph.
Call requests and Ringing group
Operator stations of type CRMV work with both call requests and calls to a Ringing Group.
Operator stations of type ITSV-1/2/3 work best when the ITSV-1/2/3 is a member of a Ringing Group, and calls to it are made as Ringing Group calls. Call requests and ringing group calls can be accepted from the GUI.
Note that calls to Ringing Groups 6701-6710 have by default a priority of 155 or higher. Ringing groups shall in any case have a priority of 150 and higher to have the call announced with a ringing tone at the operator station. By default, call requests and ringing group calls with a priority of 140 and higher are indicated as high priority. It is possible to change this to be able to also have ringing group calls indicated as a standard priority:
- Go to C:\Program Files\Milestone\MIPPlugins\Zenitel Call Handler.
- Open the file Zenitel.CallHandler.Plugin.ConfigData.xml with a text editor.
- Locate the line <HighPriorityLevel>140</HighPriorityLevel> and change the value 140 to a value appropriate for your application.
- Save the file.
- Restart the client.
The ITSV-1/2/3 is a Vingtor-Stentofon SIP telephone. To be able to use it as an operator intercom in an ICX-system, the following setting must be made:
- Log in into the ITSV-1/2/3 web page (default credentials: admin/alphaadmin)
- Navigate to Call Settings related to the account that is used to connect to the ICX.
- Make the setting as indicated in the picture below

Calls in private to an ITSV-1/2/3
If stations can make calls in 'Private mode' to the ITSV-1/2/3, the call will be shown in the Call Request list with the annotation P. Such calls can only be accepted from the ITSV-1/2/3 by either lifting the handset or touching the Answer-button. The Call request buttons in a button set for such a station shall be set with Visible as disabled. If the call is made on a busy line the call will be shown with the annotation B.
Communication with ICX
Each Smart Client in the system needs its own communication channel with ICX.
Communication via API ports 61112 and 61113
As from ICX software version 1.1.3.0, ports 61112 and 61113 allow multiple connections. The total number of API connections is 120, independent of whether this is to a single port, single ICX, or divided over multiple servers.
For AlphaCom and earlier ICX software versions, each port 61112 or 61113 allows only one TCP/IP connection. These 2 ports are independent of each other, and allow 2 entities to communicate with AlphaCom or ICX. In an AlphaNet, it is possible to use API ports of multiple AlphaCom or ICX servers, up to a maximum of 10 ports.
Communication via the AlphaNet Service Provider
The AlphaNet Service Provider connects to one port on an ICX or AlphaCom (either 61112 or 61113) and provides a single port for entities to connect to. This port allows multiple connections. The AlphaNet Service Provider can therefore be seen as a port expander. This can be used if the number of API ports provided with AlphaCom or older ICX software is not sufficient.
Options
The Zenitel Call Handler options are configured by pushing the “Option” button when the client is in setup mode.
There are 3 sections in the Options dialog.

Make the changes as required in the Options dialog and click OK to save the changes.
AlphaNet setup
- Direct connect - Enable this if communication is established directly with ICX, that is with either ICX API-port 61112 or 61113; When this setting is disabled, connection to the ICX will be through the AlphaNet Service Provider
- ICX (provider) address - This is the IP address of either the ICX or the PC on which the AlphaNet Service Provider is running
- ICX (provider) port - This is the port to connect to either the ICX (61112 or 61113) or of the PC on which the AlphaNet Service Provider is running; in this latter case the port to be used is as configured in the AlphaNet Service Provider
Operator
Enter the node number and directory number of the station which will be used by the operator to answer call requests and make calls.
Configuration
Configuration file
All nodes and all stations can be auto-discovered. This information, together with settings related to operation and camera association is stored in an XML file. By selecting an already existing file (in case the configuration has been done for a different operator already) it is not necessary to do the same task multiple times.
Simply do all configuration for one operator, and store the resulting file Zenitel.CallHandler.Plugin.ProjectData.xml in a location that can be reached by any operator workstation. Then simply point to this file every time a new workstation is configured.
Disable config
Setting this will disable the possibility for users of the XProtect Smart Client application to make changes to the configuration. Configuration mode will not be available anymore. To provide access again:
- Navigate to the file Zenitel.CallHandler.Plugin.ConfigData.xml, normally located at C:\Program Files\Milestone\MIPPlugins\Zenitel Call Handler and edit it; Find the line <DisableConfig>true</DisableConfig> and change true to false; Save the file.
Explore

Select the radio-button Explore system and click Explore. All configured ICXs and stations will be discovered and listed with directory numbers and display text as defined in the ICX. Newly discovered stations are indicated with +Added, and stations whose name has changed since the last discovery are indicated with Updated.
Station configuration
Save and Load
When the configuration has been completed, click Save. The Save-button is enabled whenever any changes (not options) have been made. Options are saved when OK is pushed from within the menu.
If during configuration it is necessary to go back to the current setup click Load; this will undo all configuration changes which have not been saved yet.
Switch between configuration mode and operational mode
To change between operational mode and configuration mode, left click the ICX-icon in the top right corner of the view ![]()
Operation
Popup window
As soon as a call is queued the popup window will be opened. Popup windows will be drawn on top of any other open window and persist as the topmost window until manually closed. This way the operator can use the VMS to view video from the stations and the popup window to answer calls.

Usage
The main TAB in operational mode is the Call Requests-TAB.
All call requests are listed in order of priority in the Call Requests-list; the time when the call request entered the list is shown below the station identification.
An established call is shown in the top section of the TAB and in the popup window. A timer shows how long the conversation has been going on.

The Stations-TAB allows the selection of stations for directly calling them through the Milestone XProtect VMS. Clicking on the call icon will establish a call with the selected station and immediately open the popup window. NOTE: The popup window lacks the station tab to place calls from the Milestone XProtect VMS. More on stations tabs in the Usage section below.

Additional Information
All Zenitel devices with a camera (TCIV and TCIV+) are certified to ONVIF Profile S. This allows the stations to be discovered by Milestone XProtect. As from VS-IS software version 6.4.3.0, a number of additional capabilities have been added:
- Support for DeviceIO
- Audio Backchannel, meaning audio from Milestone XProtect VMS to the device
In addition, some other major changes have been made:
- Audio only stations which can run VS-IS 6.4.3.0 are now able to generate a video stream and are therefore compliant with ONVIF Profile S
- As a further enhancement to DeviceIO, station modes are made available as a logical input to the Milestone XProtect VMS and can then trigger function in that Milestone XProtect VMS
Non-Video Intercom stations as ONVIF Profile S compliant devices
The stations generate a video stream (a Zenitel logo) and can be discovered as any other camera. As with the TCIV and TCIV+, the microphone is also discovered as a camera capability.
Audio backchannel
Milestone XProtect will also discover the presence of the station's loudspeaker. This then gives the possibility for the Milestone XProtect VMS operator to directly send a voice message to the station. This would normally be used when the same message needs to be broadcast to all cameras featuring a loudspeaker and which cannot be reached in the normal Zenitel way, as they are not part of an ICX-AlphaCom, IC-EDGE or SIP system.
DeviceIO
VMS's which support this ONVIF feature will be able to discover the presence of all inputs and outputs on the station, this includes Milestone XProtect VMS. Inputs can be used to trigger actions in the Milestone XProtect VMS event handler. Control of the outputs can be triggered directly by the operator, or as an action from the Milestone XProtect VMS event handler.

Report DAK as Digital Input in ONVIF
Other than the general-purpose inputs which are available on the station, it is possible to have a DAK-button press reported as an input to the Milestone XProtect VMS. This can for instance be used as an additional way of signaling that there is somebody at the door, wanting to talk to the operator. (Turbine stations only, TCIS and TCIV+)
Report station call events as Digital Input in ONVIF
Stations know the state they are in: in a call, ringing, in call requester mode. This state information is now available to the ONVIF module in the station software and can be used to provide a number of additional 'virtual' inputs. These inputs are discovered through DeviceIO, in the way any physical input is discovered. States that can be signaled to Milestone XProtect are:
- Call established - Call in progress input Activated
- Call ended - Call in progress input Deactivated
- Station in ringing mode - both for an outgoing (ringback) and incoming call - Call ringing input Activated
- Station ringing mode ended - Call ringing input Deactivated
- Station has made a call request or ringing group call (only when the station is in AlphaCom mode) - Call queued input Activated
- Station leaves call request or ringing group call mode (only when the station is in AlphaCom mode) - Call queued input Deactivated
Use cases that can be solved by these inputs are:
- Switching a camera to a monitor pane at the start of a conversation
- Starting and stopping video and/or audio recording
- Adding an entry in a the log for audit trail purposes
The order of inputs being reported
The following order, from first to last, is used to report the different inputs if enabled and available.
- Call Active
- Call Queued
- Call Ringing
- DAK 1....n
- Inputs 1....n