Pelco Digital Sentry - ICX-AlphaCom integration
From Zenitel Wiki
Contents
Introduction
The Digital Sentry can be integrated with the ICX-AlphaCom system or the AlphaCom XE system. The integration is using the EDO port.
Digital Sentry has an ASCII string based alarm input option. ICX or AlphaCom can send matching strings out from one its EDO-ports on events such as Call Request and Call. Digital Sentry can be set up to record and display the appropriate camera when it receives the correct strings.
Licenses
When used with the ICX System, the following license is required in the ICX in order to enable the EDO port: 1002602400 - ILI-IF Interface enabling
Digital Sentry
This paragraph assumes that Digital Sentry has been setup and is working.
Digital Sentry can be a large system. In that case there may be multiple VAU's (Video Acquisition Unit) to which cameras are connected. Each VAU must have its own data connection to ICX/AlphaCom.
Note that Digital Sentry only has serial ports available for this function. The AlphaCom has 2 physical serial ports, Ethernet-Serial port converters will need to be used in case there are more than 2 VAUs. The ICX doesn't have any serial ports for such use, so Ethernet to Serial converter will be required.
It is also possible to use software like NetSerial from PCMicro to define virtual COM-ports; in that case the connection between the VAU and ICX/AlphaCom can still be via IP.
For detailed programming instruction please download the Digital Sentry Operation and Configuration manual from the Pelco web-site
Serial Port Configuration
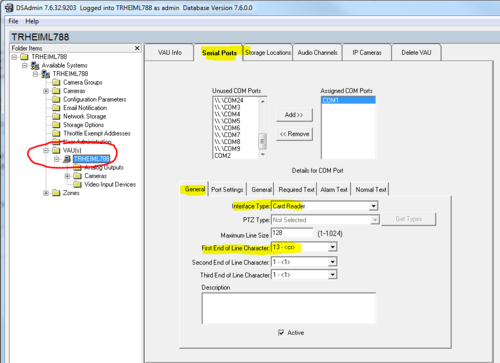
- In the DS Admin tool, open the VAU(s) folder and select the computer. In the Serial Ports tab select the General tab, and set up the serial port as 'Card Reader' and select an appropriate End Of Line Character (for instance 13 <CR>); Enable the 'Active'check box
- In Port Settings tab, set the correct serial port parameters: 9600 baud, no parity, 1 stop bit
- In Required Text tab, program part of the string which will be sent out of the EDO-port; Note that it is possible to enter multiple text sections, each of them will be recognised; 'Required Text' must be used to be able to trigger any event; An example could be INTERCOM
- If live video pop up is required then you must program a string in 'Alarm Text'; An example could be CALL
Zone definition
When an alarm is triggered one or cameras in a zone can be recorded. If there are 3 or less cameras in the zone, they can all be displayed for live viewing automatically.
- Define a new zone and give it an appropriate name; For instance ENTRANCE
- Enable the 'Active' and 'Report Alarm' check boxes
- In the Camera-TAB, assign the appropriate camera(s) to the zone
- In the Serial Input TAB select the serial port which is used for the connection to ICX or AlphaCom, and enter a 'Unique Zone Text', click 'Add'; Note that the combination 'Unique Zone Text' 'Required Text' 'Alarm Text' must be what the ICX or AlphaCom will sent out on its EDO port, see the paragraph below
- Click 'Save'
ICX or AlphaCom EDO action
Assuming that EDO port 3 has been programmed for the connection to Digital Sentry the following action string would trigger an alarm in Digital Sentry, using the example trigger strings as described in the paragraph above:
- EDO 3 "ENTRANCE INTERCOM CALL\x0D"
CP-CAM and Digital Sentry
See the article Pelco Digital Sentry and CP-CAM on how to define CP-CAM, the camera in the IP Video Door Station 1401110100, as a camera in Digital Sentry.


