Pocket Paging
From Zenitel Wiki
This article describes the integration to Pocket Paging systems and the general capabilities for the AlphaCom XE Audio Server. For specific information concerning earlier AlphaCom models (AlphaCom M/AlphaCom 80+/AlphaCom 138) please refer to manual A100K10002_0300, page 193 onwards.
Contents
- 1 Product Features
- 2 Installation Highlights
- 3 Connecting the Pager System to the Exchange
- 4 Serial ports Connections
- 5 Connecting a Stento or Multitone Pager System
- 6 Connecting an Ascom T940si or T942si Pager System
- 7 Connecting an Ascom Pager System through an USI interface
- 8 Connecting an Ericsson PSP800 Pager System
- 9 Feature description
- 9.1 Feature overview
- 9.2 Pocket Paging Someone Who is Not at Their Station
- 9.3 Queuing of Paging
- 9.4 Paging Someone Who Has Left a Message
- 9.5 Answering Paging at the Nearest Intercom Station
- 9.6 Sending a Mail message to a Display Pocket Receiver
- 9.7 Answering Text Paging
- 9.8 Paging With a Default Voice Message
- 9.9 Answering Voice Message Paging
- 9.10 Automatic Search to Pager
- 9.11 Initiating Paging to a Group of Pagers - Multiple Answer
- 9.12 Paging Without Calling a Station (Direct Paging)
- 10 Related Articles
Product Features
To provide a flexible range of paging services, the AlphaCom intercom exchange offers a serial data interface to pocket paging systems that conform to the ESPA 4.4.4. standard.
The AlphaCom is designed especially for connection to any of the following types of pager systems:
- Multitone Access 1000/3000/P318
- Multitone RPE 351
Multitone RPE 651/RPE 671 - Ascom T940si/T942si/USI
- Ericsson PSP800.
You can connect up to three of these to your AlphaCom system at the same time.
Installation Highlights
To integrate the pager system you:
- Connect the paging system encoder to the AlphaCom exchange
- Program each receiver with a logical address in the paging system, and program group membership for each receiver as desired - see documentation for the pager system
- Program the AlphaCom exchange with information about the paging system and users
Connecting the Pager System to the Exchange
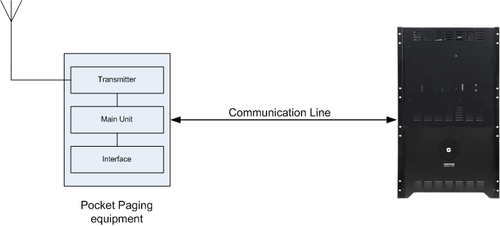
The following diagram provides an overview of the system:
Communication
Interface:     RS232
Protokoll:     ESPA 4.4.4
Max. length:   15m/50ft
Wires:         3
Cable:         0.5 mm/24AWG flat or twisted telephone cable
Note that the RS 232 communication cable between the AlphaCom exchange and the paging system is not included in standard deliveries.
The AlphaCom exchange is responsible for starting and monitoring communication on the line. When a user makes a pocket paging call, the exchange builds a complete description of the call and then sends the data to the paging equipment.
Serial ports Connections
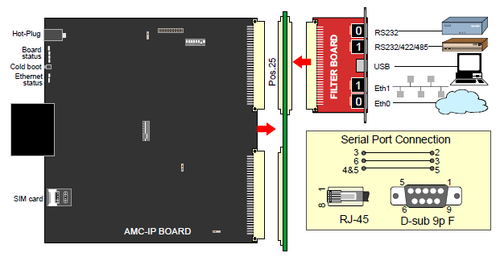
The pager equipment can be connected to any of the two serial ports in the AlphaCom exchange.
Only one paging system can be connected to each serial port - there is no multidrop function.
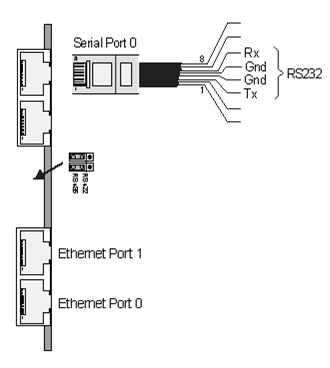
Serial Port 0
Serial port 0 on the AlphaCom is RS232 only. This is an RJ45 on all the AlpahCom XE modules.
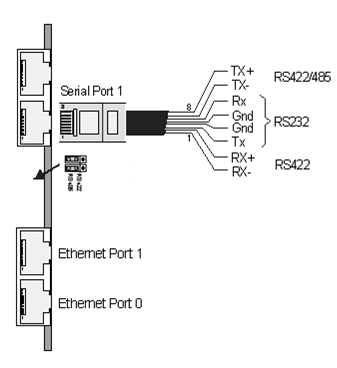
Serial Port 1
Serial Port on the AlphaCom can be:
- RS232
- RS422
- RS485
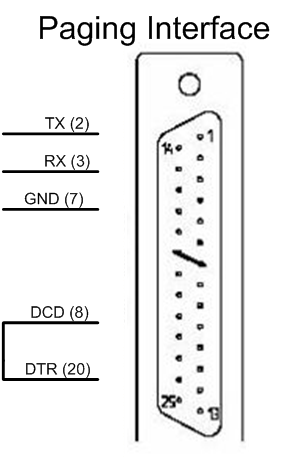
Connecting a Stento or Multitone Pager System
Connect the pocket paging encoder to an RS232 on the Data Connection Board (port 5 has been prepared).
The connector on the exchange side is a 9-pin female D-sub.
The Multitone system has no particular lamp signals to indicate successful installation.
For more information on cabling on the pager side, see the installation instructions included with the pager system.
RPE351, RPE651 and RPE671
Access 1000/3000
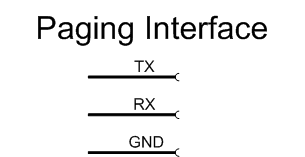
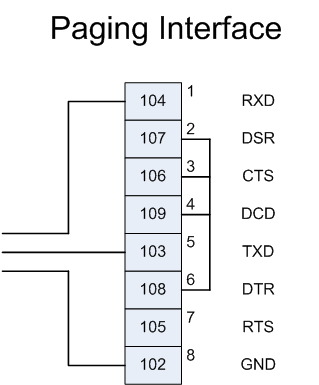
Connecting an Ascom T940si or T942si Pager System
Connect the pocket paging encoder to an RS232 port of the AlphaCom XE.
The connector on the exchange side is an RJ45 connector or a 9-pin female D-sub.
For more information on cabling on the pager side, see the installation instructions included with the pager system.
The red lamp inside the Ascom T940si box flashes until you have successfully installed the RS232 connection on the autoloaded port. If you use another port, the lamp will flash till the port is correctly programmed (using AlphaPro). It then shows a steady light.
Serial link between AlphaCom XE and T942si module:
 AlphaCom      or       AlphaCom                   T942si
  RJ45                 9 pin DSUB                   J09

   |                       |                         |
 - 6 --------------------- 3 ----------------------- 2 -
   |                       |                         |
   |                       |                         |
 - 3 --------------------- 2 ----------------------- 3 -
   |                       |                         |
   |                       |                         |
 - 5 --------------------- 5 ----------------------- 7 -
   |                       |                         |
Note that the T942si module is by default using 9600 baud, even parity, 8 data bits and 1 stop bit.
Connecting an Ascom Pager System through an USI interface
Access the USI by:
- Set all switches on SW3 to OFF
- Connect the eth port to your DHCP network
- Power up the unit
- After the USI is fully started access it with your web browser
- In the address field write: ”ELISE-xxxxxx”, where xxxxx = module key number. Found in the enclosed license certificate or on the circuit board.
- When prompted fill in username and password:
- Username: admin
- Password: changeme (normal user)
NOTE!
The flag ’Ascom Character Set’ needed with interfaces previous to USI to support the nordic characters is not applicable.
Configure the USI
- Select ’serial interface’ in the top left corner
- Click on the first available ’NOT USED’ in the ESPA list
- Change ’Enabled’ to YES
- Give it a Descriptive name
- Select serial port
- Set the Bit rate to: 9600 bits/s
- Set mode to: 8 Data bits, Event parity, 1 stop bit
- Set default methode for ACK to: Automatick ACK
- Set Identical Pagings Treatment to ’Create New’
- At the bottom click ’Activate’
AlphaPro
Configure a Serial port:
- Bitrate: 9600baud.
- Databits: 8
- Parity: E
- Stopbits: 1
Send changes and reset.
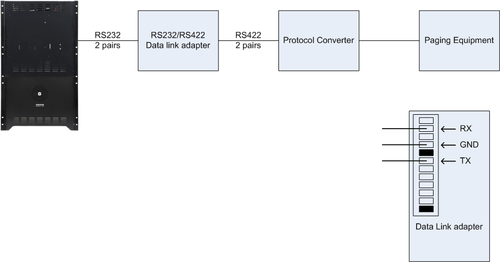
Connecting an Ericsson PSP800 Pager System
Connect the pocket paging encoder to an RS232 in the AlphaCom.
The additional boards shown in the picture below are supplied with the paging system. For more information on cabling on the pager side, see the installation instructions included with the pager system.
Feature description
Feature overview
The AlphaCom System has unique capabilities of offering Pocket Paging (Radio Paging) features.
There are several possibilities for paging:
- Paging with answer option:
- – Set-up of conversation.
- – Playback of voice message.
- Paging with mail messages:
- – Showing the number of the calling station in the pager display.
- – Showing one of the standard mail messages in the AlphaCom system.

|
The features available depend on the type of Paging System, the set-up of the Paging System and the AlphaCom exchange programming. |
Pocket Paging Someone Who is Not at Their Station
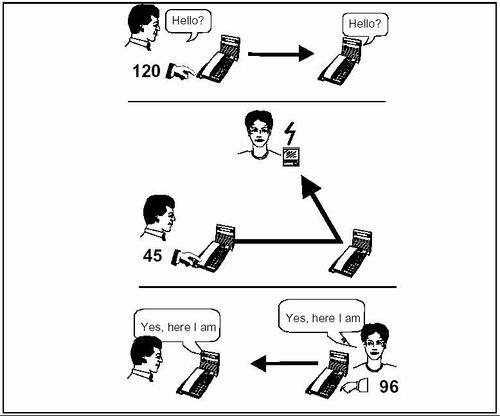
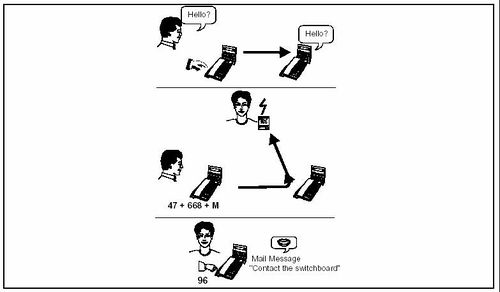
If you get no reply when you make a call to someone, you can activate the person’s pocket pager by pressing two digits. The defaults are 44, 45, 46 and 47.
- To send a mail message to the pocket pager showing the calling station number, press 44 (Pager Text Notify feature).
- To activate the user’s pocket pager and wait for the person to answer, press 45 (Personal Call).
- To activate one of the standard mail messages to be sent to the pocket pager, press 46 (Pocket paging mail message feature).
- To activate one of the default Voice Messages to be heard by the owner of the pocket pager, press 47 (Pocket paging voice message feature). The message will be heard when the paging is answered at a station.
- If the pager is programmed first in the search list: Press 9 to activate the pager. See Search for details on the function.
If you have a Display Station, the options appear on the display.
If the subscriber does not have a pocket pager, the attempt is ignored and you remain connected to the other station. The pager equipment may be capable of detecting that the pager cannot be activated (in for battery charge, out of range). In this case the AlphaCom System notifies the initiator that the paging failed. If you have a Display Station, the display tells you if the called user has no pager.
If you wait for an answer (45), you cannot make or receive any intercom calls, or use any intercom functions, while you are waiting. When the paging equipment has transmitted the call, you hear an attention tone at your station. Until then, you can cancel the radio transmission, without activating the receiver, by pressing the C-key.
The person you have paged can answer from any station. If you do not get an answer within the time-out period, the answer possibility will be canceled, and the initiating station becomes free.
Additional Information:
→ After the time-out of the answer period, or if the initiator presses the C-key, the answer possibility followed by connection is no longer possible.
→ The time-out period is by default set to 30 seconds. This value can be changed by programming without any effect on the time-out on other features.
→ When using pocket paging in an AlphaNet system, each exchange must have its own paging system connected. You can activate a paging call in a remote exchange. You can answer a paging call normally.
Queuing of Paging
The AlphaCom system handles up to 5 simultaneous paging calls with answer option. If paging without answer is used, the limit is 10 simultaneous paging calls. Paging calls are queued and transmitted to the paging system as they are received.
Additional Information:
→ The simultaneous pages must be sent to different pagers = pagers with different physical addresses in the paging system.
Paging Someone Who Has Left a Message
Activate Paging
You can activate paging when you hear an absence message at a station. The same possibilities as those described on the previous page are available.
Restricted Access To Paging During Absence Indication
If you call a person and hear an absence message, your station can be programmed so that it is not possible to make a transfer to the pocket pager connected to the station you call.
The feature is programmable per station. It is the setting of the calling station that determines whether access to paging is denied.
Answering Paging at the Nearest Intercom Station
If the paging is to be answered - meaning that the initiator has pressed 45 and is waiting for an answer - there are different ways of answering depending on the pager type and the exchange programming. At the nearest station, the paged person can:
- dial the personal answer code or
- dial the standard answer code 96 (if the pager has no display) or
- dial the answer code shown in the pager display (if applicable).
Additional Information:
→ After the time-out period, or if the initiator presses the C-key, the answer possibility followed by connection is no longer possible.
→ The default answer time for individual paging with answer possibility is set to 30 seconds.
→ The time-out value for the answer option can be changed by programming for each paging type. The change will not affect the default answer time for other features.
Sending a Mail message to a Display Pocket Receiver
Sending a Mail message to a pocket receiver is similar to sending a standard voice/mail message to an intercom station. After dialing the directory number, you dial 46 + the mail message number and any extra digits required. To complete the procedure, press the M-key. The pager display then shows the message + the number of the station that sent the message.
To cancel before all information is entered, press the C-key. If the pocket receiver in question does not have a display, the attempt will be canceled with a failure tone when you have pressed 46.
Eight different mail messages are available. The messages are the same as for voice/text messages.
Additional Information:
→ The optional digits are usually 4 digits to indicate time or an intercom number. For some messages, there can be more optional digits, e.g. telephone numbers can be up to 18 digits.
→ For each mail message there is a short and a long version, because different pocket receivers have displays of different lengths. The AlphaCom System works out which to send. The available messages as seen by the initiator are usually identical to the ones used for voice mail and are recognized (read or heard) by the initiator as such.
Answering Text Paging
Text Pagers show the name/station number of the initiator in addition to the text. There is no answer possibility implicit in this type of paging. To talk to the initiator, dial the number displayed.
Paging With a Default Voice Message
Paging with a standard voice message is much like sending a voice message to a station. After dialing the directory number + 47, you dial the message number and any extra digits required. To complete the procedure, enter your own intercom directory number, or just press the M-key if you are using your own station.
The messages are identical to the ones used for voice/text mail messages. When the paged person answers the paging at an intercom station, he or she hears the voice message at the station.
Additional Information:
→ You will get no acknowledgment that the message has been received.
Answering Voice Message Paging
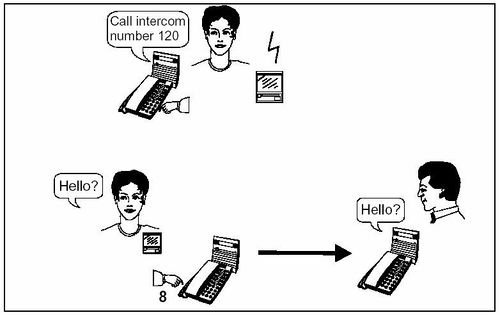
When you dial the answer code on an intercom station you hear a voice message. To initiate a call to the person who searched for you, you simply press digit 8 after you have heard the message.
Automatic Search to Pager
To Alternative Pager When A Pager Call Is Not Answered
The system can be programmed to make an automatic search to an alternative pager if there is no answer to the first paging. You get an attention tone before the alternative search is activated. The automatic search can include a number of search steps.
To Pager When There Is An Absence Message
When you call a station where there is left an absence message, the system can be programmed to make an automatic search to the person’s pager. The feature is programmable per station. There is an attention tone before the search is activated.
Initiating Paging to a Group of Pagers - Multiple Answer
A group of pagers can be defined in the paging system.
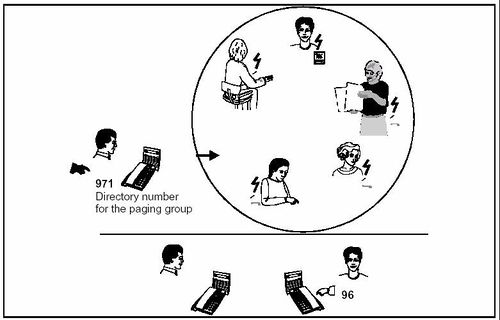
You can send one paging call to a group of pocket receivers. Anyone in the group can answer (Multiple Answer). You can also send a Mail message or a Voice Message to the group.
When you page a group of pocket receivers, you dial the directory number of the paging group + the paging function number (44, 45, 46 or 47).
Additional Information:
→ After the time-out period, or if the initiator presses the C-key, the answer possibility followed by connection is no longer possible.
→ The time-out period is by default set to 2 minutes. This value can be changed by programming.
Paging Without Calling a Station (Direct Paging)
You can activate a paging call from your InterCom station to a pocket pager directly, without calling a station first.
This is like paging after calling an intercom station, except that you dial the pager directory number instead of the directory number for the intercom station. Then you can:
- make a Personal Call - the paged person answers your call from an intercom station to speak to you. or
- send a Mail message or
- send a Voice Message
The paged person ends up in a conversation with you, gets a display message, or gets a voice message by pressing an answer code at the nearest intercom station.
Additional Information:
→ The Direct Pocket Paging feature gives you the possibility of identifying people or responsible “roles” (for example, service personnel) that actually do not have intercom stations of their own.
See articles Simple Direct Paging and Direct pocket paging (pager user number) feature
Related Articles
- Pager Text Notify feature
- Pocket paging connection with answer option feature
- Pocket paging mail message feature
- Pocket paging voice message feature
- Pocket paging connection, high priority feature
- Pocket paging answer feature
- Pocket paging personal answer code feature
- Direct pocket paging (pager user number) feature
- Simple Direct Paging
- Monitoring: Pocket Paging Ports
- ASCOM Norwegian Character Mapping
- ESPA 4.4.4
- Pager number
- MPP - Mail to Pocket Pager
- Pocket Pagers (AlphaPro)

