Turbine Compact - Image recovery
From Zenitel Wiki

|
This article is replaced by: Turbine Stations - Image recovery |
This article describes how the flash image of a Turbine station ("Compact" and "Extended" versions) can be recovered.
Contents
Requirements
- The TFTP Server application "Turbine Station Production Upgrade Application" (TSU) installed on a Windows PC.
- A terminal emulator program. PuTTY is recommended
- An USB to Serial cable for serial connection from the PC to the Turbine Compact board
- Optionally an USB cable is required if the bootloader software on the Turbine station is corrupted
Preparation of the USB to Serial converter cable
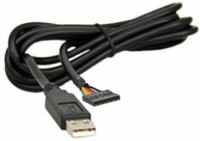
The Turbine station has a TTL level serial interface which we need to connect to during the upgrade process. For this purpose a USB to Serial converter cable can be used. Recommended cable is TTL-232R-3V3, available from Farnell.
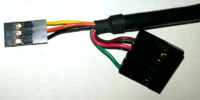
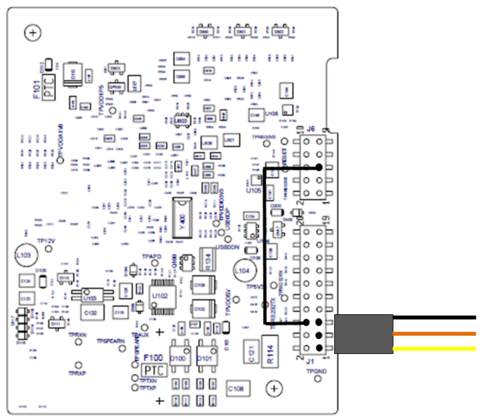
This cable needs to be slightly modified as per photo below:
- Pin 1 = Black (GND)
- Pin 2 = Orange (Turbine RX)
- Pin 3 = Yellow (Turbine TX)
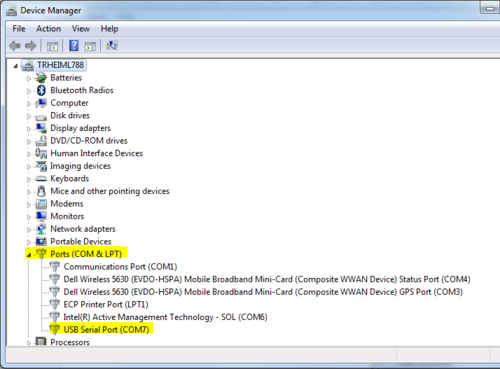
Insert the USB connector in the PC. The unit will now install itself. Make a note of which COM port number it is assigned to. You will also find it in the Device Manager.
Upgrade process
Prepare the serial communication
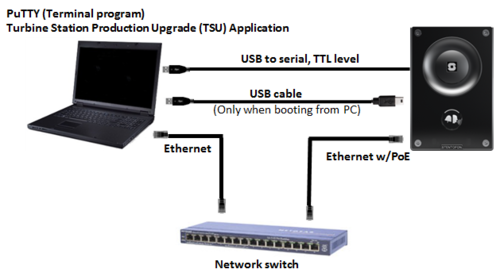
- Connect the USB to Serial converter cable to the PC and to the Turbine board
- Note that there also must be a strap as indicated on the drawing below.
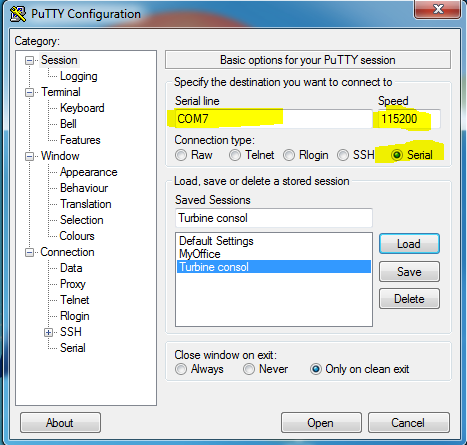
- Start "PuTTY" (or another terminal emulator), and select:
- Connection type = Serial
- Serial line: Set COM port number according to the device installation
- Speed = 115200.
- Select Open to start communication. Leave the window open.
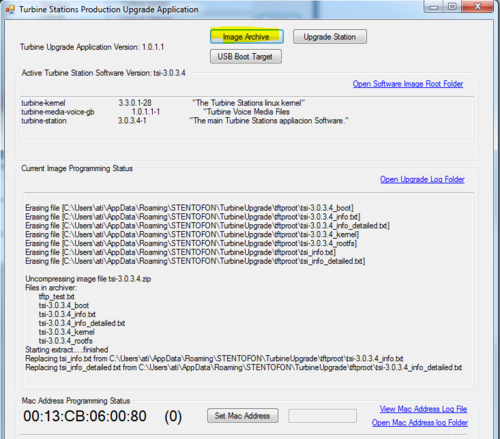
Prepare the TSU application
- Download to the PC a Turbine Image file from AlphaWiki, e.g. tsi-3.0.3.4.zip. Do not extract the ZIP file.
- Download and install the TFTP Server application "Turbine Station Production Upgrade Application" (called TSU application) on the PC
- Start the TSU application
- Select "Image Archive", and browse to the tsi-3.0.3.4.zip file.
Station boot process
- If not already done, connect the PC to the network switch
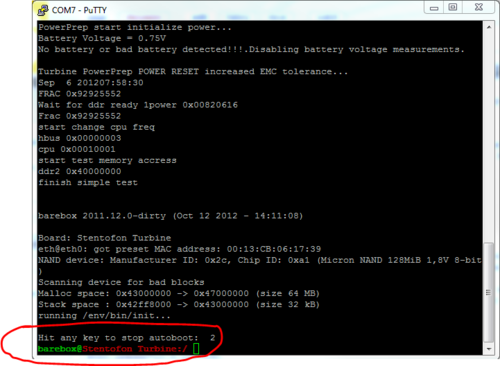
- Connect the Turbine station to the network switch. The station will now start up, and you should see the boot sequence on the PuTTY terminal window
- During the initial booting, you will see "Hit any key to stop autoboot". Press any key to stop the booting process. You should now get the prompt barebox@Stentofon Turbine:/:
- If you don't see any boot information in the PuTTY terminal window at all, or just rubbish, you need to boot the station from the PC. See next section "Boot the station from the PC using the USB port". If you do see the boot sequence, you should skip the next section "Boot the station from the PC using the USB port", and jump to the section Recovery procedure.
Boot the station from the PC using the USB port
If you don't see any information at all on the PuTTY terminal window during the startup of the station, it could be that the bootloader software itself is corrupted on the Turbine board. But first you should eliminate any issues with the USB to Serial converter cable by connecting the cable to an operational Turbine station, and verify that you get the boot sequence displayed in PuTTY when the Turbine station is powered up.
In case the bootloader is corrupted, you need to boot the Turbine station from the PC using the USB port of the Turbine station. Here is how you do it:
- You need an additional cable, a USB cable with a USB Standard Type A plug in one end and a USB Mini B plug in the other end.
- Disconnect the Ethernet cable from the station (leave the USB to Serial converter cable connected, so you can view progress on PuTTY)
- Connect one end of the USB cable to the PC
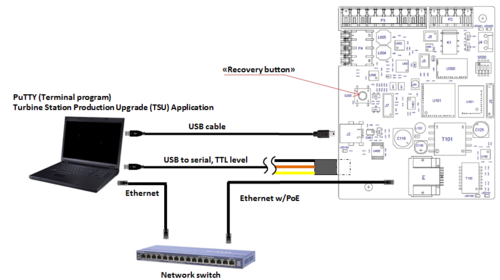
- Push the "Recovery button" on the station (switch S200), and keep it pressed for 5 sec while connecting the USB cable to the station (connector J2)
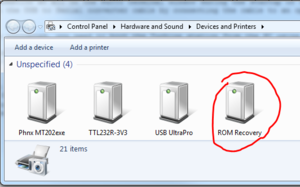
- The PC will indicate new USB Device
- Connect the Ethernet cable. Now you have the following setup:
- From the TSU, press the button "USB Boot Target". The station will now boot from the PC. The progress is seen in PuTTY
- The boot process is finished when the barebox@Stentofon Turbine prompt appears.
- Disconnect the USB cable
- Continue with next section, "Recovery procedure".
Recovery procedure
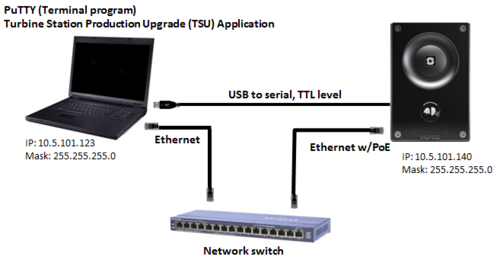
Below is a drawing of your current setup, ready for image recovery. The IP addresses used in the following are just examples. You can use other IP addresses.
In the PuTTY terminal window, type the following commands, one line at a time:
- Enable the ethernet interface:
st_net_enable (Enables the ethernet interface, only required on newer bootloader versions.)
In the PuTTY terminal window, type the following commands, one line at a time:
- Set IP settings:
eth0.ipaddr=10.5.101.140          (Set IP address of the Turbine station)
eth0.gateway=10.5.101.1           (Set getway IP address)
eth0.netmask=255.255.255.0        (Set the network mask)
eth0.serverip=10.5.101.123        (Set the IP address of the PC with the TSU application)
- Write new bootloader and Bootloader environment:
update -t bootstream -d nand -f tsi_boot
update -t bareboxenv -d nand -f tsi_bareboxenv
- Program all images (progress is shown in the terminal window):
update -t kernel -d nand -f tsi-3.0.3.4_kernel
update -t rootfs -d nand -f tsi-3.0.3.4_rootfs
When the progress indication stops and the barebox@Stentofon Turbine:/ prompt reappears, the station can be finalized.
Finalizing the station
- Disconnect the ethernet cable
- Disconnect the serial cable and remove the strap
- Reconnect the ethernet cable
The station will now come up with factory default settings:
- Station mode: PULSE
- Station IP address: Determined by DHCP server. If no DHCP server available, it gets a random 169.254.x.x address
- Username: admin
- Password: alphaadmin

