Milestone XProtect - ICX-AlphaCom Integration
From Zenitel Wiki
(Redirected from Milestone XProtect - ICX-AlphaCom plug-in)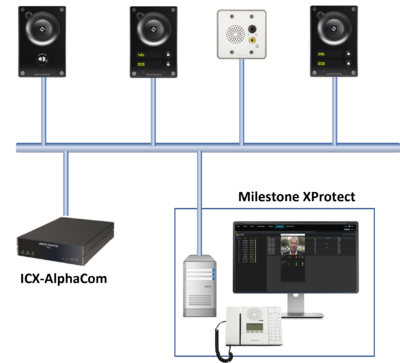 |
| Milestone XProtect - ICX-AlphaCom Integration |
Introduction
The interface between ICX-AlphaCom and Milestone XProtect VMS is through an integration module which is available on the Downloads page of Zenitel Wiki.
This integration requires a Zenitel desktop station or SoftClient to be associated with each XProtect Smart Client, as audio is routed through ICX-AlphaCom.
This article assumes that the reader is:
- familiar with setup and operation of the Milestone XProtect VMS
- that the Milestone XProtect VMS is operational, with all to the system connected cameras configured
- that ICX-AlphaCom is operational, with all the system connected intercom devices and SoftClients configured
Only points which are specific to this integration and to connected intercom stations/SoftClients and IP speakers are described.
Read more about the integration in the Solution Brochure.
Licensing
Milestone XProtect
The integration interface does not require a specific license from Milestone.
However, note that Zenitel stations are typically registered as ONVIF devices in XProtect, to e.g. stream and record audio/video from stations. This requires separate station licenses from Milestone. For an overview of the ONVIF features supported in Zenitel devices, please read our article ONVIF Settings
ICX-AlphaCom
ICX-AlphaCom gateways requires the presence of the appropriate API/OPC license:
- 1002602306 - ILI-API64 - API License Supporting 64 Intercom Stations
- 1002602309 - ILI-API512 - API License Supporting 512 Intercom Stations
With ICX-AlphaCom it is possible to purchase a single Product Key which covers all stations connected to all ICX-AlphaCom's in a network. Licenses can be stacked, i.e. 1x 1002602306 + 2x 1002602309 gives 1088 API licenses which can be used on 2 or more ICX-AlphaCom's.
Note that the licenses are based on the number of intercom stations, not the number of gateways and servers. Thus, 1 API license can be used across multiple networked ICX-AlphaCom gateways and Milestone servers. The license is independent of the number of XProtect Smart Clients.
If the Zenitel SoftClient is to be used for SIP audio directly in the XProtect Smart Client you will need 1 SoftClient license (item number 1002600300) per Operator computer.
Installation
This section describes how to install the integration plugin.
It is assumed that the Milestone XProtect VMS has been installed and is running. It is also assumed that the Milestone XProtect VMS has been licensed appropriately.
- When installing (or uninstalling) the plugin all XPRotect Clients (XProtect Management Client and XProtect Smart Client) must be closed.
- The plugin is to be installed on the same machine as the XProtect Smart client.
- Download the msi setup file from the Downloads section on Zenitel Wiki.
- Run the setup file, and follow the instructions on the screen
- When prompted for the installation location, select the Milestone/MIP installation folder (e.g. C:\Program Files\Milestone\MIPPlugins).
- Click "Close" to complete the installation.
Configuration
Basic plugin configuration
- Open the XProtect Smart Client.
- Open the "Configuration" window by clicking the "Configuration" Icon button in the toolbar.
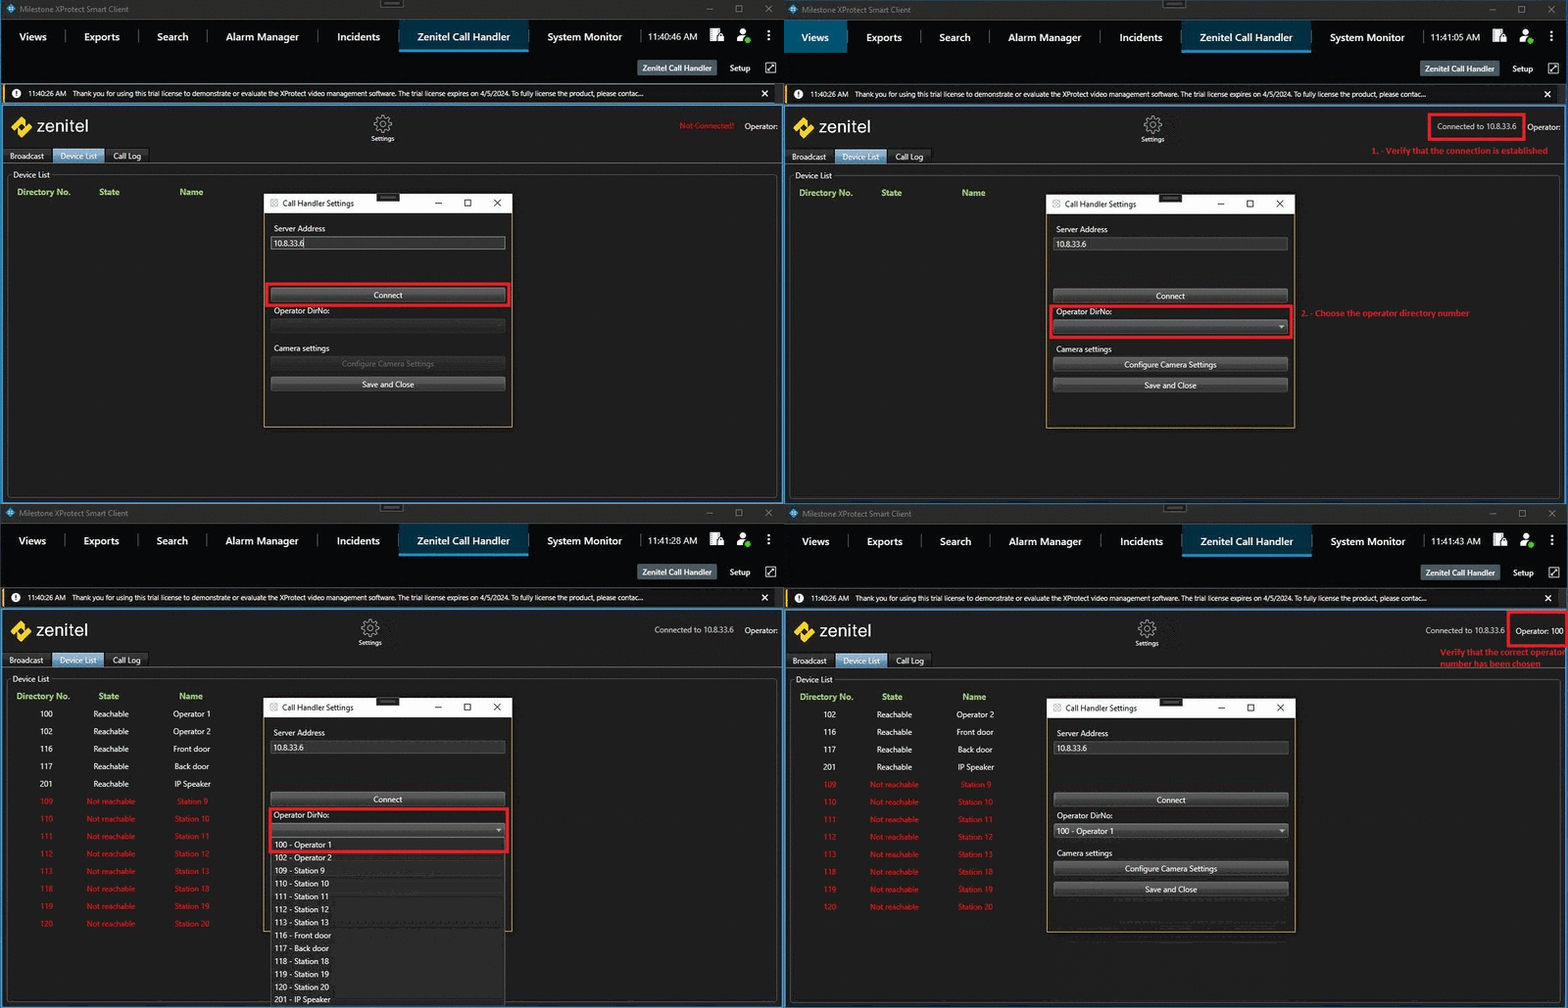
- In the "Configuration" window enter the IP address of your Zenitel intercom system in the "IP Address" field. The port used for connection is TCP port 61112 and must be open in the filters settings of the ICX-Alphacom.
- Click the "Connect" button and wait for the system to retrieve the list of available devices.
- Select the operator's device by choosing its directory number from the drop-down list.

|
When using the Broadcasting feature, the operator station should not be an ITSV-2, ITSV-3, ITSV-4 or ITSV-5 |
Associating cameras with devices
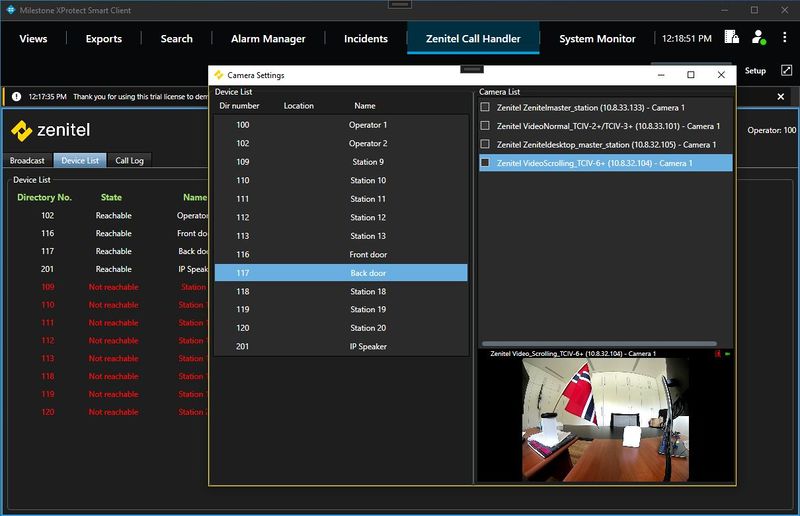
- Open the camera settings window.
- On the left side, there will be a list of devices registered with ICX-AlphaCom. On the right side, there will be a list of cameras registered within the XProtect system.
- Click on a device in the left list to select it.
- Click on an item in the right list to preview the video feed from that camera.
- To associate a camera with a selected device, click on the checkbox next to the camera's name.
- Repeat steps 3-5 to associate additional cameras with the selected device.
- Once satisfied with the configuration, close the camera settings window.
- Click "Save and Close" on the configuration window to save the changes.
Groups configuration (available from Plugin Version 3.0.6)
To enable live announcements and prerecorded message broadcasting, you'll first need to configure the groups.
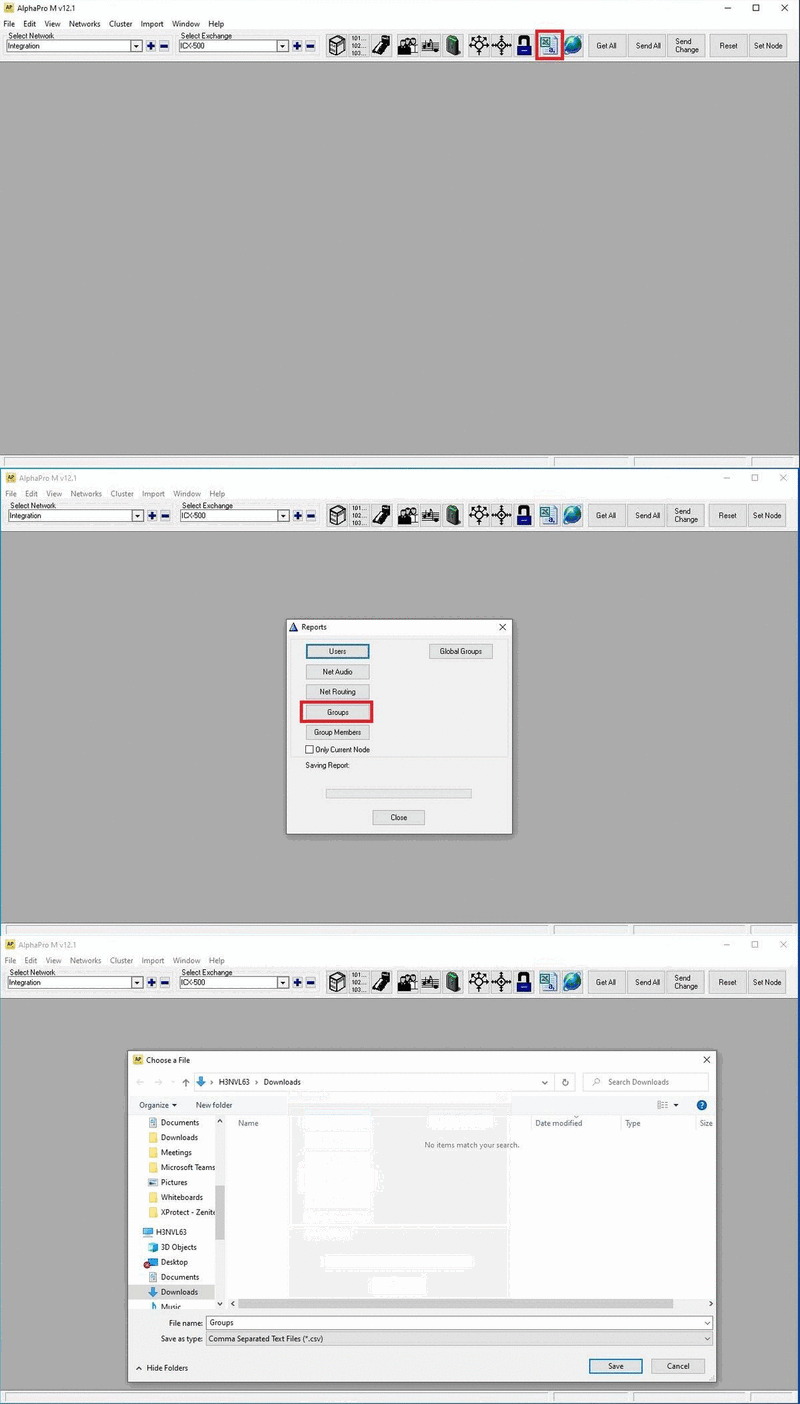
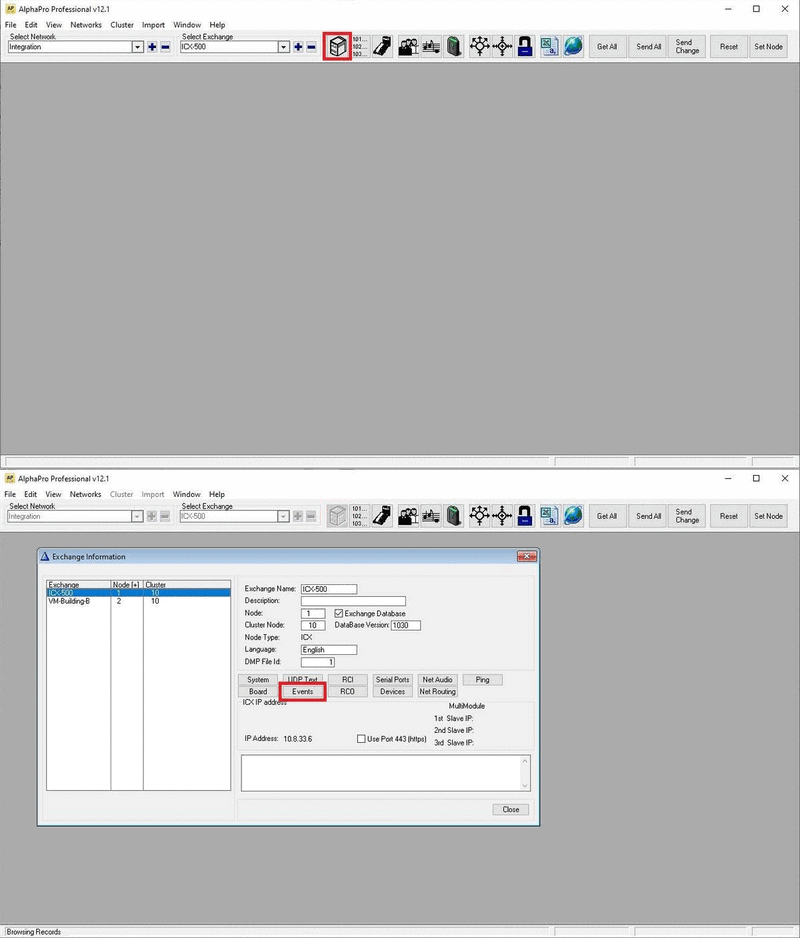
To do this, you'll require access to the AlphaPro software, and then you can proceed with the following steps:
1. Open the AlphaPro software and follow these steps to export the groups csv file:
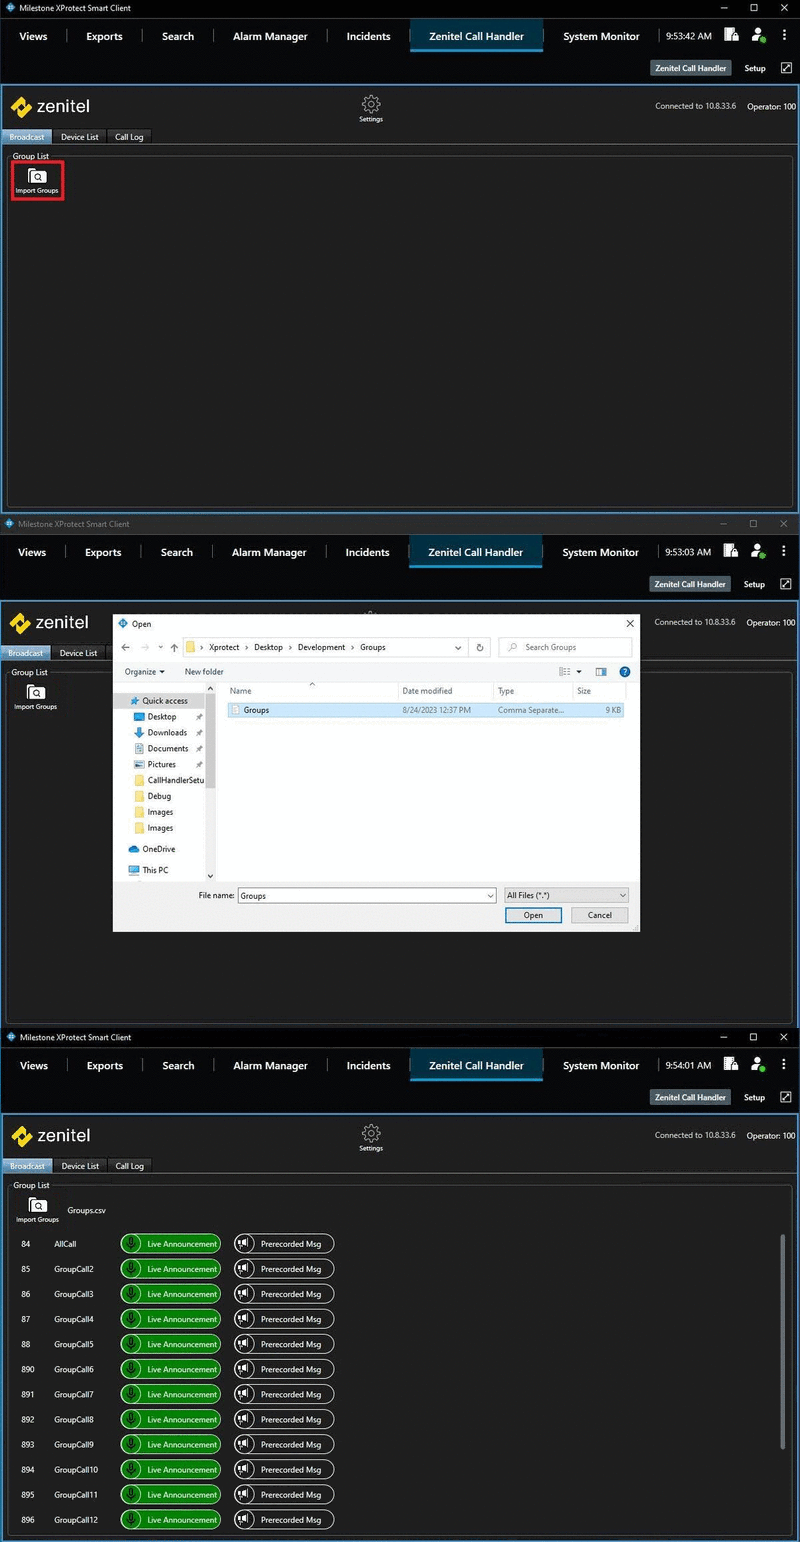
2. Return to Milestone XProtect and within the Zenitel Call Handler, navigate to the 'Broadcasting' tab.
3. Follow these steps to import the groups list file exported from AlphaPro into Zenitel Call Handler:
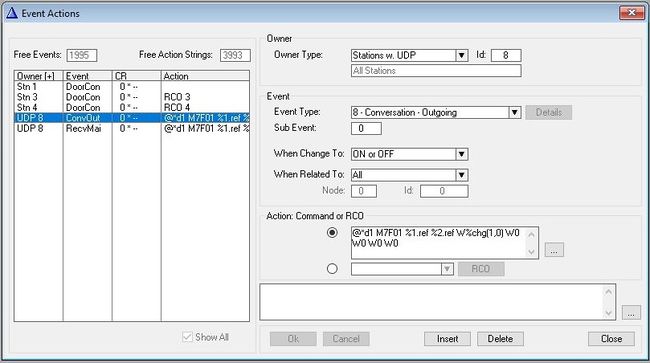
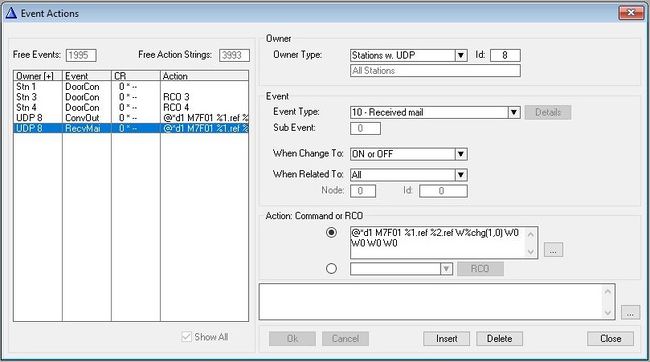
4. Return to the AlphaPro software and follow these steps to configure the necessary events for group UI to function properly:
- Open Exchange Information -> Events
- then Insert two new records with the following information:
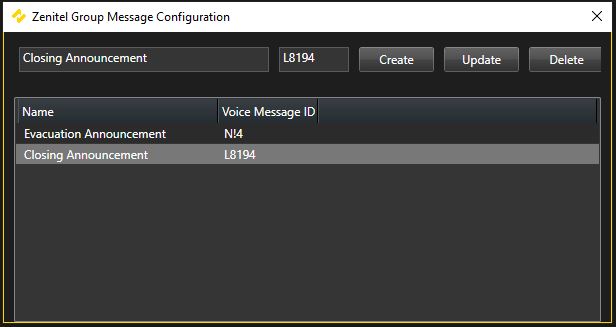
Configuration of prerecorded messages (available from Plugin Version 3.0.6)
In the message configuration window, the user needs to provide the message's name and the corresponding directory number.
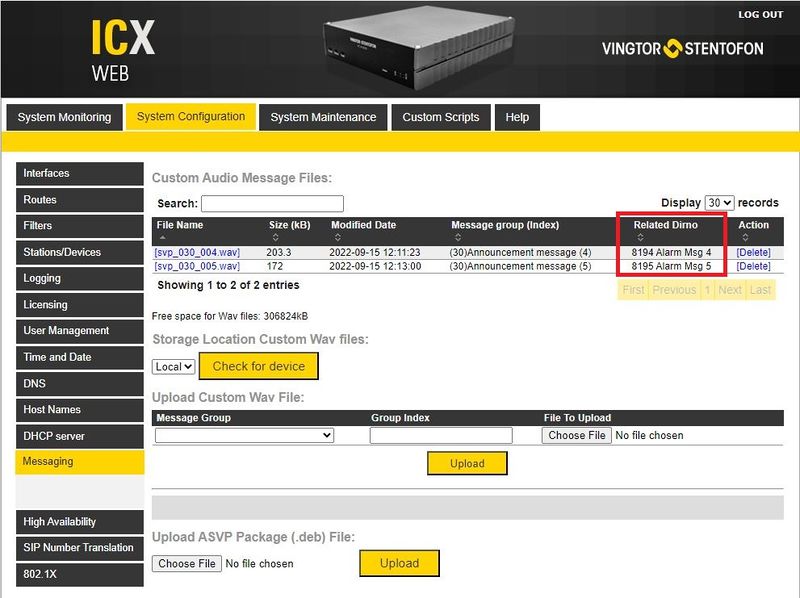
You can get the message directory number in the ICX-Web
Using the Call Handler
The Zenitel Call Handler (ICX-AlphaCom) plugin can be used for two scenarios: initiating calls and handling incoming calls.
Note that SIP audio is routed through ICX-AlphaCom, so audio calls and audio broadcasts are established on a Zenitel desktop station or softclient.
If the Operator uses a desktop station, the Call Handler transfers the call from the Smart Client to the desktop station where the operator gets audio through the station connected handset, speaker or headset.
If the Operator uses the Zenitel softclient, the Call Handler transfers the call from the Smart Client to the softclient, which runs in background on the PC, and the operator gets audio through the PC connected microphone, speakers or headset.
Initiating Calls
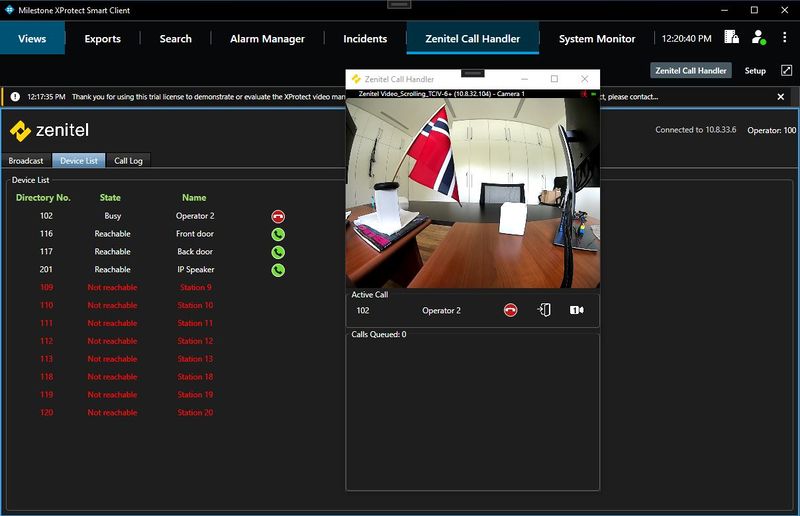
In XProtect Smart Client on the Zenitel Audio tab select a device you wish to call and click on the green "Answer/Call" button.
A popup window will be displayed showing the active call, along with a video preview from an associated camera.
Answering queued Calls
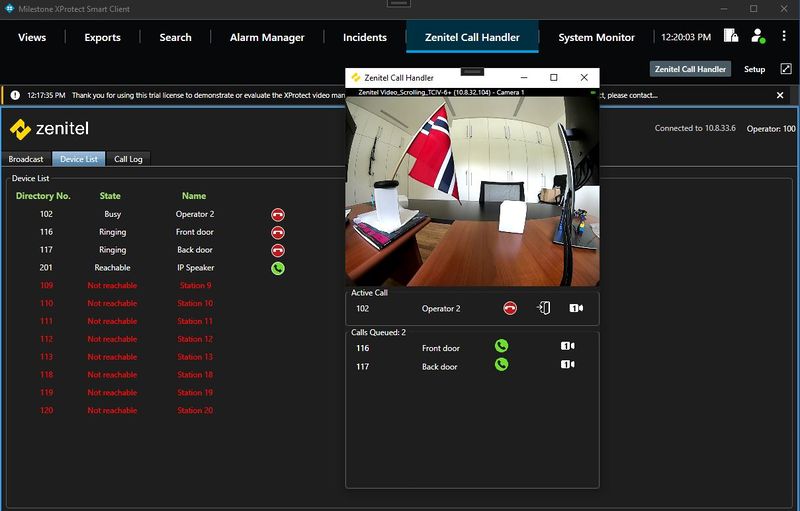
- When an inbound call is received, a popup window will be displayed showing the queued call, along with a video preview from an associated camera.
- To answer the call, click the green "Answer/Call" button.
- If there is an active call, the Call Handler will automatically hang up the active call and answer the inbound call.
- If there are multiple queued calls, they will be displayed in order of priority. To answer a specific queued call, simply click on the green "Answer/Call" button.
Tracking calls meant for a different operator
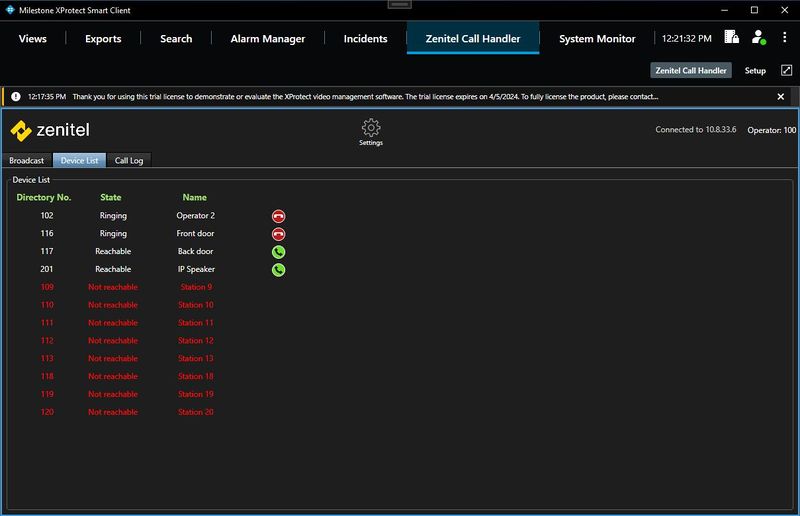
You can determine if a station is busy by checking the device list. If another operator has initiated a call, the current user will be informed about which operator and station are engaged. Notably, there will be no popup window displayed in this scenario.
Using the Popup Window
- The popup window displays the active call (if it was initiated by the operator) or a list of queued calls, along with a video preview from an associated camera.
- The popup window will display the camera feed from the first associated camera of the active call (if present) or if there are no active calls, the first queued device-associated camera will be displayed.
- To manually switch the camera video feed to any active or queued device, select the desired device from the dropdown list in the popup window.
- To hang up the active call, click the red "Hang-Up" button.
- To answer a queued call, click the green "Answer/Call" button.
- If there are multiple queued calls, they will be displayed in order of priority. To answer a specific queued call, select it from the dropdown list in the popup window.
Broadcasting (available from Plugin Version 3.0.6)

|
Prior to utilizing the features in the broadcasting tab, please ensure that you have configured groups, as explained in the Groups configuration section of this page. |
Live announcements (available from Plugin Version 3.0.6)
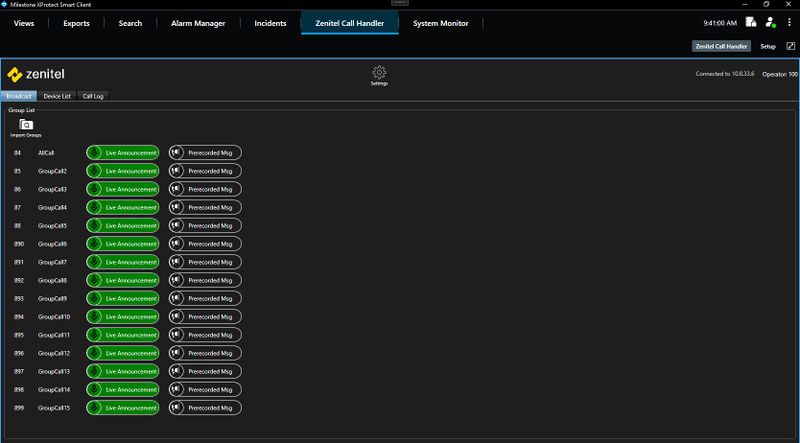
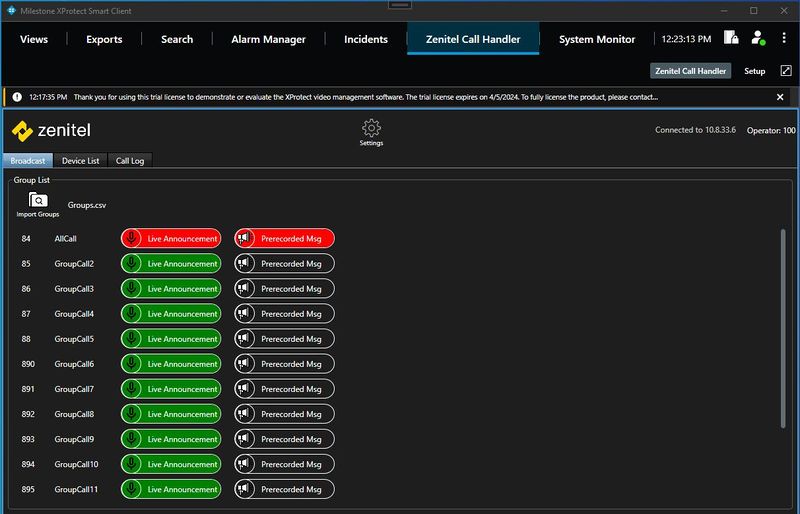
The user will be presented with a list of all available groups.
From this list, the user can make a selection to interact with a particular group by simply clicking either of the two buttons: "Live Announcement" or "Prerecorded Message."
Notably, if any group is currently engaged or busy, both buttons will be displayed in a distinctive red color to indicate the unavailability of the group.
This visual cue helps users quickly identify the status of the chosen group.
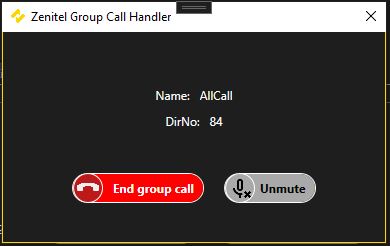
When the user clicks on the "Live Announcement" button, a new window will appear, providing the user with essential information about the selected group.
Within this window, the user will have access to the following controls:
1. Stop Live Announcement Call: This button allows the user to halt the live announcement call in progress.
2. Mute/Unmute Operator Microphone: Users can control the operator's microphone by toggling between mute and unmute states.
It's important to note that the initial microphone state is set to mute, ensuring a silent start for the operator's microphone during the live announcement.
Broadcasting prerecorded messages (available from Plugin Version 3.0.6)

|
Before using prerecorded messages, it's essential to upload WAV audio files to the ICX-AlphaCom system. For more information, please refer to the ICX web Messaging |
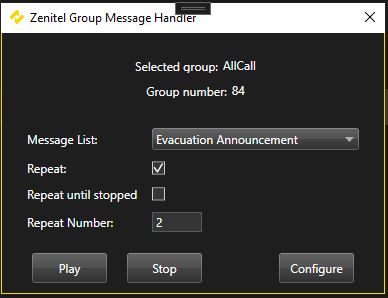
When the user clicks on the "Prerecorded Message" button, a new window will appear, providing the user with vital information about the selected group and controls for broadcasting prerecorded messages to that group. Within this window, the user can:
- Select a prerecorded message.
- Choose whether to play it once, repeat it indefinitely (until manually stopped), or repeat it a specific number of times.
- Configure message settings using the "Configure" button, which opens a new window for message setup.
Previous versions
For configuration of previous versions of the plugin go to:
- Milestone Xprotect - ICX-Alphacom Integration (Zenitel Call Handler) or
- Milestone Xprotect - ICX-Alphacom Integration (VS-Milestone Plugin)


