Difference between revisions of "IP Desktop Station with Video Display - 1408001635"
From Zenitel Wiki
(→Software Upgrade of the LCD screen) |
|||
| Line 1: | Line 1: | ||
| − | [[File:1408001635.jpg|thumb| | + | [[File:1408001635.jpg|thumb|300px|IP Desktop Station with Video Display - 1408001635]] |
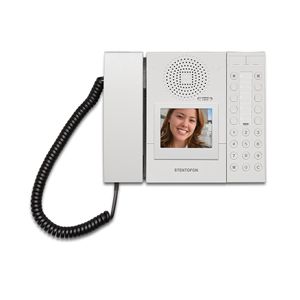
| + | This article describes how to set up the '''IP Desktop Station with Video Display - 1408001635''' to operate in a PULSE system. The station can be used for audio only, and it can be used to also show the video stream from a Vingtor-Stentofon Video Door Station. | ||
| − | = | + | = Operation = |
| − | + | If the calling station has an associated camera, the video stream will pop up when the call is received. The video is available both during ringing and during the conversation. There is a text overlay at the bottom of the screen which shows the name of the calling party (e.g. "Entrance"). | |
| − | |||
| − | |||
| − | |||
| − | |||
| − | |||
| − | + | It is also possible via the LCD touch screen to manually select a camera when there is no active calls. | |
| − | |||
| − | + | If the calling station has no camera associated, regular Caller ID (number and name) will be displayed. | |
| − | |||
| − | |||
| − | |||
| − | |||
| − | |||
| − | |||
| − | |||
| − | |||
| − | |||
| − | |||
| − | |||
| − | |||
| − | |||
| − | |||
| − | |||
| − | |||
| + | = Requirements = | ||
== Software requirement == | == Software requirement == | ||
| + | * The IP Desktop Station requires software version''' 02.5.3.0''' or newer | ||
| + | * The LCD screen requires firmware''' 2.1''' or newer | ||
| − | + | == Camera requirement == | |
| − | + | The LCD screen supports MJPEG video only, with the resolution 240 x 320. Video codec H.264 is not supported. The camera must be able to provide video on MJPEG format at resolution 240 x 320. | |
| − | |||
| − | |||
| − | |||
| − | |||
| − | |||
| − | |||
| − | |||
| − | [[ | + | = LCD Screen Configuration = |
| − | + | * The IP Desktop Station it self is configured in the same way as any other station in a Pulse system. The default IP address is '''169.254.1.100'''. For more details, see [[Installation_and_configuration#Connect_and_Set_Up_the_other_Intercom_Stations|Installation_and_configuration]]. | |
| − | + | * The LCD screen has its own IP address, and is configured separately. The default IP address is '''169.254.1.101'''. | |
| − | [[File: | + | # Touch the upper part of the LCD touch screen for a few seconds to read the IP address. |
| + | # Open the web browser of your computer, enter the IP address into the address bar (e.g. <nowiki>"http://169.254.1.101"</nowiki> or "169.254.1.101") and click '''Enter'''. | ||
| + | # Enter the user name (default: '''admin''') and password (default: '''alphaadmin''') in the pop-up dialogue box and click '''Login''' | ||
| + | [[File:Video Main.PNG|thumb|left|500px|The main menu of the LCD screen]] | ||
<br style="clear:both;" /> | <br style="clear:both;" /> | ||
| − | |||
| − | |||
| − | |||
| − | |||
| − | |||
| − | + | ==Network == | |
| − | + | From the main menu, click on '''Network''', and configure the station to use '''DHCP''' (obtain an IP address automatically) or '''Manual''' (Static IP address). | |
| − | |||
| − | |||
| − | + | [[File:Video Network.PNG|thumb|left|500px|Setting Network parameters]] | |
| − | |||
| − | [[File: | ||
<br style="clear:both;" /> | <br style="clear:both;" /> | ||
| − | |||
| − | + | In the LCD display there is a bar color indicating the connection status: | |
| + | * '''<span style="color: Orange">Yellow</span>''' indicates that the IP Desktop Station is connected to the server. | ||
| + | * '''<span style="color: Green">Green</span>''' indicates an active, incoming or outgoing call. | ||
| + | * '''<span style="color: Red">Red</span>''' indicates that no network connection can be established. If an Ethernet cable is connected the IP Video Display should connect automatically during start up. | ||
| + | * '''<span style="color: Orange">Yellow</span>-<span style="color: Red">Red</span>''' flashing indicates that no connection to the server can be established. If the server and the IP Desktop Station is configured correctly the connection is established automatically during start up. (May take some time) | ||
| − | [[ | + | ==Cameras == |
| − | + | The station can show video image from all Vingtor-Stentofon Video Door Stations: | |
| − | + | * [[IP Video Door Station - 1401110100]] | |
| − | + | * [[IP Video Door Station - 1401110200]] | |
| − | + | * [[Turbine Compact IP Video-3 - 1008115030|Turbine Compact IP Video - TCIV]] | |
| − | |||
| − | |||
| − | |||
| − | + | The video is streamed in MJPEG format directly from the camera to the stations LCD screen. The Pulse server is not involved in the video stream. The cameras must have a static IP address. | |
| − | |||
| − | The | + | The directory number of the Video Door Station must be defined in camera allocation list, together with the URL of the camera. When a call is received, the station will look up in this camera allocation list, and find the correct URL for the associated camera. |
| − | [[File:IPVideoDesk | + | To access the camera allocation table, select '''Cameras''' from the main menu. Up to 80 cameras can be configured in this table. |
| + | [[File:IPVideoDesk CamPass.PNG|thumb|left|500px| Camera settings]] | ||
<br style="clear:both;" /> | <br style="clear:both;" /> | ||
| − | + | === Passcode === | |
| + | By using the menus on the LCD touchscreen, it is possible to view a camera image from idle, without any calls being active. The Passcode is an up to 10 digit long numeric code for restricting the access to the camera image. If Passcode is required or not, is a setting per camera in the Camera Allocation table. | ||
| − | + | === Camera Types === | |
| − | ''' | + | There are two predefined Camera Types, ''Baudisch'' and ''Axis''. In addition there are 3 empty fields in which one can define additional camera types and their URL. |
| − | + | Use the camera type '''Baudisch''' for these Video door station models: | |
| + | * IP Video Intercom with CP-CAM, model 140 1110 100. | ||
| + | * Turbine with Video, TCIV-x, model 100 8115 0x0 | ||
| − | ''' | + | Use the camera type '''Axis''' for the Video door station model: |
| + | * IP Video Intercom with Axis, model 140 1110 200. | ||
| − | |||
| − | |||
| − | |||
| − | |||
| − | |||
| − | |||
| − | |||
| − | + | ===Camera Allocation === | |
| − | * | + | Use the left (<) and right (>) arrows to step up and down in the Camera Allocation table. Up to 80 cameras can be defined. |
| − | + | *'''Name''': Any text (optional). The text is displayed in the LCD screen during ringing and while in conversation, and in the "Cam Select" menu when accessing video from idle. If this field is blank, the name received in the Caller ID will be displayed in the LCD screen during a call. | |
| − | + | *'''AlphaCom Node Number''': Not in use in Pulse system. Enter value "0". | |
| − | * | + | *'''AlphaCom Directory Numer''': Not in use in Pulse system. Enter value "0". |
| − | * | + | * '''SIP ID''': The Directory Number of the intercom unit to which the camera is associated |
| − | * | + | *'''Camera IP''': The IP address of the camera allocated to the intercom unit defined in the SIP ID field |
| − | : | + | *'''Camera Type''': Choose the camera type |
| + | *'''Camera User''': Type in the username to access the camera stream (optional) | ||
| + | * '''Camera Password''': Type in the password to access the camera stream (optional) | ||
| + | * '''Passcode required''': Activates or deactivates the requirement for a passcode authentication to access this camera via the "Cam Select" menu in the LCD screen | ||
| + | * '''Allocation active?''': Enables or Disables this camera. '''Must be enabled''' to see video image from this camera. | ||
| − | [[File: | + | [[File:Video CamAllocation.PNG|thumb|left|500px|Door station number 303 ("Entrance"), with associated camera 10.5.101.38]] |
<br style="clear:both;" /> | <br style="clear:both;" /> | ||
| − | == | + | ==System== |
| − | + | *'''Camera Allocation''': Upload or download the camera allocation list. | |
| − | + | *'''Settings''': Upload or Download the settings of the LCD screen (including the camera allocation). | |
| − | * ''' | + | *'''Factory Reset''': Resets the LCD screen to factory settings. Resets the '''LCD screen''' only. |
| − | * ''' | + | *'''Firmware update''': Upload new firmware to the LCD screen. |
| − | + | <br><br> | |
| − | |||
| − | |||
| − | <br | ||
==User Interface== | ==User Interface== | ||
| − | + | Select '''User Interface''' from the main menu to change the behavior of the user interface on the LCD screen. | |
| − | + | * '''Screensaver''': Define timers and brightness for the screensaver. | |
| − | * ''' | + | * '''Text overlay during video''': Here you can define properties of the overlay text in the LCD screen during ringing and connected call. |
| − | |||
| − | * ''' | ||
| − | |||
| − | |||
| − | |||
| − | == | + | ==User== |
| − | + | Select '''User''' from the main menu to change the username and password for the access to the web interface. | |
| − | + | <br><br> | |
| − | |||
| − | |||
| − | |||
| − | |||
| − | |||
| − | <br | ||
| − | + | =Manually selection of video image= | |
| − | + | Touch on the upper part of the LCD screen to get the Option Menu. | |
| − | |||
| − | |||
| − | |||
| − | |||
| − | |||
| − | |||
| − | + | [[File:VideoOptionMenu.PNG|thumb|left|300px|The Option menu]] | |
| − | |||
| − | |||
| − | [[File: | ||
<br style="clear:both;" /> | <br style="clear:both;" /> | ||
| − | + | At the bottom of the option screen there are four buttons for the following functions: | |
| − | + | [[File:CamSelect.PNG|40px|left]] | |
| − | + | '''Cam Select:''' Press this button to get a list of defined cameras. A touch on a camera entry shows the camera stream for 60 seconds. A touch on the screen during this 60 seconds will stop the stream and jump back to "Cam Select" screen. If the camera is configured to require Passcode authentication, you need to enter the code to access the video stream. | |
| − | |||
| − | : | ||
| − | |||
| − | |||
| − | |||
| − | |||
| − | |||
| − | |||
| − | |||
| − | |||
| − | |||
| − | |||
| − | |||
| − | |||
<br style="clear:both;" /> | <br style="clear:both;" /> | ||
| − | + | [[File:CamSwtch.PNG|40px|left]] | |
| − | + | '''Enable/Disable Cam switching:''' If more than one camera has been allocated to a remote station the display will switch between the allocated cameras every 5 seconds. This feature can be enabled/disabled here. | |
| − | |||
| − | |||
| − | |||
| − | : | ||
| − | |||
| − | |||
| − | |||
| − | |||
| − | |||
| − | |||
| − | |||
<br style="clear:both;" /> | <br style="clear:both;" /> | ||
| − | + | [[File:CamScreensaver.PNG|40px|left]] | |
| − | + | '''Enable/Disable Screensaver; avoid total switch off:''' If this function is enabled, the Screensaver does not switch off the display after a period of inactivity. Only the Backlight is dimmed. | |
| − | |||
| − | |||
| − | : ''' | ||
| − | |||
| − | |||
| − | |||
| − | |||
| − | |||
| − | |||
| − | |||
| − | |||
| − | |||
| − | |||
| − | |||
| − | |||
| − | |||
| − | |||
| − | |||
<br style="clear:both;" /> | <br style="clear:both;" /> | ||
| − | + | [[File:CamHome.PNG|40px|left]] | |
| − | + | '''Back to Main Screen:''' A push on this button will jump back to the Main screen. | |
| − | |||
| − | |||
| − | [[File: | ||
| − | |||
| − | |||
| − | |||
| − | |||
| − | |||
| − | |||
<br style="clear:both;" /> | <br style="clear:both;" /> | ||
Revision as of 17:01, 29 March 2016
This article describes how to set up the IP Desktop Station with Video Display - 1408001635 to operate in a PULSE system. The station can be used for audio only, and it can be used to also show the video stream from a Vingtor-Stentofon Video Door Station.
Operation
If the calling station has an associated camera, the video stream will pop up when the call is received. The video is available both during ringing and during the conversation. There is a text overlay at the bottom of the screen which shows the name of the calling party (e.g. "Entrance").
It is also possible via the LCD touch screen to manually select a camera when there is no active calls.
If the calling station has no camera associated, regular Caller ID (number and name) will be displayed.
Requirements
Software requirement
- The IP Desktop Station requires software version 02.5.3.0 or newer
- The LCD screen requires firmware 2.1 or newer
Camera requirement
The LCD screen supports MJPEG video only, with the resolution 240 x 320. Video codec H.264 is not supported. The camera must be able to provide video on MJPEG format at resolution 240 x 320.
LCD Screen Configuration
- The IP Desktop Station it self is configured in the same way as any other station in a Pulse system. The default IP address is 169.254.1.100. For more details, see Installation_and_configuration.
- The LCD screen has its own IP address, and is configured separately. The default IP address is 169.254.1.101.
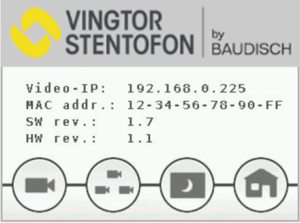
- Touch the upper part of the LCD touch screen for a few seconds to read the IP address.
- Open the web browser of your computer, enter the IP address into the address bar (e.g. "http://169.254.1.101" or "169.254.1.101") and click Enter.
- Enter the user name (default: admin) and password (default: alphaadmin) in the pop-up dialogue box and click Login
Network
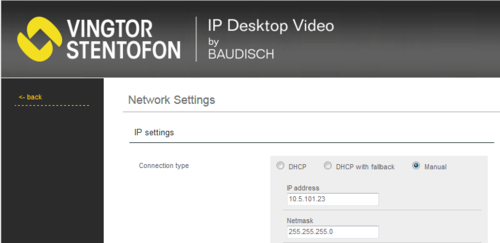
From the main menu, click on Network, and configure the station to use DHCP (obtain an IP address automatically) or Manual (Static IP address).
In the LCD display there is a bar color indicating the connection status:
- Yellow indicates that the IP Desktop Station is connected to the server.
- Green indicates an active, incoming or outgoing call.
- Red indicates that no network connection can be established. If an Ethernet cable is connected the IP Video Display should connect automatically during start up.
- Yellow-Red flashing indicates that no connection to the server can be established. If the server and the IP Desktop Station is configured correctly the connection is established automatically during start up. (May take some time)
Cameras
The station can show video image from all Vingtor-Stentofon Video Door Stations:
- IP Video Door Station - 1401110100
- IP Video Door Station - 1401110200
- Turbine Compact IP Video - TCIV
The video is streamed in MJPEG format directly from the camera to the stations LCD screen. The Pulse server is not involved in the video stream. The cameras must have a static IP address.
The directory number of the Video Door Station must be defined in camera allocation list, together with the URL of the camera. When a call is received, the station will look up in this camera allocation list, and find the correct URL for the associated camera.
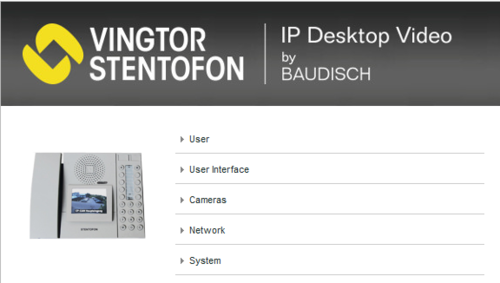
To access the camera allocation table, select Cameras from the main menu. Up to 80 cameras can be configured in this table.
Passcode
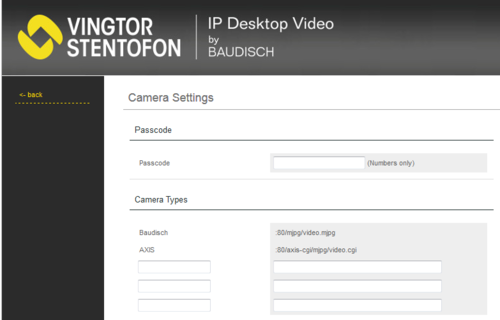
By using the menus on the LCD touchscreen, it is possible to view a camera image from idle, without any calls being active. The Passcode is an up to 10 digit long numeric code for restricting the access to the camera image. If Passcode is required or not, is a setting per camera in the Camera Allocation table.
Camera Types
There are two predefined Camera Types, Baudisch and Axis. In addition there are 3 empty fields in which one can define additional camera types and their URL.
Use the camera type Baudisch for these Video door station models:
- IP Video Intercom with CP-CAM, model 140 1110 100.
- Turbine with Video, TCIV-x, model 100 8115 0x0
Use the camera type Axis for the Video door station model:
- IP Video Intercom with Axis, model 140 1110 200.
Camera Allocation
Use the left (<) and right (>) arrows to step up and down in the Camera Allocation table. Up to 80 cameras can be defined.
- Name: Any text (optional). The text is displayed in the LCD screen during ringing and while in conversation, and in the "Cam Select" menu when accessing video from idle. If this field is blank, the name received in the Caller ID will be displayed in the LCD screen during a call.
- AlphaCom Node Number: Not in use in Pulse system. Enter value "0".
- AlphaCom Directory Numer: Not in use in Pulse system. Enter value "0".
- SIP ID: The Directory Number of the intercom unit to which the camera is associated
- Camera IP: The IP address of the camera allocated to the intercom unit defined in the SIP ID field
- Camera Type: Choose the camera type
- Camera User: Type in the username to access the camera stream (optional)
- Camera Password: Type in the password to access the camera stream (optional)
- Passcode required: Activates or deactivates the requirement for a passcode authentication to access this camera via the "Cam Select" menu in the LCD screen
- Allocation active?: Enables or Disables this camera. Must be enabled to see video image from this camera.
System
- Camera Allocation: Upload or download the camera allocation list.
- Settings: Upload or Download the settings of the LCD screen (including the camera allocation).
- Factory Reset: Resets the LCD screen to factory settings. Resets the LCD screen only.
- Firmware update: Upload new firmware to the LCD screen.
User Interface
Select User Interface from the main menu to change the behavior of the user interface on the LCD screen.
- Screensaver: Define timers and brightness for the screensaver.
- Text overlay during video: Here you can define properties of the overlay text in the LCD screen during ringing and connected call.
User
Select User from the main menu to change the username and password for the access to the web interface.
Manually selection of video image
Touch on the upper part of the LCD screen to get the Option Menu.
At the bottom of the option screen there are four buttons for the following functions:
Cam Select: Press this button to get a list of defined cameras. A touch on a camera entry shows the camera stream for 60 seconds. A touch on the screen during this 60 seconds will stop the stream and jump back to "Cam Select" screen. If the camera is configured to require Passcode authentication, you need to enter the code to access the video stream.
Enable/Disable Cam switching: If more than one camera has been allocated to a remote station the display will switch between the allocated cameras every 5 seconds. This feature can be enabled/disabled here.
Enable/Disable Screensaver; avoid total switch off: If this function is enabled, the Screensaver does not switch off the display after a period of inactivity. Only the Backlight is dimmed.
Back to Main Screen: A push on this button will jump back to the Main screen.
Software Upgrade of the LCD screen
This procedure is about upgrading the software in the LCD screen only.
A separate article describes how to upgrade the station software.
Updating the firmware
- Download the firmware
- Log in to the web interface of the LCD screen, and click on System.
- In the category Firmware Update, click on Browse and select the firmware file. The file has the extension .bin. E.g. 20160216PL_v11_FW_v21_StentofonIPDesktopVideo.bin
- Click on Upload and wait for the upload to finish.
- When the upload is finished the LCD screen will automatically reboot.
Updating the file system (user interface and web interface)
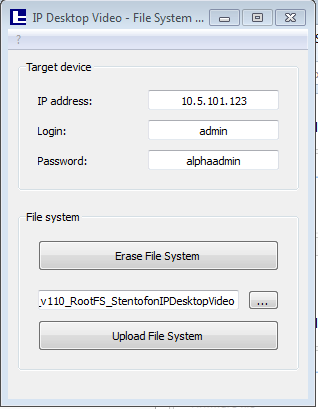
To update the file system to a newer version, use the PC application IP Desktop Video –File System Updater which comes with the software package.
- Download the software
- Start the IP Desktop Video –File System Updater application by executing the file IPDesktopVideoFSUpdater.exe
- Enter the IP address of the LCD screen, and the login (admin) and password (alphaadmin) of the LCD screen.
- Click on the "…" button and navigate to the folder containing the new file system, e.g. 20160216PL_FW_v21_RootFS_StentofonIPDesktopVideo.
- Select the folder of the new file system and click Ok.
- Click on the Erase File System button and wait for the station to reboot.
- After the reboot click on Upload File System and wait for the process to finish. This may take a few minutes.
- When the update is finished, the station will reboot with the new file system.

