INCA Station Kit Restore Factory Defaults: Difference between revisions
From Zenitel Wiki
(Created page with "== Restore to Factory Default for IP Stations without Display and Key == * IP Speaker - 1401002100/IP Horn Loudspeaker - 1401002500|1...") |
No edit summary |
||
| (21 intermediate revisions by 3 users not shown) | |||
| Line 1: | Line 1: | ||
{{APS}} | |||
This procedure is applicable for: | |||
* IP Substation Kit - [[IP Substation Kit - 1008090200|1008090200]] | * IP Substation Kit - [[IP Substation Kit - 1008090200|1008090200]] | ||
* IP Master Station Kit [[IP Master Station Kit - 1008093000|100809300]] | |||
< | |||
The | <div style="text-align:left;"> <youtube width="300" height="180">WP9m-DG0hMU</youtube> </div> | ||
[[File:Load Defaults without KEY.PNG| | |||
The unit can be set to use either '''Static IP''' or '''DHCP'''. On the rear side of the PCB there is a red status LED. Pay attention to this LED during the restore procedure: | |||
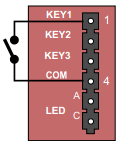
[[File:Load Defaults without KEY.PNG|right|thumb|800px|Connect a push button between pins 1 and 4]] | |||
== Procedure == | |||
# Connect a push button ('''KEY1''') between pin 1 and 4 on the P4 connector. | |||
# While pressing the button, power up the station kit and keep the button pressed. | |||
# Release the button '''after exactly 2 flashes''' of the LED. | |||
# Let the LED flash for '''exactly 2 more times''' (Static IP) or '''exactly 4 more times''' (DHCP), then press the button again. | |||
# Keep the button pressed until the LED '''flashes fast 2 times''' (Static IP) or '''flashes fast 4 times''' (DHCP) indicating a successful reset. | |||
# Release the button and the station will restart with the factory default settings. | |||
== Factory default values == | |||
*Station Mode: '''Pulse''' | |||
*Station IP address: '''169.254.1.100''' or '''DHCP''' | |||
*Username: '''admin''' | |||
*Password: '''alphaadmin''' | |||
[[Category: INCA - Restore Factory Defaults and Software Upgrade]] | [[Category: INCA - Restore Factory Defaults and Software Upgrade]] | ||
Latest revision as of 13:25, 15 May 2018
This procedure is applicable for:
- IP Substation Kit - 1008090200
- IP Master Station Kit 100809300
The unit can be set to use either Static IP or DHCP. On the rear side of the PCB there is a red status LED. Pay attention to this LED during the restore procedure:
Procedure
- Connect a push button (KEY1) between pin 1 and 4 on the P4 connector.
- While pressing the button, power up the station kit and keep the button pressed.
- Release the button after exactly 2 flashes of the LED.
- Let the LED flash for exactly 2 more times (Static IP) or exactly 4 more times (DHCP), then press the button again.
- Keep the button pressed until the LED flashes fast 2 times (Static IP) or flashes fast 4 times (DHCP) indicating a successful reset.
- Release the button and the station will restart with the factory default settings.
Factory default values
- Station Mode: Pulse
- Station IP address: 169.254.1.100 or DHCP
- Username: admin
- Password: alphaadmin


