Difference between revisions of "SNOM IP Phone"
From Zenitel Wiki
(→Configuration) |
|||
| (49 intermediate revisions by 3 users not shown) | |||
| Line 1: | Line 1: | ||
| − | This article describes how to set up '''Snom IP phones''', models 820, 821 and 760, to operate with an AlphaCom server. The Snom Phones can be used for audio only, or they can also be used to show the video image from a Stentofon IP Video Door Station or an external Axis camera. | + | {{A}}[[File:Snom XE Video.PNG|thumb|right|500px|Snom IP Phone with AlphaCom XE server]] |
| + | |||
| + | This article describes how to set up '''Snom IP phones''', models 820, 821 and 760, to operate with an '''AlphaCom server'''. The Snom Phones can be used for audio only, or they can also be used to show the video image from a Stentofon IP Video Door Station or from an external Axis camera. | ||
For video the following possibilities can be realized: | For video the following possibilities can be realized: | ||
* '''Pop up video image'''. The video image of IP Video Door Station is shown automatically on an incoming call and end automatically when the communication is finished. | * '''Pop up video image'''. The video image of IP Video Door Station is shown automatically on an incoming call and end automatically when the communication is finished. | ||
| − | * '''Manual video image'''. The video image of the IP Video Door Station can be activated and ended by key | + | * '''Manual video image'''. The video image of the IP Video Door Station can be activated and ended by pressing a function key. |
| − | |||
| Line 18: | Line 19: | ||
* 5 - Maintenance | * 5 - Maintenance | ||
* 4 - Reset Values | * 4 - Reset Values | ||
| − | * Enter default password '''0000'''. The phone will restart. | + | * Enter default password '''0000 + #'''. The phone will restart. |
Follow the display setup wizard to set: | Follow the display setup wizard to set: | ||
| Line 64: | Line 65: | ||
During conversation with the Door Station a relay can be operated by pressing digit 6 on the Snom phone. The Snom phone uses DTMF by RFC2833 by default, which is supported by AlphaCom, so no settings are required in the phone. | During conversation with the Door Station a relay can be operated by pressing digit 6 on the Snom phone. The Snom phone uses DTMF by RFC2833 by default, which is supported by AlphaCom, so no settings are required in the phone. | ||
| − | In AlphaCom the relay must be mapped to a logical RCO, and an "Door Opening" event created to trigger this RCO. | + | In AlphaCom the relay must be mapped to a logical RCO, and an "Door Opening" event created to trigger this RCO. See [[Door opening]] for more details. |
| − | |||
| − | |||
| − | |||
| − | [[ | ||
| − | |||
| − | |||
| − | |||
| − | |||
| − | |||
| − | |||
| − | |||
| − | |||
| − | |||
| − | |||
== Configuration for Video == | == Configuration for Video == | ||
The Snom phones can be configured to show video image from the following stations/cameras: | The Snom phones can be configured to show video image from the following stations/cameras: | ||
| − | * | + | * [[IP Video Door Station - 1401110100]] |
| − | * | + | * [[IP Video Door Station - 1401110200]] |
| − | * | + | * [[TCIV-2|Turbine Compact IP Video - TCIV]] |
| − | * | + | * External Axis camera |
| + | |||
| − | * '''Note 1:''' In order to support video, the Snom phone must have the correct firmware. See [[#Firmware update of Snom phone|Firmware update of Snom phone]] at the bottom of this article. | + | * '''Note 1''': The cameras must have a Static IP address. |
| − | * '''Note | + | * '''Note 2:''' In order to support video, the Snom phone must have the correct firmware. See [[#Firmware update of Snom phone|Firmware update of Snom phone]] at the bottom of this article. |
| + | * '''Note 3:''' When using Axis camera, an [[#Axis camera - Uploading .XML file|.xml file must be uploaded to the camera]]. This is applicable for [[IP Video Door Station - 1401110200|IP Video Door Station model 1401110200]] as well as when using standalone Axis camera. | ||
=== Pop up video image === | === Pop up video image === | ||
| − | The screen | + | The screen of the Snom IP phone can be used to automatically show the video image during a call. The [[directory number]] of the station must be defined in the Directory of the Snom phone. When a call is made or received, the telephone will look up in the Directory, and find the correct URL for the associated camera. |
| − | |||
| − | |||
| − | |||
| − | |||
| − | The | ||
In the web interface of the phone, select '''Directory''' in the menu, and enter the following parameters: | In the web interface of the phone, select '''Directory''' in the menu, and enter the following parameters: | ||
| Line 104: | Line 88: | ||
* '''Title''': Enter any text | * '''Title''': Enter any text | ||
* '''Action URL''': Which URL to use depends on the type of camera/IP Station being used: | * '''Action URL''': Which URL to use depends on the type of camera/IP Station being used: | ||
| − | ** '''IP Video Door Station - 1401110100''' (CP-CAM camera): <nowiki>http://<IP | + | ** '''IP Video Door Station - 1401110100''' (CP-CAM camera): <nowiki>http://<IP address of the camera>/snoma.cgi.</nowiki> For example '''http://10.5.101.95/snoma.cgi''' |
| − | ** '''IP Video Door Station - 1401110200''' (Axis camera): <nowiki>http://<IP | + | ** '''IP Video Door Station - 1401110200''' (Axis camera): <nowiki>http://<IP address of the camera>/local/viewer/snomaxis.xml.</nowiki> For example '''http://10.5.101.87/local/viewer/snomaxis.xml''' |
| − | ** ''' | + | ** '''Turbine Compact IP Video - TCIV''': <nowiki>http://<IP address of the camera>:<mjpeg port>/snoma.cgi.</nowiki> For example '''http://10.5.101.38:8090/snoma.cgi''' |
| − | ** '''External Axis camera''': <nowiki>http://<IP | + | ** '''External Axis camera''': <nowiki>http://<IP address of the camera>//local/viewer/snomaxis.xml.</nowiki> For example '''http://10.5.101.37/local/viewer/snomaxis.xml''' |
* '''Nickname''': Enter any text | * '''Nickname''': Enter any text | ||
| Line 113: | Line 97: | ||
[[File:SnomVideo4.png|thumb|500px|left|Configure the IP Video Door station in the Directory list of the Snom phone]] | [[File:SnomVideo4.png|thumb|500px|left|Configure the IP Video Door station in the Directory list of the Snom phone]] | ||
<br style="clear:both;" /> | <br style="clear:both;" /> | ||
| + | |||
| + | http://<IP address of the camera>:<mjpeg port>/snoma.cgi. For example http://10.5.101.38:8090/snoma.cgi | ||
===Manual video image === | ===Manual video image === | ||
The video image can be started and ended manually by pressing a function key. With this feature the video image can be displayed without setting up a conversation. | The video image can be started and ended manually by pressing a function key. With this feature the video image can be displayed without setting up a conversation. | ||
| − | |||
| − | |||
In the web interface of the phone, select '''Function Keys''' in the menu, and enter the following parameters: | In the web interface of the phone, select '''Function Keys''' in the menu, and enter the following parameters: | ||
* '''Context''': Active | * '''Context''': Active | ||
* '''Type''': Action URL | * '''Type''': Action URL | ||
* '''Number''': The URL for the camera. Which URL to use depends on the camera being used: | * '''Number''': The URL for the camera. Which URL to use depends on the camera being used: | ||
| − | ** ''' | + | ** '''IP Video Door Station - 1401110100''' (CP-CAM camera): <nowiki>http://<IP address of the camera>/snoma.cgi.</nowiki> For example '''http://10.5.101.95/snoma.cgi''' |
| − | ** ''' | + | ** '''IP Video Door Station - 1401110200''' (Axis camera): <nowiki>http://<IP address of the camera>/local/viewer/snomaxis.xml.</nowiki> For example '''http://10.5.101.87/local/viewer/snomaxis.xml''' |
| − | ** ''' | + | ** '''Turbine Compact IP Video - TCIV''': <nowiki>http://<IP address of the camera>:<mjpeg port>/snoma.cgi.</nowiki> For example '''http://10.5.101.38:8090/snoma.cgi''' |
| − | ** '''External Axis camera''': <nowiki>http://<IP | + | ** '''External Axis camera''': <nowiki>http://<IP address of the camera>//local/viewer/snomaxis.xml.</nowiki> For example '''http://10.5.101.37/local/viewer/snomaxis.xml''' |
* '''Short text''': Enter any text | * '''Short text''': Enter any text | ||
| Line 137: | Line 121: | ||
* '''End video image''' by pressing the "X-key". | * '''End video image''' by pressing the "X-key". | ||
| − | ==== | + | === Authentication === |
| + | |||
| + | If the access of the CP-CAM camera is to be password protected, the following adjustments are necessary to the URL: | ||
| + | * <nowiki>http://<User name>:<Password>@<IP adress of the camera>/snoma.cgi. If for example username is "admin" and the password is "1234", enter http://admin:1234@10.5.101.97/snoma.cgi</nowiki> | ||
| + | |||
| + | == Axis camera - Uploading .XML file == | ||
| − | + | When the Snom Phone is used to show an image from an Axis camera, an .xml file must be uploaded to the camera. This is applicable for IP Video Door Station model 1401110200 as well as when using standalone Axis camera. | |
| − | + | * Create a new textfile on your windows desktop and rename it to '''snomaxis.xml'''. | |
| − | + | * Open the file with a text editor e.g. Notepad | |
| − | + | * Copy the following lines to the snomaxis.xml text file: | |
| − | + | ||
| − | * ''' | + | <nowiki><?xml version="1.0" encoding="UTF-8"?> |
| + | <SnomIPPhoneImageFile state="relevant" track="no" dtmf="on" > | ||
| + | <LocationX>00</LocationX> | ||
| + | <LocationY>00</LocationY> | ||
| + | <url>http://<ip-address>/axis-cgi/jpg/image.cgi?resolution=320x240</url> | ||
| + | <fetch mil="100">http://<ip-address>/local/viewer/snomaxis.xml</fetch> | ||
| + | </SnomIPPhoneImageFile></nowiki> | ||
| + | |||
| + | * Replace the two ''<ip-address>'' tags with the IP address of your camera. | ||
| + | * Save the file. | ||
| + | * Etablish a FTP connection to the IP camera, using e.g. the PC tool [http://winscp.net/eng/index.php WinSCP]. Use the same username and password as the login on the webinterface. | ||
| + | * Navigate to the following folder: ''/mnt/flash/etc/httpd/html/viewer'' | ||
| + | * Copy the snomaxis.xml into the folder. | ||
| + | * Close the FTP connection. | ||
| − | + | [[File:WinSCP Snomaxis.PNG|thumb|500px|left|Uploading the "snomaxis.xml" file to an Axis camera using the PC tool WinSCP]] | |
| + | <br style="clear:both;" /> | ||
== Firmware update of Snom phone== | == Firmware update of Snom phone== | ||
| − | In order to support video | + | In order to support video, the Snom phone must have the correct firmware. The firmware is uploaded using a TFTP server. |
Upgrade procedure: | Upgrade procedure: | ||
* Download firmware for the relevant Snom model from the [[Downloads#IP_Video_stations|AlphaWiki download site]] | * Download firmware for the relevant Snom model from the [[Downloads#IP_Video_stations|AlphaWiki download site]] | ||
| + | ** Model 820: Version 8.7.4.5t | ||
| + | ** Model 821: Version 8.7.4.8 | ||
| + | ** Model 760: Version 8.7.4.8 | ||
* Unzip the file. Remember in which folder you stored the file | * Unzip the file. Remember in which folder you stored the file | ||
* Start a TFTP server, and browse to the folder which contains the file. A TFTP server can be downloaded here: [http://tftpd32.jounin.net/tftpd32_download.html TFTP server] | * Start a TFTP server, and browse to the folder which contains the file. A TFTP server can be downloaded here: [http://tftpd32.jounin.net/tftpd32_download.html TFTP server] | ||
| − | * In the Snom webinterface, select '''Software Update''' and enter address ''tftp://[TFTPServer]/[file name],'' where ''[TFTPServer]'' = IP address of PC running the TFTP server and ''[file name]'' is the name of the downloaded .bin file. Example: '''tftp://10.5.101.129/snom821-8.7.4. | + | * In the Snom webinterface, select '''Software Update''' and enter address ''tftp://[TFTPServer]/[file name],'' where ''[TFTPServer]'' = IP address of PC running the TFTP server and ''[file name]'' is the name of the downloaded .bin file. |
| + | **Example: '''tftp://10.5.101.129/snom821-8.7.4.8-SIP-r.bin'''. | ||
* Select '''Load''', and watch the progress on the display of the Snom phone | * Select '''Load''', and watch the progress on the display of the Snom phone | ||
[[File:SnomVideo11.png|thumb|500px|left|Starting the software upgrade process]] | [[File:SnomVideo11.png|thumb|500px|left|Starting the software upgrade process]] | ||
| Line 162: | Line 169: | ||
| − | '''Note:''' It is not recommended to use newer beta versions | + | '''Note:''' It is not recommended to use newer beta versions of the Snom FW. |
| − | [[Category: | + | [[Category:AlphaCom - SIP Integration]] |
Latest revision as of 11:43, 9 June 2022
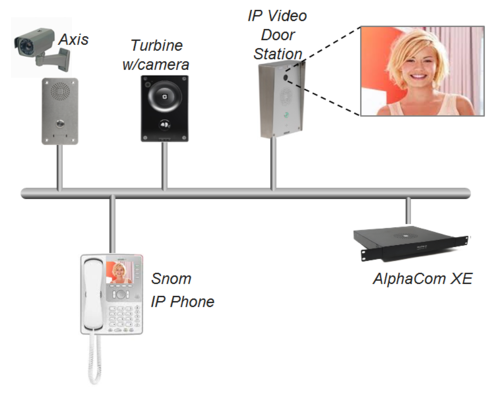
This article describes how to set up Snom IP phones, models 820, 821 and 760, to operate with an AlphaCom server. The Snom Phones can be used for audio only, or they can also be used to show the video image from a Stentofon IP Video Door Station or from an external Axis camera.
For video the following possibilities can be realized:
- Pop up video image. The video image of IP Video Door Station is shown automatically on an incoming call and end automatically when the communication is finished.
- Manual video image. The video image of the IP Video Door Station can be activated and ended by pressing a function key.
Contents
AlphaCom configuration
The Snom phone must be configured as a SIP User in AlphaPro, Users & Stations. See article SIP phone as station for details.
Configuration of the Snom Phone
Network settings and SIP account in Snom phone
Factory default of the phone is done from the phones keyboard by pressing:
- The button Menu
- 5 - Maintenance
- 4 - Reset Values
- Enter default password 0000 + #. The phone will restart.
Follow the display setup wizard to set:
- Language
- Time Zone
- Tone scheme
- SIP Account = Directory number in AlphaCom
- Registrar = IP address of AlphaCom
- Select DHCP or enter IP settings of phone
The phone must be rebooted after this.
SIP account settings can be changed in Identity 1 in web access. IP settings are changed in Advanced -> Network.
Codec settings
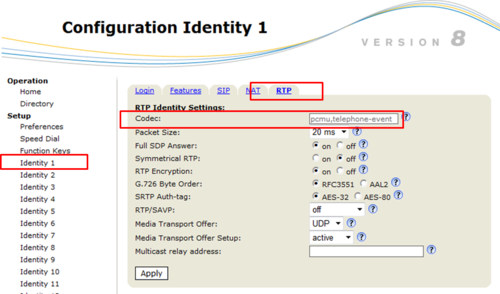
Codec must be changed to G.711u-law (pcmu) and the internal "telphone event".
In Identity 1 -> RTP, set the codec to: "pcmu,telephone-event", remove all other codecs:
Other parameters
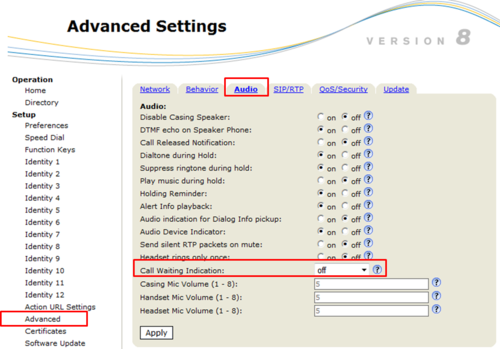
Set Call Waiting Indication to "Off":
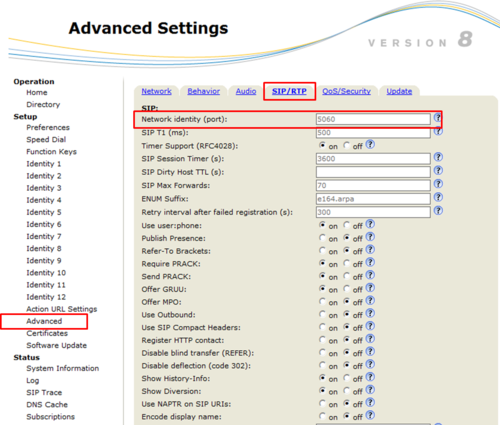
Set SIP port to 5060:
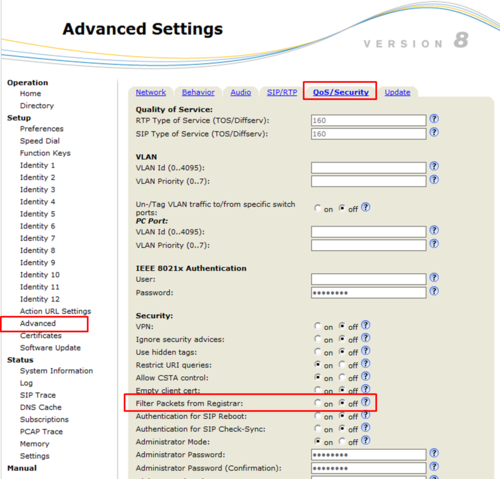
Disable Filter Packets from Registrar:
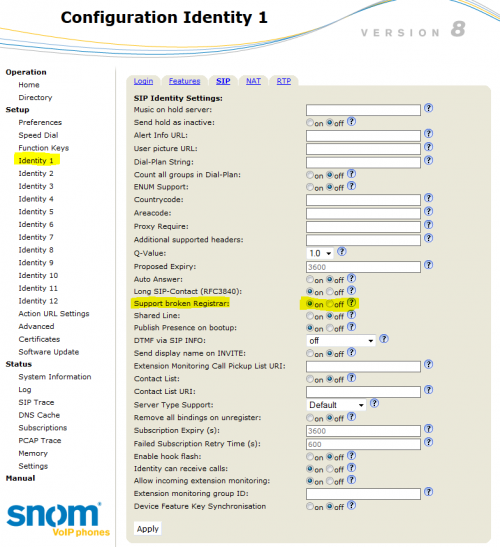
In Identity 1 -> SIP, set Support broken Registrar to "On":
Door Opening feature (optional)
During conversation with the Door Station a relay can be operated by pressing digit 6 on the Snom phone. The Snom phone uses DTMF by RFC2833 by default, which is supported by AlphaCom, so no settings are required in the phone.
In AlphaCom the relay must be mapped to a logical RCO, and an "Door Opening" event created to trigger this RCO. See Door opening for more details.
Configuration for Video
The Snom phones can be configured to show video image from the following stations/cameras:
- IP Video Door Station - 1401110100
- IP Video Door Station - 1401110200
- Turbine Compact IP Video - TCIV
- External Axis camera
- Note 1: The cameras must have a Static IP address.
- Note 2: In order to support video, the Snom phone must have the correct firmware. See Firmware update of Snom phone at the bottom of this article.
- Note 3: When using Axis camera, an .xml file must be uploaded to the camera. This is applicable for IP Video Door Station model 1401110200 as well as when using standalone Axis camera.
Pop up video image
The screen of the Snom IP phone can be used to automatically show the video image during a call. The directory number of the station must be defined in the Directory of the Snom phone. When a call is made or received, the telephone will look up in the Directory, and find the correct URL for the associated camera.
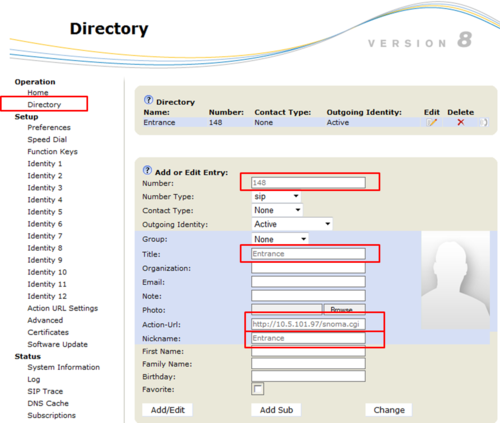
In the web interface of the phone, select Directory in the menu, and enter the following parameters:
- Number: The directory number of the IP Video Door Station, as entered in AlphaPro, Users & Stations.
- Title: Enter any text
- Action URL: Which URL to use depends on the type of camera/IP Station being used:
- IP Video Door Station - 1401110100 (CP-CAM camera): http://<IP address of the camera>/snoma.cgi. For example http://10.5.101.95/snoma.cgi
- IP Video Door Station - 1401110200 (Axis camera): http://<IP address of the camera>/local/viewer/snomaxis.xml. For example http://10.5.101.87/local/viewer/snomaxis.xml
- Turbine Compact IP Video - TCIV: http://<IP address of the camera>:<mjpeg port>/snoma.cgi. For example http://10.5.101.38:8090/snoma.cgi
- External Axis camera: http://<IP address of the camera>//local/viewer/snomaxis.xml. For example http://10.5.101.37/local/viewer/snomaxis.xml
- Nickname: Enter any text
http://<IP address of the camera>:<mjpeg port>/snoma.cgi. For example http://10.5.101.38:8090/snoma.cgi
Manual video image
The video image can be started and ended manually by pressing a function key. With this feature the video image can be displayed without setting up a conversation.
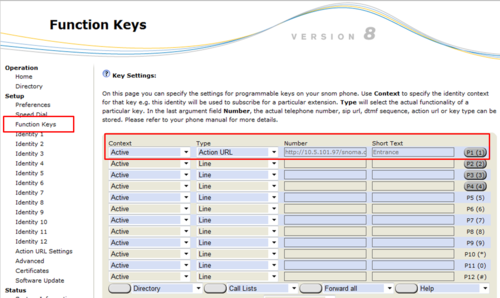
In the web interface of the phone, select Function Keys in the menu, and enter the following parameters:
- Context: Active
- Type: Action URL
- Number: The URL for the camera. Which URL to use depends on the camera being used:
- IP Video Door Station - 1401110100 (CP-CAM camera): http://<IP address of the camera>/snoma.cgi. For example http://10.5.101.95/snoma.cgi
- IP Video Door Station - 1401110200 (Axis camera): http://<IP address of the camera>/local/viewer/snomaxis.xml. For example http://10.5.101.87/local/viewer/snomaxis.xml
- Turbine Compact IP Video - TCIV: http://<IP address of the camera>:<mjpeg port>/snoma.cgi. For example http://10.5.101.38:8090/snoma.cgi
- External Axis camera: http://<IP address of the camera>//local/viewer/snomaxis.xml. For example http://10.5.101.37/local/viewer/snomaxis.xml
- Short text: Enter any text
- Start video image by pressing the programmed key.
- End video image by pressing the "X-key".
Authentication
If the access of the CP-CAM camera is to be password protected, the following adjustments are necessary to the URL:
- http://<User name>:<Password>@<IP adress of the camera>/snoma.cgi. If for example username is "admin" and the password is "1234", enter http://admin:1234@10.5.101.97/snoma.cgi
Axis camera - Uploading .XML file
When the Snom Phone is used to show an image from an Axis camera, an .xml file must be uploaded to the camera. This is applicable for IP Video Door Station model 1401110200 as well as when using standalone Axis camera.
- Create a new textfile on your windows desktop and rename it to snomaxis.xml.
- Open the file with a text editor e.g. Notepad
- Copy the following lines to the snomaxis.xml text file:
<?xml version="1.0" encoding="UTF-8"?>
 <SnomIPPhoneImageFile state="relevant" track="no" dtmf="on" >
 <LocationX>00</LocationX>
 <LocationY>00</LocationY>
 <url>http://<ip-address>/axis-cgi/jpg/image.cgi?resolution=320x240</url>
 <fetch mil="100">http://<ip-address>/local/viewer/snomaxis.xml</fetch>
 </SnomIPPhoneImageFile>
- Replace the two <ip-address> tags with the IP address of your camera.
- Save the file.
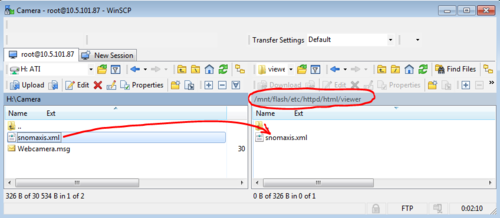
- Etablish a FTP connection to the IP camera, using e.g. the PC tool WinSCP. Use the same username and password as the login on the webinterface.
- Navigate to the following folder: /mnt/flash/etc/httpd/html/viewer
- Copy the snomaxis.xml into the folder.
- Close the FTP connection.
Firmware update of Snom phone
In order to support video, the Snom phone must have the correct firmware. The firmware is uploaded using a TFTP server.
Upgrade procedure:
- Download firmware for the relevant Snom model from the AlphaWiki download site
- Model 820: Version 8.7.4.5t
- Model 821: Version 8.7.4.8
- Model 760: Version 8.7.4.8
- Unzip the file. Remember in which folder you stored the file
- Start a TFTP server, and browse to the folder which contains the file. A TFTP server can be downloaded here: TFTP server
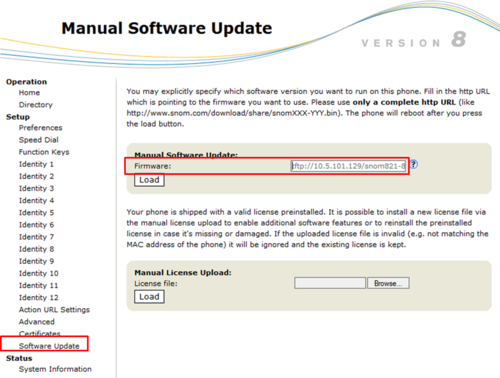
- In the Snom webinterface, select Software Update and enter address tftp://[TFTPServer]/[file name], where [TFTPServer] = IP address of PC running the TFTP server and [file name] is the name of the downloaded .bin file.
- Example: tftp://10.5.101.129/snom821-8.7.4.8-SIP-r.bin.
- Select Load, and watch the progress on the display of the Snom phone
Note: It is not recommended to use newer beta versions of the Snom FW.

