ENA2060 Amplifier - Speaker Line Monitoring: Difference between revisions
From Zenitel Wiki
No edit summary |
No edit summary |
||
| (14 intermediate revisions by 3 users not shown) | |||
| Line 1: | Line 1: | ||
{{S}} | {{S}} | ||
The [[ENA2060 | The [[ENA2060 Amplifier|ENA2060]] amplifier has the option to monitor each speaker line to detect line faults such as '''Open''', '''Shorted''' or '''Ground Fault'''. <br> | ||
To configure Speaker Line Monitoring | |||
To configure Speaker Line Monitoring select '''Amplifier Settings''' > '''Line Control''' | |||
[[File:ENA2060 | |||
[[File:ENA2060 LineMonitoring.PNG|alt=|left|thumb|700px|Line Control]] | |||
<br style="clear:both;" /> | <br style="clear:both;" /> | ||
| Line 11: | Line 12: | ||
After the calibration, the speaker line load must not be changed, or else false fault messages may be reported. | After the calibration, the speaker line load must not be changed, or else false fault messages may be reported. | ||
'''Monitor Mode''' can be '''Disabled''', '''Manual''' for manual monitor triggering and '''Continuous''' for continuous monitoring | |||
*To get access to monitoring configuration options, either type of monitoring has to be enabled | |||
*In Manual Monitoring mode, the status of the line must be manually checked | |||
*In Continuous Monitoring mode, the status of the line is checked every 60 minutes. This includes changing status from ok to fault and from fault to ok. | |||
''' | '''Line Monitoring''' Speaker Line monitoring Enable/Disable. | ||
To calibrate a speaker line: | |||
#Select '''Monitor Mode''' either '''Continuous''' or '''Manual''' | |||
#Enable '''Line Monitoring''' | |||
#Click the '''Calibrate''' button | |||
#Ensure the Calibrated status is displaying '''Calibrated'''. '''Unknown''', '''Short''' or '''Open''' status will not allow the speaker monitoring to start. | |||
The four benchmarks for the evaluation of line state is Voltage, Current, Phase and Ground Fault. | The four benchmarks for the evaluation of line state is '''Voltage''', '''Current''', '''Phase''' and '''Ground Fault'''. | ||
The values measured on Voltage, Current and Phase will together provide an evaluation of the line state regarding whether it is Shorted, Open or OK. | The values measured on Voltage, Current and Phase will together provide an evaluation of the line state regarding whether it is Shorted, Open or OK. | ||
| Line 83: | Line 33: | ||
<br style="clear:both;" /> | <br style="clear:both;" /> | ||
{| border="1" | {| border="1" | ||
| | | width="120pt" align="center" | || align="left" |'''Calibration OK'''|| align="left" |'''Shorted @ENA'''|| align="left" |'''Shorted @100M'''|| align="left" |'''Open @ENA'''|| align="left" |'''Open @100M'''|| align="left" |'''Ground Fault''' | ||
|- | |- | ||
| | | style="background:#ffd400;" width="120pt" align="center" |Voltage|| align="left" |985|| align="left" |403|| align="left" |403|| align="left" |780|| align="left" |1015|| align="left" |400..1500 | ||
|- | |- | ||
| | | style="background:#ffd400;" width="120pt" align="center" |Current|| align="left" |1045|| align="left" |1370|| align="left" |1365|| align="left" |435|| align="left" |1065|| align="left" |400..1500 | ||
|- | |- | ||
| | | style="background:#ffd400;" width="120pt" align="center" |Phase|| align="left" |1075|| align="left" |765|| align="left" |925|| align="left" |1545|| align="left" |975|| align="left" |400..1500 | ||
|- | |- | ||
| | | style="background:#ffd400;" width="120pt" align="center" |Ground Fault|| align="left" |405|| align="left" |405|| align="left" |405|| align="left" |405|| align="left" |405|| align="left" |1580 | ||
|- | |- | ||
|} | |} | ||
Latest revision as of 12:45, 28 June 2024
The ENA2060 amplifier has the option to monitor each speaker line to detect line faults such as Open, Shorted or Ground Fault.
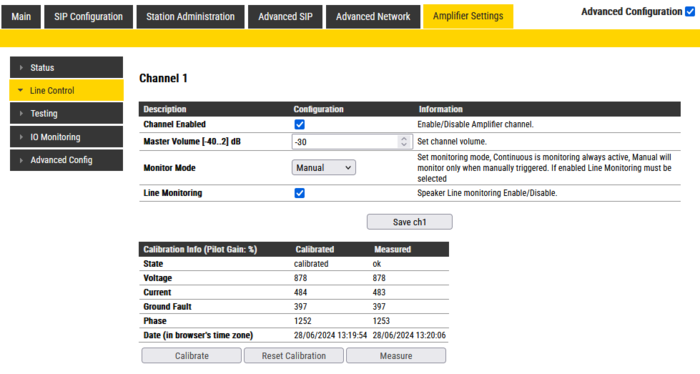
To configure Speaker Line Monitoring select Amplifier Settings > Line Control
After the speaker line is set up with all the speakers and the line is properly connected to the amplifier, the speaker line that is to be monitored must be calibrated.
When calibration is carried out, the amplifier makes an initial measurement of the speaker line to check whether the line load is within acceptable limits.
The calibration values are used as a reference and are compared with later speaker line measurements for any significant changes that will cause line fault reporting.
After the calibration, the speaker line load must not be changed, or else false fault messages may be reported.
Monitor Mode can be Disabled, Manual for manual monitor triggering and Continuous for continuous monitoring
- To get access to monitoring configuration options, either type of monitoring has to be enabled
- In Manual Monitoring mode, the status of the line must be manually checked
- In Continuous Monitoring mode, the status of the line is checked every 60 minutes. This includes changing status from ok to fault and from fault to ok.
Line Monitoring Speaker Line monitoring Enable/Disable.
To calibrate a speaker line:
- Select Monitor Mode either Continuous or Manual
- Enable Line Monitoring
- Click the Calibrate button
- Ensure the Calibrated status is displaying Calibrated. Unknown, Short or Open status will not allow the speaker monitoring to start.
The four benchmarks for the evaluation of line state is Voltage, Current, Phase and Ground Fault.
The values measured on Voltage, Current and Phase will together provide an evaluation of the line state regarding whether it is Shorted, Open or OK.
Typical SLM values for a 100 m line with 15W speaker load, calibrated values and various Shorted, Open and Ground Fault situations are as follows:
| Calibration OK | Shorted @ENA | Shorted @100M | Open @ENA | Open @100M | Ground Fault | |
| Voltage | 985 | 403 | 403 | 780 | 1015 | 400..1500 |
| Current | 1045 | 1370 | 1365 | 435 | 1065 | 400..1500 |
| Phase | 1075 | 765 | 925 | 1545 | 975 | 400..1500 |
| Ground Fault | 405 | 405 | 405 | 405 | 405 | 1580 |

