Grandstream GXP2000: Difference between revisions
From Zenitel Wiki
| Line 34: | Line 34: | ||
have to be changed, press the menu option needed. | have to be changed, press the menu option needed. | ||
Minimum configuration required: | |||
Basic Settings | |||
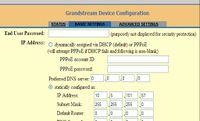
* '''IP address''': Select DHCP (obtain IP address automatically from the network), or enter IP address, subnet mask and gateway IP if using static IP. | |||
Advanced Stettings: | |||
Account 1: | |||
Account Active: Yes | |||
Account name: Any text | |||
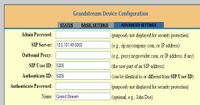
SIP Server: The IP address of the AlphaCom | |||
SIP User ID: The directory number of the phone. Must be the same as entered in the Users & Stations list in AlphaPro | |||
Authenticate ID: Same as SIP User ID | |||
Name: The name of the user, e.g. John Smith. | |||
Send DTMF: via SIP INFO | |||
Preferred Vocoder: Enter PCMU for all eight choises | |||
Revision as of 13:18, 19 August 2009
Make sure that the phone has the latest firmware version.
Factory default settings
How to perform a Factory Reset of the GXP2000:
- Disconnect the ethernet cable
- Press the round MENU button to enter the menu.
- Scroll down to CONFIG and select it (by pressing round button again)
- Scroll down to Factory Reset and select it.
- Move cursor to the empty space above the OK and CANCEL.
- Enter the MAC Address with alphabets and numbers.
- Once finished, press round button till cursor is on OK.
- Press the round button once more to initiate the Factory Reset.
- Reconnect the ethernet cable
The display will show the IP address of the phone.
Configuration of the phone via Web Browser
To access the phone’s Web Configuration Menu:
- Connect the computer to the same network as the phone
- Make sure the phone is turned on and shows its IP-address in the display
- Start a Web-browser on your computer
- Enter the phone’s IP-address in the address bar of the browser
- Enter the administrator’s password to access the Web Configuration Menu
The default administrator password is “admin”; the default end-user password is “123”.
NOTE: When changing any settings, always Update them by pressing the button on the bottom of the page. Reboot the phone to have the changes take effect. If, after having submitted some changes, more settings have to be changed, press the menu option needed.
Minimum configuration required:
Basic Settings
- IP address: Select DHCP (obtain IP address automatically from the network), or enter IP address, subnet mask and gateway IP if using static IP.
Advanced Stettings:
Account 1:
Account Active: Yes
Account name: Any text
SIP Server: The IP address of the AlphaCom
SIP User ID: The directory number of the phone. Must be the same as entered in the Users & Stations list in AlphaPro
Authenticate ID: Same as SIP User ID
Name: The name of the user, e.g. John Smith.
Send DTMF: via SIP INFO
Preferred Vocoder: Enter PCMU for all eight choises
Select Advanced Settings
- Enter the IP address of the AlphaCom E exchange
- Enter SIP User ID – must be identical to the Directory Number entered in AlphaPro
- Update and Reboot
Configuration of AlphaCom E
The AlphaCom E needs to be configured with a SIP registrar node.


