1-3b. IP Stations – Substations (solution): Difference between revisions
From Zenitel Wiki
| (3 intermediate revisions by one other user not shown) | |||
| Line 6: | Line 6: | ||
=== Station configuration === | === Station configuration === | ||
==== Configure the IP Substation ==== | ==== Configure the IP Substation ==== | ||
* Perform a "Factory Default" setting on the IP Substation | * Perform a "Factory Default" setting on the IP Substation: | ||
** Press the call button | ** Press the call button | ||
** While the button is pressed, connect the IP Substation to the PoE switch | ** While the button is pressed, connect the IP Substation to the PoE switch | ||
** Wait until the call LED of the station | ** Wait until the call LED of the station has flashed two times | ||
** Release the call button for | ** Release the call button and wait for two new flashes | ||
** Push the button briefly | ** Push the button briefly after the two flashes | ||
* Assign the PC an IP address in the range 169.254.x.x | * Assign the PC an IP address in the range 169.254.x.x | ||
* Connect the PC to the network switch | * Connect the PC to the network switch | ||
| Line 18: | Line 18: | ||
* On the PC start a web browser, and enter the IP station address 169.254.1.100 in the address field | * On the PC start a web browser, and enter the IP station address 169.254.1.100 in the address field | ||
* Log in with Username: '''admin''', password: '''alphaadmin''' | * Log in with Username: '''admin''', password: '''alphaadmin''' | ||
* Select ''' | * Select '''Station Main''' -> '''Main Settings''', and enter the following parameters: | ||
[[File:1-3b solution2.PNG|thumb|left| | [[File:1-3b solution2.PNG|thumb|left|500px|Enter the IP settings in the IP Station web page]] | ||
<br style="clear:both;" /> | <br style="clear:both;" /> | ||
* Connect the IP substation and the AlphaCom XE (Eth1) to the same network switch | * Connect the IP substation and the AlphaCom XE (Eth1) to the same network switch | ||
| Line 51: | Line 51: | ||
===Related articles === | ===Related articles === | ||
* [[1-3b. IP Stations – Substations (practice)]] | * [[1-3b. IP Stations – Substations (practice)]] | ||
[[Category: AlphaCom practice]] | |||
Latest revision as of 09:04, 30 June 2022
Station configuration
Configure the IP Substation
- Perform a "Factory Default" setting on the IP Substation:
- Press the call button
- While the button is pressed, connect the IP Substation to the PoE switch
- Wait until the call LED of the station has flashed two times
- Release the call button and wait for two new flashes
- Push the button briefly after the two flashes
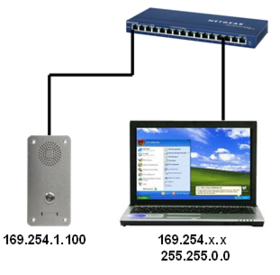
- Assign the PC an IP address in the range 169.254.x.x
- Connect the PC to the network switch
- On the PC start a web browser, and enter the IP station address 169.254.1.100 in the address field
- Log in with Username: admin, password: alphaadmin
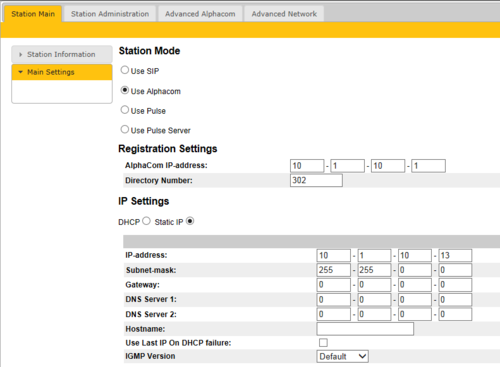
- Select Station Main -> Main Settings, and enter the following parameters:
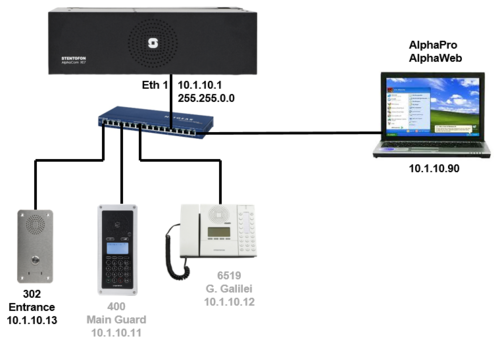
- Connect the IP substation and the AlphaCom XE (Eth1) to the same network switch
Configure the AlphaCom XE
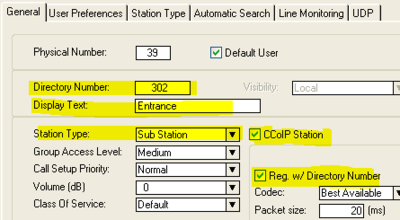
- In AlphaPro go to Users & Stations, and select physical number 39; 139 Station 39
- Use the section on the right and change the configuration as follows:
Call Button
- In AlphaPro, Users & Stations, select physical port 39. Then press the button DAK, and configure as follows:
- Send the changes to the AlphaCom XE
Troubleshooting
- If the IP station does not register, check the following:
- In AlphaWeb, System Configuration -> Filters, verify that port for IP Stations and VoIP Audio is enabled
- In AlphaWeb, System Configuration -> Licenses, verify that there are licenses installed for the IP stations


